After you prepare a workflow for use in SharePoint
2010, deployment of the workflow varies depending on whether it is a
predefined workflow, a SharePoint Designer workflow, or a Visual Studio
custom workflow. The following sections provide a high-level overview of
the procedures required for deploying each type of workflow.
1. Deploying Predefined Workflows
Predefined workflows
are already installed on the SharePoint farm when you install SharePoint
2010. The deployment of predefined workflows is focused on activating
the workflow features and associating the workflow with lists and
libraries. The following procedures must be carried out to deploy a
predefined workflow.
Activate the workflow features pertaining to predefined workflows.
Associate the workflow with list, library, content type, or site.
Start and verify the workflow.
2. Deploying Declarative Workflows
Declarative
workflows are created by end users using SharePoint Designer 2010, and
they are associated with a list, library, content type, or site by
SharePoint Designer tool itself. The following procedures are associated
with deploying a declarative workflow.
Create and deploy declarative workflow using SharePoint Designer.
Start and verify the deployed workflow.
3. Deploying Custom Workflows
Custom workflows created
using Microsoft Visual Studio 2010 are created as features and packaged
into solution files. The deployment of a custom workflow starts with
solution installation, feature activation, and finally association. The
following procedure allows you to deploy a custom workflow.
Create the custom workflow in Visual Studio 2010. Package it as a feature, which is then packaged as a solution file.
Install and deploy the solution into SharePoint farm.
Activate the workflow feature at site collection level.
Associate the workflow with a list, library, content type, or site.
Start and verify the workflow.
4. Activating a Workflow
You must activate both
predefined and custom workflows before they can be used. Use the
following procedure to determine whether the workflow that you want to
use is active, and then activate the workflow as necessary.
On the top level of the site collection, on the Site Actions menu, click Site Settings.
In the Site Collection Administration section on the Site Settings page, click Site Collection Features.
On
the Features page, click Activate next to the workflow feature that you
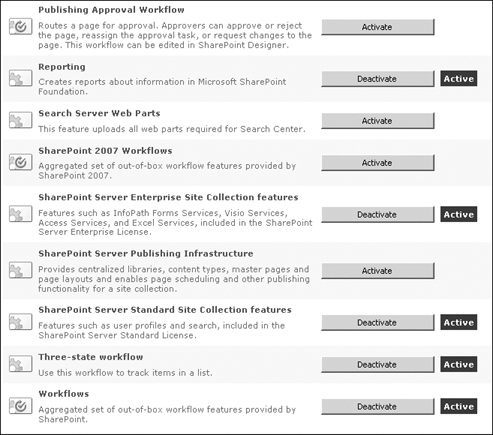
want to activate. The Status column displays Active to indicate that
the feature is now active. See Figure 1 for a list of site collection features.
Note:
In SharePoint Foundation 2010, there is only one predefined workflow—the Three-state Workflow—and it is active by default.

5. Adding a Workflow Association
This procedure is applicable for both predefined and custom workflows.
When you add a workflow association, you assign a task list and history
list to use with the selected workflow. You can use the default task
list, select another existing task list, or create a new one. As
SharePoint lists grow, site performance might be adversely affected. If
your SharePoint environment will have many workflows, consider creating a
separate task list and history list for each workflow to avoid
potential performance problems. The workflow can be associated with a
list or a library, content type, and site.
5.1. Associating a Workflow with a List or Library
Use the following steps to
associate a workflow with a list or document library. Note that some
workflows, such as the Three-state workflow, require you to create a
column in your list in which the workflow can display status. For
example, before you add the Three-state workflow to a list, you first
should create a column of the Choice type and assign three choices to
the column, signifying the start, middle, and end state of the
Three-state workflow.
Browse to the list or library to which you want to add a workflow.
Perform one of the following steps.
For a list, on the List Tools tab, click List.
In the Settings group, click Workflow Settings and then click Add A Workflow.
For a library, on the Library Tools tab, click Library.
In the Settings group, click Workflow Settings and then click Add A Workflow.
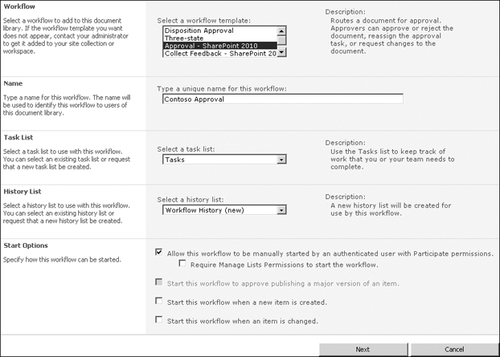
In the Workflow section of the Add A Workflow page shown in Figure 2, select the workflow template that you want to associate with this list or library.
In the Name section, type the name that you want to use to identify this workflow to users of this list or library.
In the Task List section, specify a task list to use with this workflow.
In the History List section, select a history list to use with this workflow.
In the Start Options section, select from the following options.
To allow the users to start the workflow manually, select the Allow The Workflow To Be Manually Started By An Authenticated User With Participant Permission check box.
If
you want only list administrators to start the workflow, select the
Require Manage Lists Permissions To Start The Workflow check box.
In
many scenarios, you’ll see a check box selection that appears dimmed
for the option Start This Workflow To Approve Publishing Of A Major
Version Of An Item. This option will become available when you have
enabled content approval, selected major/minor versioning in the library
settings, and you have selected an Approval workflow.
To
allow the workflow to be started when a new item or document is
created, select the Start This Workflow When A New Item Is Created check
box.
To allow the
workflow to be started when a new item or document is updated, select
the Start This Workflow When An Item Is Changed check box.

If
the workflow that you selected has additional configuration options,
click Next and customize the settings that are on the next page in order
to complete the creation of your workflow. For purposes of
illustration, the Three-state workflow is being used here to complete
this section.
Note:
If you select the Disposition
Approval workflow, there is only an OK or Cancel button at the bottom of
the page. Selecting the other workflows,
such as Three-state or Collect Signatures, will result in a Next or
Cancel button combination at the bottom of the page, indicating that you
must provide additional information on the following screen to fully
configure the workflow.
On the next page, shown in Figure 3,
you can select the various states of the workflow and the associated
tasks that will be assigned at each stage. You can also specify e-mail
settings at each stage so that through the combination of task
assignment and auto-generated e-mail messages, you can ensure those
involved in the workflow are kept fully informed (and tasked!) as the
documents move through the workflow.

When you have finished specifying your configuration options, click OK to apply your changes to the workflow association.
5.2. Associating a Workflow with a Site Content Type
Use the following steps to associate a workflow with a site content type.
On the home page for the site, select Site Settings from the Site Actions menu.
In the Galleries section of the Site Settings page, click Site Content Types.
In
the Site Content Type column on the Site Content Types page, click the
content type to which you want to add a workflow association.
On the page for the content type you selected, in the Settings section, click Workflow Settings.
On the Workflow Settings page, click Add A Workflow.
In the Workflow section of the Add A Workflow page shown, select the workflow that you want to add.
In the Name section, type the name that you want to use to identify this workflow to site users.
In the Task List section, specify a task list to use with this workflow.
In
the History List section, select a history list to use with this
workflow. The history list displays all events that occur during each
instance of the workflow.
In the Start Options section, specify the following:
To allow the users to start the workflow manually, select the Allow The Workflow To Be Manually Started By An Authenticated User With Participant Permission check box.
If
you want only list administrators to start the workflow, select the
Require Manage Lists Permissions To Start The Workflow check box.
To
allow the workflow to be started when a new item or document is
created, select the Start This Workflow When A New Item Is Created check
box.
To allow
the workflow to be started when a new item or document is updated,
select the Start This Workflow When An Item Is Changed check box.
If
you want this workflow to be applied to all of the content types that
are inheriting from this content type, select the Yes option.
When
you have finished specifying your configuration options (including
options that might be on a second screen that are not illustrated here),
click OK to apply your changes to the workflow association.
5.3. Associating a Workflow with a Site
Use the following steps to associate a workflow with a site.
Browse to the site from which you want to add a workflow association.
On the Site Actions menu, click Site Settings.
In the Site Administration section of the Site Settings page, click Workflow Settings.
On the Workflow Settings page, click Add A Workflow.
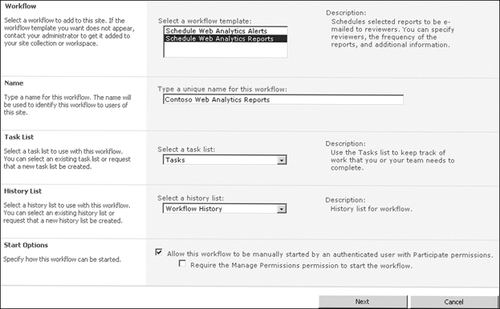
In the Workflow section of the Add Workflow page shown in Figure 4, select the workflow template that you want to associate with this site.
In the Name section, type the name that you want to use to identify this workflow to site users.
In the Task List section, specify a task list to use with this workflow.
In the History List section, select a history list to use with this workflow.
In
the Start Options section, specify whether the workflow can be manually
started by an authenticated user who has Participate Permissions and
whether Manage Permissions are also required to start the workflow.
Note:
You can only start site workflows manually.

When you have finished specifying your configuration options, click OK to apply your changes to the workflow association.
Note:
If your permissions are
explicitly set on the site, list, or library in question, then instead
of seeing the option Allow This Workflow To Be Manually Started By A
User With Participate Permissions, you will see the option Allow This
Workflow To Be Manually Started By A User With Edit Item Permissions.
This occurs on all lists and libraries after you have visited the Site
Workflows list and you are a site owner or you have the Edit Item
permissions applied to your account at the site level.
5.4. Starting and Verifying the Workflow
This procedure is applicable
for predefined, declarative and custom workflows. After you activate a
workflow and add it to a list, library, content type, or site, an
authenticated user can run the workflow on an item in the list or a
document in the library, or in the case of a site workflow, on a site.
When you add the workflow, specify whether you want the workflow to run
automatically or manually. If the workflow is configured to start
automatically, the default settings are always used when the workflow
begins. If the workflow is configured to start manually, the user can
modify the default settings, such as specifying workflow participants
and a due date. The workflow runs on items in the list or documents in
the library with which the workflow is associated.
As the workflow is
executing, ensure that all relevant tasks are being created and are
assigned to the correct participants. Ensure that the correct updates
are made when the users complete the tasks assigned to them. Check that
task notification e-mail messages are being sent to the users as the
tasks are assigned.
If you have workflows
that execute an impersonation step, ensure that the permissions before
workflow executions and after workflow executions are in the intended
state and that no unwanted permission changes are made. Ensure that the
expected permissions are supposed to be granted by the workflow.