After installing IIS, you are ready to set up and
manage new Web sites. In this section, we will walk through setting up
and configuring a new Web site using IIS Manager within Server Manager.
Before creating new Web sites, you need to have a basic understanding of
Web sites and application pools and how they relate to one another.
IIS Web sites
IIS Web sites serve up files
used by the Web application or site. IIS Web sites manage all of the
security and configuration settings for each site including
authentication methods allows, which types of files can be served via
the sites, error handling, and the directory where the Web site files
are located.
Application pools
Application pools help
isolate Web sites so that issues that may occur on one site do not bring
down other sites running on the same server. Application pools can also
be used to restart a Web site if it begins to consume too many
resources on the server, again preventing a single site from interfering
with the performance of other sites on the same server. Additionally,
application pools allow administrators to set specific sites to run as a
defined identity or user account. This gives the application a security
context in which it can connect to and access other resources on the
network if necessary.
Each IIS Web site runs in an
application pool. An application pool can contain one or more IIS Web
sites. If an application pool stops or restarts, the IIS Web site is
also offline during the time the application pool is stopped.
During the installation of the
Web Server role, DefaultAppPool, and Classic.Net AppPools are created
along with a Default Web site.
Creating Web sites
To create a new Web site within IIS, perform the following tasks:
1. | Open Server Manager and select the node Roles | Web Server (IIS) | Internet Information Services (IIS) Manager.
|
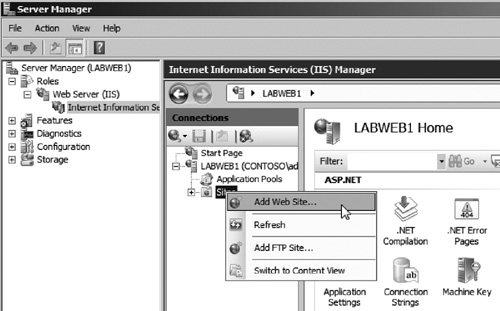
2. | In the middle pane, expand the Web server name and right-click the Sites node and choose the option Add Website as seen in Figure 1.

|
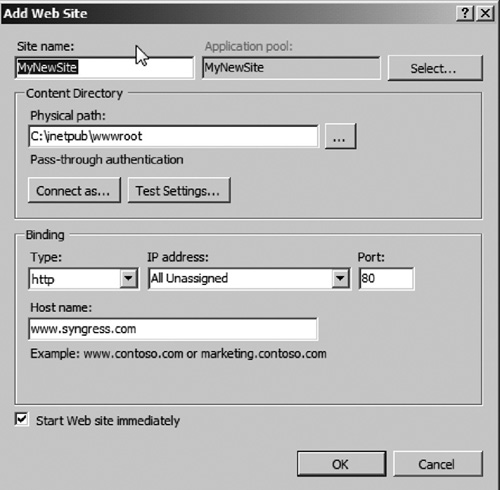
3. | Enter the required site information (see Figure 2) including:
Site name—This is the name of the site. This should be a name that easily describes the site, for example, “BillingApplication”. Application
pool—Choose the application pool for this site to run under. By
default, a new application pool will be created for the new site. Physical path—Enter the path on the server where the Web site files are located. Binding
information—Choose the binding settings such as IP address and
protocols used. You can also enter a host header in this section. IIS
Web sites can use host headers allowing you to bind more than one Web
site to a single IP address. Without the use of host headers, each Web
site would require a dedicated IP address.

|
4. | After entering the Web site configuration information, click OK.
|
5. | You should now see the new site listed under the sites node in IIS Manager.
|
Any
settings for the Web site can now be managed using the IIS Manager in
Server Manager. Some of the more common settings that may need to be
configured are:
Authentication—You may
need to set the authentication method used by the Web site. IIS can use
Anonymous Authentication, Basic Authentication, Digest Authentication,
Forms Authentication, and Windows Authentication. IIS can use any one or
all of these authentication methods. The IIS Authentication methods are
defined in Table 1.
Table 1. IIS Authentication Methods
| Authentication Method | Description |
|---|
| Anonymous authentication | Anonymous
authentication allows anyone to access the Web site without entering a
username or password. This authentication method is commonly used for
public Web sites where everyone should have access. |
| Basic authentication | Basic
authentication presents the user with a logon dialog box asking for a
username and password. If the user enters a valid username and password
combination, he is given access to the Web site. It is highly
recommended that SSL be used with Basic Authentication as Basic
Authentication sends the username and password across the network in
clear text. |
| Digest authentication | Digest
authentication provides a much greater level of security than Basic
Authentication. Digest authentication can also be used to authenticate
users when accessing an application through firewalls. |
| Forms authentication | Forms
authentication provides a very user-friendly authentication method
providing the end user with a Web page-based form to enter his
credentials. Applications such as Microsoft Exchange Server 2007 and
2010 provide forms-based authentication to the Outlook Web Access
feature. |
| Windows authentication | Windows
authentication is used on internal Windows domain environments. Windows
authentication uses the Windows domain to authenticate users. This
authentication type is heavily used on only intranet Web sites. |
Default
document—Web sites have a default document or page that is accessed
when accessing the site. To prevent users from having to know the name
of this page, the Web site will automatically direct users to the
defined default document when they access the Web site URL.
HTTP
redirect—The HTTP Redirect option can be used to direct users hitting
the Web site to another URL. This is helpful when a Web site has been
moved and you want to redirect the users to the new location.