4. ItineraryHelper
ESB itineraries
are simply raw XML. Working with raw XML can be a pain, but ESB
components need to interact with itineraries routinely in order to
function. They need to retrieve information from them, update them, and
validate them. Therefore, in order to avoid the pain of having to access
this XML directly, the ESB Toolkit contains a component called
ItineraryHelper. This component acts as a .NET wrapper to the underlying
XML and prevents you from having to touch it directly. Although you
might never need to call this component directly, it is used by most of
the core ESB components. Therefore, we have included this brief section
about it so that you have some concept of it when it is mentioned. Also,
if you plan to develop your own components to extend the ESB Toolkit or
if you want to build a new orchestration to perform some custom
business logic, then you will need to understand how to use this
component.
The ItineraryHelper component provides the following methods:
- AdvanceItinerary:
This method takes a
single parameter that is a reference to a message, and it advances the
itinerary by one step. It populates the service instance with the
properties of the service for the next step, marks the current service
as completed, sets the time stamp, and updates other relevant ESB
context properties.
- CurrentStep:
This method takes a reference to a message, and it returns an instance of the ItineraryStep class for the current step. It also changes the state of the current service instance from Pending to Active and sets the BeginTime property.
- GetItineraryHeader:
This method retrieves the
value of the itinerary property from the BizTalk message context. It
gives you back the entire raw XML representing the itinerary.
- GetResolvers:
This method returns a typed collection of resolvers as a ResolverCollection instance, populated by parsing the itinerary.
- GetServiceResolversXML:
This method returns an XML
string that represents the resolvers associated with a specific service
located at specific position within the itinerary.
- ProcessItinerary:
This method takes a single
parameter (a reference to a message), reads the itinerary, and writes
it to a custom BizTalk context property in the message for future
retrieval.
- ValidateItinerary:
This method takes as its single parameter a reference to a message, sets the default values of the Itinerary context property within the message, removes any values that should not be set, and updates the Itinerary property.
In an orchestration, you can use this component to retrieve the current service for a message by using the following code:
// Retrieve the current itinerary step
itineraryStep = Microsoft.Practices.ESB.Itinerary.ItineraryHelper.CurrentStep(
InMessage);
You could also update a message's itinerary by using the following code:
// Call the Itinerary helper to advance to the next step
Microsoft.Practices.ESB.Itinerary.ItineraryHelper.AdvanceItinerary(OutMessage,
itineraryStep);
NOTE
This code is assuming that your incoming message and outgoing message are named InMessage and OutMessage, respectively. If you have different message names, you will need to use them instead.
5. Pipeline Components
Pipelines play an incredibly
important role in the ESB. Beyond the standard BizTalk pipeline
components, eight new components come with the ESB Toolkit. It is
critical to understand what they do and how they work.
5.1. ESB Itinerary Component
Some of the web services used
within the default ESB on-ramps allow you to submit both a message and
its itinerary at the same time. For these services, you are able pass in
the itinerary within the SOAP headers (if you are using the ASMX web
service)or the WCF headers (if you are using the WCF-based service).
What the ESB Itinerary component does is extract the itinerary
information from these SOAP or WCF headers and convert it into the
format that BizTalk requires. Essentially, it reads the incoming
itinerary, validates that it is in the proper format, and then writes it
as raw XML into the message's ItineraryHeader context property.
You should note that this
component is needed only if the web service within your on-ramp allows
you to submit an itinerary along with the message. If you want the ESB
to determine what itinerary your message should have, then you will need
to use the ESB Itinerary Selector pipeline component.
In the default
installation of the ESB Toolkit, there are four on-ramps that use this
component, and these can all be found in the Receive Locations folder
within the Microsoft.Practices. ESB BizTalk application. In this folder
you will find the OnRamp. Itinerary.WCF, OnRamp.Itinerary.SOAP,
OnRamp.Itinerary.Response.WCF, and OnRamp.Itinerary.SOAP receive
locations. All four of these locations use the ItineraryReceiveXML
receive pipeline, which contains the ESB Itinerary component. This is
because all four of these receive locations are tied to an ASMX or WCF
service that allows the itinerary to be submitted along with the
message.
5.2. ESB Itinerary Selector Component
In version 1.0 of the toolkit (or Toolkit
as it was referred to in that version), on-ramps required you to pass
in a valid itinerary along with the message that the ESB needed to
process. This was a problem for many people since they thought that the
ESB should be responsible for figuring out which itineraries needed to
be used for incoming messages. They also thought that they did not want
the end user to have to worry about itineraries and that the ESB should
abstract this entire concept from the client application.
In version 2.0, you no
longer have this issue because the on-ramp no longer requires you to
submit an itinerary along with your message. You can simply submit your
message into the ESB without any knowledge of itineraries at all.
However, the ESB components
are still designed to process messages based on itineraries. So, you
need some way to attach an itinerary to a message after it has been
submitted into the ESB. The ESB Itinerary Selector component gives you
this capability. It is a receive pipeline that allows you to do the
following:
Use the resolver framework to figure out what itinerary an incoming message should have
Load that itinerary from the itinerary database
Attach the itinerary to the incoming message
Initialize
all of the ESB context properties based on the data inside the
itinerary so that the ESB components can begin processing the message
Figure 1
shows this process and the components involved. You can see in this
image that the ESB Itinerary Selector component starts by passing a
resolver connection string to the Resolver Manager. This in turn
executes either the Static or Business Rules resolver, which provides an
itinerary name (and version number). The ESB Itinerary Selector
component then uses this name and version information to load the
requested itinerary from the Itinerary Database.
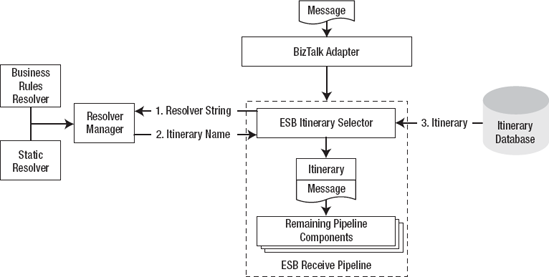
With the ESB
Itinerary Selector, two resolvers are available to determine the name of
the itinerary you need to load: the Static resolver and Business Rules
resolver. Both of these resolvers work the same way that the mapping and
endpoint resolvers do. You provide a resolver connection string that
the Resolver Manager uses to figure out what resolver you want. This
resolver is then called, and it returns an itinerary name based on the
parameters you provided in the connection string.
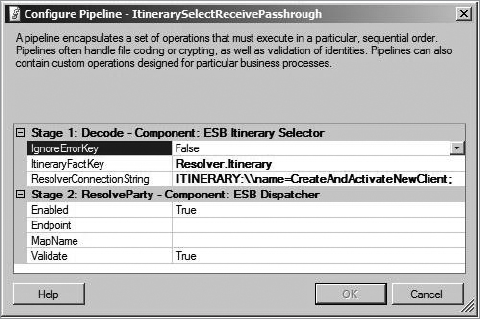
As you can see in Figure 2,
the properties for ESB Itinerary Selector component can be set using
the Configure Pipeline dialog box in the BizTalk Administration Console.
The Static resolver is very
basic and simply allows you to hard-code the name of the itinerary that
you want. The need to hard-code the name does not give you a very
flexible solution since it means that you would need to create a
separate receive port for every itinerary that you need to resolve.
Therefore, the Business Rule Engine Itinerary (BRI) resolver is by far
the more useful and valuable one for you to use. It allows you to invoke
a policy in the rules engine, which is able to dynamically figure out
which itinerary you need. This pattern aligns much better to the overall
design goals for the ESB and allows you to create a truly "generic"
on-ramp that can handle multiple messages using multiple different
itineraries. Be sure to note that this resolver is referred to as the BRI resolver
in order to distinguish it from the BRE resolver that the generic
routing and generic mapping services use. Both of these resolvers call
into the Business Rule Engine, but for very different reasons.
To use the Static resolver, you would use the following configuration settings:
IgnoreErrorKey = False
ItineraryKeyFact = Resolver.Itinerary
ResolverConnectionString = ITINERARY:\\name=YourItineraryName;
You will need to replace YourItineraryName with the name of the itinerary that you want to load from the database.
To use the BRI resolver, you can use the following configuration settings:
IgnoreErrorKey = False
ItineraryKeyFact = Resolver.Itinerary
ResolverConnectionString = BRI:\\policy=MyPolicy;version=1.1;useMsg=True;
You will need to replace the MyPolicy and 1.1
values with ones that match the policy you have deployed in your rules
engine. Optionally, you can leave the version parameter empty so that
you do not have to update this configuration string every time you
deploy a new version of the policy.
Using the Resolver Connecting
String we provided earlier, the BRI resolver passes only the message's
context properties into the rules engine. This means that your policy
will be able to determine only which itinerary to use based on these
properties. If you want to use content from the body of the message to
make these decisions, then you would need to set the useMsg property to True. Doing that instructs the BRI resolver to submit the message body as well as the context properties into the invoked policy.
If you want to see an example of
an on-ramp that uses this component, you can find one in the
Microsoft.Practices.ESB BizTalk application. If you expand the Receive
Locations folder, you will find a receive location named
OnRamp.Itinerary.Generic.WCF. If you open this receive location, you
will see that it uses the ItinerarySelectReceive pipeline. One of the
components within this pipeline is the ESB Itinerary Selector component.
NOTE
The ESB Itinerary Selector
component will try to use the name that the resolver returns to load an
itinerary from the itinerary database. Therefore, you need to ensure
that the itinerary the resolver returns actually exists in the database.
5.3. ESB Dispatcher Component
The Dispatcher is a critical
component to understand in order to use the ESB. In itineraries, you
can specify a number of services that you want to execute and specify
whether they should be processed by the ESB at the messaging level or at
the orchestration level. Messaging-level services are executed in
pipelines, and it is the Dispatcher component that executes them. The
Dispatcher component can be used in any stage of both receive and send
pipelines.
In the default ESB
pipelines, the Dispatcher runs after the ESB Itinerary or the ESB
Itinerary Selector component has executed. By the time one of these two
components has run, the message will have a valid itinerary that needs
to be processed. It is at this point that the Dispatcher takes over. It
starts by examining the message's itinerary to find out what current
itinerary service is. If the service is a messaging-level service and it
is either the Transformation Service or Routing Service, then the
Dispatcher will execute it. If the Transformation Service is specified,
the Dispatcher will call the resolver mechanism to figure out what map
needs to be run, and then it will execute it. If the Routing Service is
specified, then the Dispatcher also calls the resolver mechanism, but
this time it asks it to figure out where the service needs to be routed
to. The resolver will return a list of data that can be used to
configure a dynamic send port.
When the Dispatcher has
finished executing this initial service, it calls into the
Itinerary-Helper component and asks it to update the message's
itinerary. This component updates the itinerary XML, marks the current
service as complete, and then updates the other ESB context properties
to indicate that the next service in the itinerary is now the current
one.
Once this update is complete,
the Dispatcher will "loop" and begin this process all over again. It
will check to see what the new "current" service is, and if it is a
messaging-level service, it will attempt to execute it. This loop
continues until all of the services in the itinerary have been completed
or until a service is found that the Dispatcher cannot process. This
could be because a service has been requested that the Dispatcher does
not understand, or an orchestration-level service has been requested.
Once the Dispatcher is finished, the message is passed into any
remaining pipeline components and finally published into the BizTalk
Messagebox. When you use the Dispatcher component, you will see that it
has six properties that can be set using the BizTalk management console.
Table 15-3 describes each of them.
Table 2. Dispatcher Pipeline Properties
| Property | Description |
|---|
| Enabled | You can enable or disable the Dispatcher by using this component. It accepts either True or False. |
| Endpoint | You
can specify a resolver connection string here to resolve an endpoint
service to route the message to. You would use this property if your
message does not have an itinerary. |
| Validate | You
use this to indicate whether you want the Dispatcher to validate the
incoming message against a schema before executing a map. This accepts
either True or False. By default this is set to True. |
| RoutingServiceName | This
property holds the name of the messaging-level Routing Service so that
the dispatcher can call it. The default value for this is
Microsoft.Practices.ESB.Services.Routing, and you should not change it
unless you plan to override the default behavior of the dispatcher by
providing your own version of the Routing Service. |
| TransformationServiceName | This
property holds the name of the messaging-level Transformation Service
so that the dispatcher can call it. The default value for this is
Microsoft.Practices.ESB.Services.Transform, and you should not change it
unless you plan to override the default behavior of the dispatcher by
providing your own version of the Transformation Service. |
| MapName | You
can specify a resolver connection string here to resolve a map to run
in the Dispatcher. You would use this property if your message does not
have an itinerary. |
The Endpoint and MapName
properties might be confusing since this information is already defined
in the message's itinerary. Why then would you need to enter this into
the pipeline component as well?
The key thing to remember is
that all of the ESB Toolkit components have been designed to be as
flexible and reusable as possible. The design team realized that you
might want to be able to use the Dispatcher without having to add the
extra overhead associated with itineraries. Therefore, they designed the
Dispatcher so that it could handle some basic routing and mapping
capabilities entirely on its own without the need for any itinerary.
That is why the Endpoint and MapName
properties have been added. You can place resolver strings into these
properties and use the resolver mechanism to determine which map to run
or service to route to. The Dispatcher can use this information to run
the dynamic mapping service and/or Routing Service once per incoming
message. If you want to do anything more complex than this, then you
will need an itinerary. The ESB Toolkit ships with a sample named
Dynamic Resolution that shows you how to implement this scenario. This
sample project also includes a pipeline named ESBReceiveXML that
contains only the ESB Dispatcher component and not the ESB Itinerary or
ESB Itinerary Selector components.
5.4. ESB Dispatcher Disassembler Component
The ESB
Dispatcher Disassembler Component works the same way that the ESB
Dispatcher component does. It is designed to execute messaging-level
services. The only difference between it and the ESB Dispatcher is that
it combines the BizTalk message debatching functionality. This component
inherits from the XSML disassembler class XmlDasmComp. You would use this component if you wanted to debatch an incoming XML message before dispatching the individual messages.
5.5. ESB Itinerary Cache Component
The difference between
on-ramps and off-ramps seems fairly easy to grasp. On-ramps are used to
receive message into the ESB, and off-ramps are used to send messages
out of the ESB. However, these nice clean lines get blurred when you
start using two-way solicit/response send ports in our off-ramps. When a
two-way send port receives the response message back from the remote
service, it is actually acting as an on-ramp. This presents an
interesting design challenge. A message's itinerary is stored in the
message's own context properties for the entire time that it is in
BizTalk. However, when a message is sent out through a send port, the
context properties are dropped, and the message no longer has any
concept of the overall itinerary that it is part of. When a response
message comes back into the ESB via the solicit-response port, it will
not have any concept of the original itinerary either. If the original
itinerary contained more services that needed to be executed after this
one, then you need some way to associate this response message back to
the original itinerary. This issue is solved by the ESB Itinerary Cache
component.
The Itinerary Cache component can be used in both receive and send pipelines. However, as shown in Figure 3,
it performs a very different function based on which one it is used in.
When the ESB Itinerary Cache component is used in a send pipeline, it
stores a copy of the outgoing message's itinerary into the itinerary
cache. When the component is used in a receive pipeline, it extracts the
itinerary out of the cache and adds it back to the incoming message.
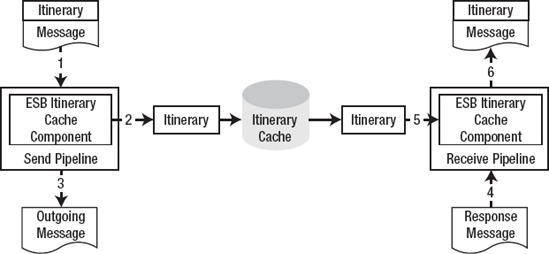
If the component is part of a
send pipeline, then its job is to save a copy of the outgoing message's
itinerary into the itinerary cache. If the component is part of a
receive pipeline, then its job is to check and see whether the message
has an associated itinerary stored in the cache. If an itinerary does
exist, it is stored back in the message's context properties. Once this
is done, the other ESB components can continue to process the message
and complete any remaining services defined in the itinerary. You might
be thinking that this looks an awful lot like correlation. However, be
aware that this does not use BizTalk's built-in correlation
capabilities. This entire mechanism is implemented in .NET components
that were created new for the ESB Toolkit.
One of the most common questions
that we get from BizTalk developers when it comes to the ESB Toolkit is
about the Itinerary Cache mechanism. Many people are worried about its
impact on performance and high availability for the underlying BizTalk
environment. In Figure 15-10
the itinerary cache is represented as a database. However, the
Itinerary Cache is actually built using the Enterprise Library's caching
block. This means that you can implement this cache using any of the
library's built-in options. These options include (but are not limited
to) the following:
In-memory (the fastest option, but it's prone to data loss in the case of a system failure)
IsolatedStorage (disaster tolerant, but it's slower than In-memory)
Database (slower than In-memory, but it's the most robust)
To set up high
availability for the itinerary cache, you will need to familiarize
yourself with the Enterprise Library and its capabilities.
5.6. Forwarder Component
A key capability for an ESB
is the ability to enable service composition and service chaining. In
the world of web services, you might want to take the output of one
service and forward it into another service. Figure 4 outlines a scenario where the ESB is composing messages across three different web services.
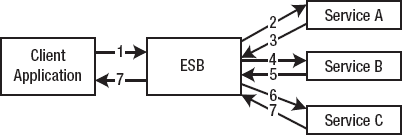
In this scenario, the
client application has submitted a single message into the ESB and is
waiting for a response. The ESB has taken this initial message and
routed it to Service A. When Service A responds, instead of returning
this message to the client application, the ESB has forwarded this
message on to Service B. Service B responds with a message, which is in
turn forwarded to Service C. It is only after Service C has responded
that a message is sent back to the original client.
In BizTalk, this type
of scenario has always been implemented using orchestrations. How-ever,
now that we have the concept of itineraries, it would be highly
preferable to use them to implement this process. Itineraries do not
carry the same performance overhead as orchestrations often do, and as
we have already discussed, they are easier to change if necessary.
BizTalk has always been
able to support the first part of this process by requiring an
orchestration (that is, steps 1, 2, 3, and 7 where the client
application calls Service A, which responds to the client). This can be
done using a two-way receive port, a two-way send port, and dynamic
subscriptions. When a message enters BizTalk through the two-way receive
port, it is routed to the two-way send port. At this point, BizTalk
creates a dynamic subscription for the message that will eventually
return from the send port and be routed to the original receive port. It
is this functionality that causes a problem for the ESB components. If
you allow this default functionality to occur, the client application
will receive a response back after step 3 (as shown in the diagram)
instead of after step 7.
The Forwarder component
solves this problem for you. It functions by intercepting the response
message that is coming back from the first web service, and it allows
you to redirect it to another ESB service or another off-ramp. With this
component, you can now compose multiple external services together
without the need for an orchestration, and it allows you to create much
more complex and useful itineraries.
So, look again at Figure 4;
messages 3 and 5 would need to be processed by a receive pipeline that
contained the Forwarder component. Message 7 would need to be processed
by a send port that did not contain the Forwarder component. So when
configuring your ESB environment, you will need to set up multiple
off-ramps to support these two scenarios.
The Forwarder component can be
added to the Decode, Validate, or PartyResolver stages in a pipeline,
and it does not contain any configurable properties. To use the
component, you simply need to add it to your pipeline (or use a pipeline
that already contains it).
5.7. ESB Add and Remove Namespace Components
It is not uncommon in many
organizations to have XML documents without namespaces. Since
traditional BizTalk components require namespaces in order to process
XML documents, you have a disconnect. Because most organizations will
not want to modify their XML documents just to appease BizTalk, the ESB
Add Namespace and Remove Namespace components were developed. These
components allow you to add root namespaces to incoming documents and
remove a namespace as the document leaves BizTalk. They can be added to
any stage of a receive or send pipeline.
The Add Namespace and
Remove Namespace components are not fundamentally tied to any other
component in the ESB Toolkit. In fact, they are not really even related
to the ESB concepts that you have been looking at. They simply solve a
logistical problem for you. They have great value even to traditional
non-ESB BizTalk projects, and you can extract them from the toolkit and
use them completely on their own.
Since these components are
not really critical in order to implement the ESB pattern that you are
looking at in this article, this article will go any deeper into them.
If you are interested in using them, then you should reference the
Namespace sample that ships with the ESB Toolkit. You can find it in the
Samples folder.
5.8. Component Summary
In this section, you have looked at the new pipeline components that are included in the ESB Toolkit. Table 3 reviews these components and their uses.
Table 3. Pipeline Components and Their Purposes
| Pipeline | Purpose |
|---|
| ESB Itinerary Selector | Used
to resolve an itinerary for an incoming message, load that itinerary
from the itinerary database, and store the itinerary in the ItineraryHeader context property. |
| ESB Dispatcher | Processes messaging-level services specified in the itinerary including the Transformation Service and Routing Service. |
| ESB Dispatcher Disassembler | Implements
the same functionality as the Dispatcher component but includes support
for XML disassembly and debatching of incoming messages. |
| ESB Itinerary | Used to initialize an incoming message that was received from an on-ramp that also accepted the message itinerary. |
| ESB Forwarder | Used when a receive port needs to intercept the incoming message are resend it back out to another external service. |
| ESB Itinerary Cache | In
a send pipeline, it stores a message's itinerary to the cache. In a
receive pipeline, it retrieves a message's itinerary from the cache. |
| ESB Add Namespace | Used to add a namespace to a message entering BizTalk. |
| ESB Remove Namespace | Used to remove a namespace from a message leaving BizTalk. |
