6. Pipelines
You can use any and all of the
ESB pipeline components to build your own custom pipelines. However, the
ESB Toolkit comes with 12 preconfigured pipelines already (well, 13 if
you count the ESB Fault Processor pipeline, but you are not going to
count that one as part of the core ESB Toolkit since it really is part
of the Exception Management Framework).
6.1. The Receive Pipelines
ItineraryReceive,
ItineraryReceivePassthrough, and ItineraryReceiveXML are receive
pipelines first shipped with version 1.0. They are designed to be used
when you are using a SOAP-based on-ramp (that is, the ASPX web service
or WCF service) that allows the external application to send in an
itinerary along with their message. In these scenarios, the itinerary is
added into the SOAP headers or WCF headers as part of the service call.
These three pipelines look into these headers to extract the itinerary.
They also all contain the ESB Dispatcher component to process the
itinerary once it is extracted. You should decide which one to use based
on the type of message you are submitting. The ItineraryReceive
pipeline is used if you are going to be receiving XML that needs to be
disassembled. The ItineraryReceivePassthrough pipeline can be used if
your message is not XML or you do not want to disassemble the XML. You
should use the ItineraryReceiveXml pipeline if you are receiving XML and
you want to use the ESB Dispatcher Disassembler.
When creating two-way
solicit-response ports, you need to be careful that you do not
accidentally use one of these three pipelines as your receive pipeline.
These pipelines will show up in the drop-down list of available
pipelines, but they are not designed to work as part of a send port.
They are to be used only as part of a receive port.
ItinerarySelectReceive,
ItineraryReceivePassthrough, and ItinerarySelectReceiveXml perform
pretty much similar functions as the last three pipelines except that
they all include the ESB Itinerary Selector component. Therefore, you
should use these pipelines if you need to resolve an itinerary for your
incoming message.
ItinerarySendReceive and
ItinerarySelectSendReceive are receive pipelines, but they are designed
to be used only within a dynamic two-way solicit-response send port. You
should not try to use them as part of a receive port. The
ItinerarySendReceive pipeline functions much the same way as the
ItineraryReceive, except that it contains the ESB Itinerary Cache
component. Likewise, the ItinerarySelectSendReceive pipeline functions
in much the same way as the ItinerarySelectReceive pipeline does except
with the addition of the ESB Itinerary Cache component.
ItineraryForwarderSendReceive
and ItineraryForwarderSendReceiveXml are designed to be used as receive
pipelines in two-way solicit response ports. They contain the Forwarder
component, so they are intended for ports that will be used as part of
an itinerary that requires service composition.
NOTE
Many of the receive pipelines make use of the Xml Disassembler component. This component has a property named AllowUnrecognizedMessage, which is set to True by default. When set to True,
this tells the component to validate the incoming message against a
schema deployed in the BizTalk environment. This default behavior will
break the "generic" design of on-ramps since it forces you to have a
schema deployed for each and every message. If you are planning to use
generic on-ramps, be sure to set this property to False.
6.2. The Send Pipelines
ItinerarySend and
ItinerarySendPassthrough are the two send pipelines that are included in
the ESB Toolkit. Both of these pipelines are designed to be used within
a two-way solicit-response dynamic. Both of these components contain
the ESB Dispatcher component and the ESB Itinerary Cache component. The
key function of these pipelines is to store a copy of the outgoing
message's itinerary into the itinerary cache.
7. Orchestrations
There are two
default orchestrations in the ESB Toolkit, and they are designed to
implement the orchestration-level version of the Dynamic Mapper and
Dynamic Routing Service. If you look into the ESB Toolkit course code,
you will find these orchestrations in the ESB.Agents project that is in
the Core => Orchestrations solution folder. Orchestrations used to implement ESB services follow the same design:
They subscribe to messages using the ESB context properties.
They use the resolver framework to retrieve their runtime information.
They implement their business function.
They update the itinerary once they are done processing the message.
They republish the message back to the Messagebox if there are more services defined in the itinerary.
7.1. Delivery Orchestration
The orchestration-level
Routing Service is implemented in the Delivery.odx orchestration file.
As per ESB orchestration design guidelines, this orchestration
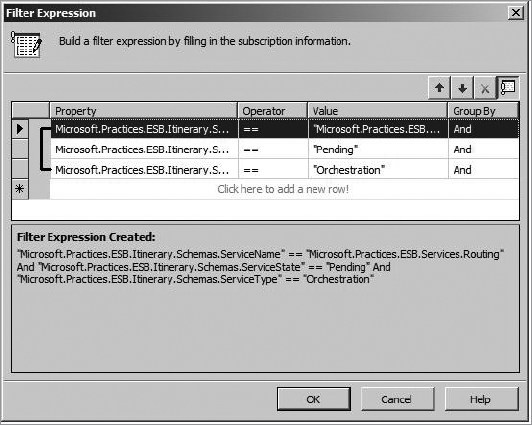
subscribes to messages using the ESB context properties (as shown in Figure 5).

7.2. Transform
The orchestration-level
mapping service is implemented in the Transform.odx orchestration file.
As per ESB orchestration design guidelines, this orchestration
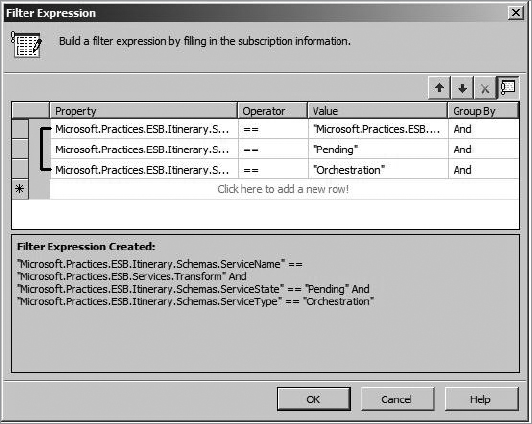
subscribes to messages using the ESB context properties (as shown in Figure 6).
If you open this
orchestration, you will see that it has three core sections. The first
section is in the Get Itinerary and Resolve scope shape. This is where
the orchestration calls into the resolver mechanism to retrieve the name
of the map it needs to execute.
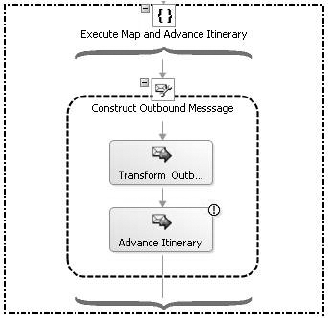
The second section is in the
Execute Map and Advance Itinerary scope shape. In this section, the
orchestration performs its actual business function, which is to
actually execute the map. It also calls into the ItineraryHelper component and asks it to update the message's itinerary. You can see these two steps in Figure 7.


In the More Itinerary
Steps section, the orchestration is checking to see whether the message
has any further ESB services that need to be executed. If it does, then
the orchestration uses a direct bound port to publish the message back
into the Messagebox.
|
The orchestration-level Routing
Service can be used only for the one-way routing of services. It is not
designed to handle two-way request-response message routing. For that,
you must use the messaging-level Routing Service.
|
|
8. Resolver Components
Unless you are planning to
develop your own custom resolvers, you will not need to dig too deep
into the components that are part of the resolver mechanism. The key
things to understand is what resolvers are available to you and how you
can define connection strings to properly use them.
At runtime, a mediation
component provides the Resolver Manager with a connection string that it
parses, populates, and validates. It does this by doing the following:
It parses the connection string to determine which resolver type to load.
It matches this type to a moniker defined in the ESB's configuration file (the key is the root moniker, such as UDDI or WSMEX).
It reads the assembly name of the resolver for this moniker.
The following is the connection string to use for the Static resolver:
STATIC:\\TransportType=WCF-BasicHttp;
TransportLocation=http://localhost:8081/NewClientService?wsdl;
Action=INewClientService/AddClient;EndpointConfig=;
JaxRpcResponse=False;MessageExchangePattern=;
TargetNamespace=http://tempuri.org/;TransformType=;
The following is the connection string to use a string for the UDDI version 2.0 resolver:
UDDI:\\ServerUrl=http://localhost/uddi;ServiceKey=;ServiceName=NewClientService;
ServiceProvider=Microsoft.Practices.ESB;
Since all these
connection strings are already clearly defined in the ESB Toolkit
documentation, we will spare you the pain of repeating each of them
here. It is enough to understand that a connection string consists of a
moniker and a series of parameters.
Beyond simply providing
resolvers out of the box for you to use, the resolver framework has also
been designed so that you can develop and add your own resolvers
without having to recompile any of the existing ESB Toolkit components.
The Resolver Manager uses late binding to instantiate resolvers. When it
parses an incoming connection string, it compares the string's moniker
against its list of registered resolvers to find a match. Resolvers are
registered in the BTSNTSvc.exe.config and Machine.config files. When
resolvers are registered in these config files, they include the fully
qualified name of the .NET assembly that they are implemented by. When
the Resolver Manager finds the appropriate resolver in the configuration
file, it instantiates a new instance of the requested assembly.
In version 1.0 of the toolkit,
you had to know how to create these connections strings manually.
Fortunately, in version 2.0 you have great tool in Visual Studio 2008
that can help you build and validate these. However, it is still a good idea to understand how they work
in case you want to extend the toolkit by creating your own resolvers.
9. Adapter Provider Components
Much like the resolver
mechanism, you will not need to dig too deeply into the components that
comprise the adapter provider mechanism unless you are interested in
creating your own adapter provider.