After you have learned to work with the many tools in
IIS to manage the environment, you will need to learn how a website is
stored and how to work with the applications your website may need to
support. In this section, you will see a basic understanding on how IIS
can provide support for your websites.
1. Understand the Basics of IIS Websites
Before you can work with
applications, you need to understand the basics of how websites are used
in IIS. Even though your websites may have a combination of simple
static web pages and complex applications, all websites have one thing
in common. The files supporting the website are stored on the server.
Being able to quickly navigate and work with these files provides you
with a quick path to fix, replace, or even troubleshoot your
applications.
Typically, before you start to
work directly with your websites by looking into the directories, you
will normally have a testing process in place. The testing process is
essential so that when you modify the website currently in production,
you do not crash the website or cause your users or even customers any
issues.
By default your websites files are stored on your system drive under the inetpub\wwwroot
directory. When your website programmers want to change the files, they
can quickly navigate directly to the directory and work with the files
on your websites. You can also view the website contents directly in the
IIS Management Console. This is especially useful if the website is on a
Windows Server 2008 R2 Server Core installation. To view the content in
the IIS Management Console, you need to be in the content view.
Open IIS Management Console by selecting Start => Administrative Tools => Internet Information Services (IIS) Manager.
In the navigation tree, click the server where the website you want to manage is located.
In the middle pane toward the bottom of the IIS Management Console window, click Content view.
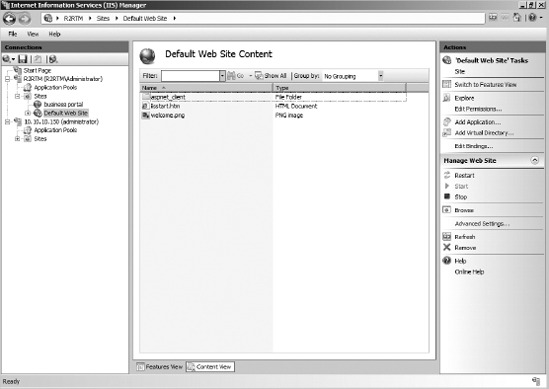
Double-click the site you want to manage, and you will see a screen similar to Figure 1.

From
the content view window, you can right-click any whitespace in the
console and select Explore. This will take you directly to the Windows
Explorer view of the directory where you can modify and work with your
files.
One of the nice things about
being able to work with your websites directly like this is that it does
not require a lot of administrative burden when you need to move the
application's files and settings. Even if the application is connected
to a server, at the end of the day you are just moving files and not
changing the configuration of the applications. You still want to test
and verify your applications prior to moving the files.
Moving the location of your
websites from one physical location to another involves two steps. First
you configure the website's physical directory, and second you copy/cut
and paste the files into the new directory. Moving the physical path
for your websites is the same procedure regardless of the application
you are moving. You could be moving a .NET application or a PHP
application. Keep in mind you are just changing the location of the
files, not the configuration. Changing the physical directory is just a
matter of modifying a setting inside the IIS Management Console:
Open IIS Management Console by selecting Start => Administrative Tools => Internet Information Services (IIS) Manager.
In the navigation tree, click the server where the website you want to manage is located.
Double-click Sites in the middle details pane, and click the site you want to change.
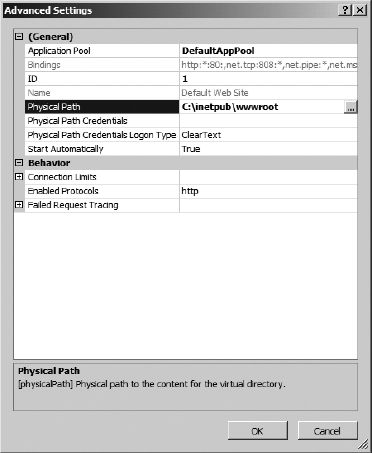
In the right Actions pane, click Advanced Settings; you will see a screen similar to Figure 2.

Click
the physical path parameter, and either type in the new path location
or click the ellipsis button to browse to the new location.
After you have configured your new directory, click Finish.
After
you have changed the configuration in IIS, go to the original file
location for the website, and copy and paste the contents to the new
location.
2. Work with Applications
Most of your websites will
contain some type of dynamic content, most likely generated from an
application on your web server. One of the areas you need to understand
is how IIS works with applications. Specifically, you need to understand
the nature of application pools and how they provide your server
stability.
Application pools allow
you to separate running applications on your web server. Therefore, if
one application crashes on your server, it will not impact any other
applications currently running on your web server. Working with
application pools allows you to configure how applications are run on
your server. However, working with application pools means you need to
understand how the applications need to run on your server. Often times,
you will need to speak to a website developer to make sure you provide
the proper support for the application.
When you create an application
pool, you will need to know a couple of aspects about the application
you are going to support. First, you need to know whether the
application is running using managed code; this typically means the
application requires the .NET Framework to run properly. Second, you
will want to know how the application pipe will be managed so you know
if you should choose either Integrated or Classic. Classic is provided
for backward compatibility for application support and simply means IIS
will not use the IIS integrated pipeline for managed code. Again, take
the time for a quick conversation to help provide adequate support to
your web developers.
2.1. Recycle Applications
One last task you may need to
perform from time to time is recycling your application pool. This will
help free up resources on your web server in case an application
encounters an error. Recycling your application pools periodically will
allow you to maintain your applications and keep them running smoothly.
You can set recycling to occur on regular intervals, or you can recycle
an application pool immediately. When you recycle an application pool,
you essentially clear up system resources and system state information.
This could negatively impact users of your website, so you need to try
to recycle the applications in off-hours. When you recycle an
application pool on your server, all existing session state data will be
lost on your server. If the application you are recycling depends on
the session state data, any users with active connections may encounter
problems when you recycle the application pool. This is why you should
try to make sure you recycle the applications during downtime, if
possible, to minimize the impact on your users.
Open IIS Management Console by selecting Start => Administrative Tools => Internet Information Services (IIS) Manager.
In the navigation tree, click the + sign next to your server to expand the container.
Click the application pool you want to recycle.
If
you want to recycle the application pool immediately, click Recycle in
the Actions pane on the right. The recycle request will process
immediately. If you want to set regular recycle intervals, click
Recycling in the Actions pane on the right.
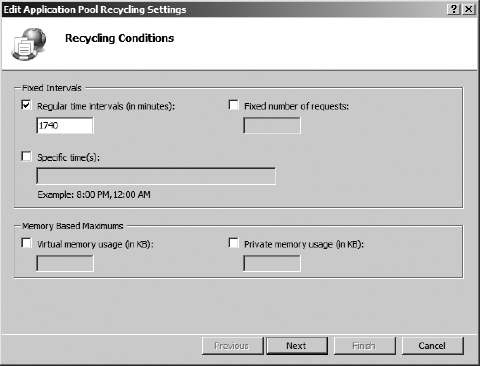
If you clicked Recycling, you will see a screen similar to Figure 3.

The
recycling conditions will allow you to set a variety of conditions when
you recycle. You can set the time, number of requests, specific time,
or even the memory usage of an application. When you are done selecting
your conditions, click Next.
You
can also create event log entries when a recycling process has occurred
on your server. The choices you will see here will be based on the
selections you made on the recycling conditions. When you are done
selecting your logging options, click Finish.
3. Integrate PHP Applications in IIS
One of the tasks you may be
asked to perform as a web administrator is to provide support of PHP
applications on your IIS web server. At first you might be inclined to
think that PHP applications are not supported on a Microsoft platform
like IIS. Fortunately, IIS provides full support for working with PHP
applications on the IIS platform. All you need to do from an IT
perspective is to know how the components in IIS provide support for
these applications and how you can maintain them. One of the great
things about this support is that to IIS, whether the application is PHP
or not, it is treated like any other applications. It will have
application pools, and you will be able to support multiple versions of
PHP on the same server.
Before you can begin working
with your PHP applications in IIS, you need to make sure you have
installed the proper IIS component to provide the PHP applications with
the back-end support they will need. In the case of IIS, you will need
to install the CGI component located under the Application Development
section of IIS. This component installs the underlying framework called
FastCGI that provides the necessary support for PHP applications to run
properly on IIS.
3.1. Install CGI on IIS
You can install CGI during
the normal install of IIS or after you have already installed IIS. To
install CGI if you already have installed IIS, you will need to install
the additional role service.
Open Server Manager by selecting Start => Administrative Tools => Server Manager.
Click the + next to Roles to expand the tree.
Right-click Web Server (IIS), and select Add Role Services.
Select CGI in the Application Development section, and click Next.
Review the confirmation screen and your selections, and when you are ready, click Install.
Review the summary screen, correct any error messages, and click Close.
After you have installed
CGI onto your IIS server, you will then need to download the version of
PHP required for your web server. When you go to download the PHP
package, you will see two versions for Windows; one titled thread-safe,
and another is non-thread-safe. You want to download the non-thread-safe
version of PHP for your IIS server on Windows Server 2008 R2. The
built-in FastCGI component will handle the necessary thread process
checks for process integrity normally handled by the thread-safe version
of PHP. This means better performance for the PHP applications loaded
on your server.
|
Using thread-safe PHP will
typically ensure your applications' threads run properly, in order, and
safely. Typically this is a very good thing. Even though this may impact
performance, making sure the applications run properly and smoothly is
vital.
Non-thread-safe
applications are going to try to execute the threads process as quickly
as the threads can be called and executed. This sometimes means the
threads bump into other threads or run improperly. The advantage of
non-thread-safe applications is typically performance.
So, this is the age-old
question of performance vs. reliability and is why IIS is so special.
The FastCGI component built in to IIS on Windows Server 2008 R2 will
make sure the threads are executed safely. In a sense, it takes the
place of the thread-safe version of PHP in regard to thread safety. You
can expect the non-thread-safe PHP package to run faster with
reliability on your IIS server.
|
You also need to make several changes to your PHP.ini file for the applications to run properly. You have to locate and uncomment the following sections in your PHP.ini file:
Set fastcgi.impersonate=1.
Set cgi.fix_pathinfo=1.
Set cgi.force_redirect=0.
Set open_basedir to point to a folder or network path where the content of the website is located. By default, on a IIS server, this is c:\inetpub\wwwroot.
Set extension_dir
to the location where the PHP extensions reside. If you have installed
PHP with the default settings, you would most likely set this parameter
to extension_dir = "./ext".
Lastly, you need to
set the application association for PHP applications when they are
accessed by your web server. In IIS this is called the handler mappings and is similar to mapping a file extension to a program such as .doc for Microsoft Word. The PHP applications will have the .php
extension. IIS will need to know how to process the files when the
requests come in. With the newer PHP for Windows packages, this handler
mapping is created; however, if it does not exist, you will have to
configure the IIS handler mapping. This will make sure that when it
processes a .php file, it passes the component to the FastCGI component.
Open IIS Management Console by selecting Start => Administrative Tools => Internet Information Services (IIS) Manager.
Click your server or website in the console tree on the left.
Double-click Handler Mappings in the center pane of the IIS console.
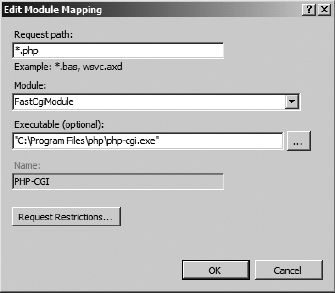
Look for an option in the Path column with a value of *.php. If one exists, double-click the mapping, and your settings should be similar to Figure 4.

If you do not see a *.php
handler mapping, click Add Module Mapping on the right action list.
Configure the mapping with the following settings, which assumes you
used the default installation settings for PHP:
Request Path: *.php
Module: FastCGI
Executable: Location of PHP installation (for example, c:\program files\php\php-cgi.exe)
Name: Can be any value you want