2. Remotely Manage IIS Servers
While you're using the IIS
console to manage your local web server, you can also manage other IIS
servers by using the IIS Management Console to connect to them. However,
before you can remotely manage IIS on other servers, you have to
configure remote management of the services. Specifically, you need to
add the IIS management service and configure and start the service to be
able to remotely manage your web servers.
First you need to
install the remote management component of IIS either via Server Manager
or via the command prompt. To add the component in Server Manager,
follow these steps:
Open Server Manager by selecting Start => Administrative Tools => Server Manager.
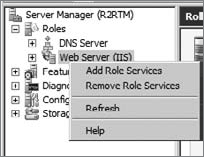
Right-click the Web Server (IIS) role; you will see a menu similar to Figure 5. Select Add Role Services.
Select
the Management Service box to add the remote management service; you
may also want to select the IIS Management Scripts And Tools box to
provide management capabilities via the command prompt. You can see an
example of these services being installed in Figure 6.

Review the confirmation screen and your selections, and when you are ready, click Install.
Review the summary screen, correct any error messages, and click Close.
To add the IIS
management service via the command prompt, as in the case of a Windows
Server 2008 R2 Server Core installation, type in the following command:
dism /online /enable-feature
 /featurename:IIS-ManagementService
After you have installed the service, you then need to configure the registry to enable the remote management service:
In the Run dialog box, type regedit.exe, and press Enter.
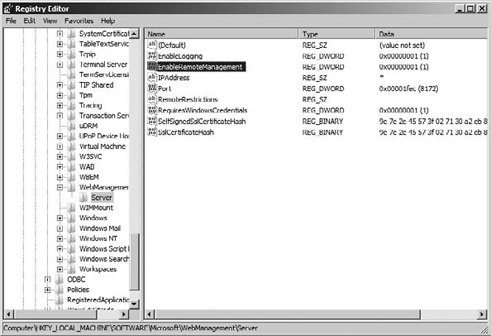
In the registry, open the following location: HKEY_LOCAL_MACHINE\Software\Microsoft\WebManagement\Server.
Set the EnableRemoteManagement key to the value of 1; you can see an example of this service enabled in Figure 7.
Close the registry editor.
After you have enabled the
service in the registry, you need to configure the service to start and
run. You can configure the service in the Services control panel, or you
can use the command prompt to start the service. To use the Services
control panel, follow these steps:
Open Services by selecting Start => Administrative Tools => Services.
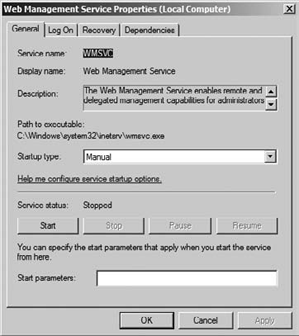
Select
Web Management Service, and click Start. If you want the service to
start automatically, you can right-click the service and click
Properties. You will see a screen similar to Figure 8.
Set the service to start automatically, and click OK.
If you want to start the
service temporarily or start the service from the command prompt, you
can just run the following command. This will not change the startup
properties of the service, and the service is only temporary until the
service is stopped or the server is rebooted.
net start wmsvc
If you want to have the service
started automatically, for example, you are configuring Windows Server
2008 R2 Server Core, you can type in the following command:
sc config wmsvc start= auto
After you have followed
those steps, you can remotely manage IIS web services from the IIS
Management Console on a centralized workstation or server system. To
connect to the remote servers, follow this procedure:
Open the IIS Management Console by selecting Start => Administrative Tools => Internet Information Services (IIS) Manager.
On the tree root on the left side of the console, right-click Start Page, and click Connect To Server.
Type in the FQDN name or IP address of the server you want to remotely manage, and click Next.
If you are prompted for credentials, type in the necessary administrative credentials, and click Next.
Give your connection a new name if you desire, and then click Finish.
You then will be able to manage
the new web server from your centralized console. This will make
working with your web servers, particularly your Server Core
installations, easier and more efficient. The new servers will appear in
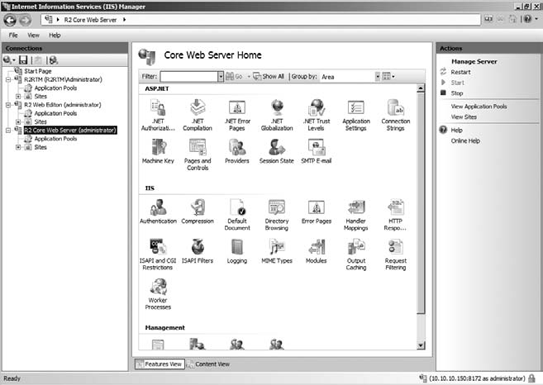
the tree on the left side of the console. You can see an example of the
IIS Management Console connected to three web servers (the local
server, Web edition, and a Server Core) in Figure 9.
3. Manage IIS with PowerShell
One of the new additions
to Windows Server 2008 R2 server is for the support of PowerShell
cmdlets and IIS. Managing IIS with PowerShell gives you another avenue
to manage and maintain your web servers. Also, with the added PowerShell
support to Windows Server 2008 R2 Server Core, PowerShell provides you
with an alternative to work with and configure your IIS servers on
Server Core installations.
Before you can use the
PowerShell utilities in IIS, you need to install the IIS Management
Scripts and Tools role service for IIS:
Open Server Manager by selecting Start => Administrative Tools => Server Manager.
In Server Manager, click + next to Roles.
Right-click Web Server (IIS), and select Add Role Services.
Select IIS Management Scripts And Tools, and click Next.
Review the summary screen, and click Install.
Review the installation summary, and click Close.
After you have installed the
scripts and tools, you have to make sure your PowerShell cmdlets,
specifically your Web Administration module on your IIS servers, has
been loaded.
Load PowerShell by selecting Start => Administrative Tools And Windows PowerShell Modules.
Run the following command:
Get-Module -all | Where {$_.moduletype -eq "Binary"}
|Format-List moduletype, name
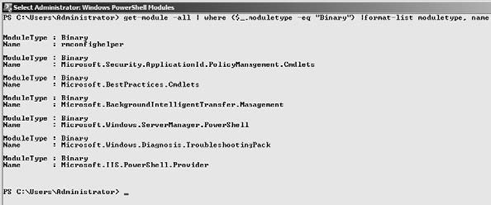
Verify Microsoft.IIS.Powershell.Provider is listed in your output list; you can see an example of this command in Figure 10.
If you do not see the IIS PowerShell provider loaded, run the following command to load the IIS PowerShell module:
import-module WebAdministration
After you have loaded or verified the IIS PowerShell module is loaded, you can then work with IIS Web Administration module.
After you have loaded
the module, you can manage several aspects of the IIS environment from
in PowerShell; if you want to see all the commands, you can type the
following command in PowerShell:
get-command –pssnapin WebAdministration
You will see a list of all the PowerShell commands, as shown in Figure 11.
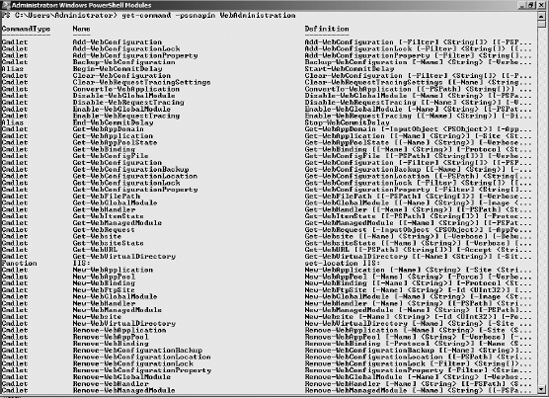
Table 2 describes some of the common cmdlets in IIS.
Table 2. IIS cmdlets
| cmdlets | Description |
|---|
| get-website | This
shows the basic configuration of the website including the directory
location for the web files, port bindings, and locations. |
| backup-webconfiguration | This backs up your existing web configuration information. |
| restore-webconfiguration | This allows you to restore the backup in case of an IIS failure. |
| stop-website | This stops the website, . You can start, remove, or even stop websites from the PowerShell command prompt. |
| new-website | This allows you to create a new website with any settings you want to use. |
If you wanted to create a new website called business portal on port 8080 with the website stored on the c:\bp drive, you would run the following PowerShell command:
new-website "business portal" -port 8080
-physicalpath "c:\bp"
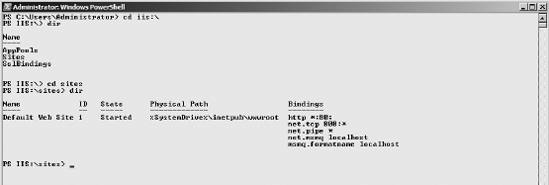
You will notice there is one function listed, which is the IIS:
function. This function allows you to navigate directly into the IIS
configuration. When you type in the following command, you will be able
to navigate the IIS configuration using common commands:
cd IIS:\
You can then navigate
three different areas of IIS configuration: application pools, sites,
and SSL Bindings. You can view or modify any of those areas by using
directory navigation commands, such as cd and dir
to view the information. For example, if you wanted to view some basic
information about all the websites currently on the IIS server, you can
perform the following steps:
Open PowerShell, and verify the IIS administration module has been loaded.
Enter cd iis:\, and hit Enter.
At the command prompt, type the following to navigate to the site information: cd sites. Then hit Enter.
Your command prompt should read PS IIS:\sites>. Type in dir, and you will see basic information about your websites. Figure 12 shows an example.
