SQL Server Agent is at the heart of automating
maintenance tasks. There are several things available in SQL Server
Agent that can assist you with routine automation and preventative
maintenance. You can create operators that will receive notification for
certain events. You can define alerts that will capture certain events,
and SQL Server Agent can then perform predefined actions in response to
those events. You can create jobs that SQL Server Agent can run on a
predefined schedule to perform routine preventative maintenance tasks.
You can even create a master server in SQL Server Agent so you can
manage jobs on multiple target servers from a single server.
1. Operators
The first thing you need to do
is define an operator so you can receive automatic notifications
through SQL Server Agent. An operator consists of two basic pieces of
information: a name used to identify the operator and the contact
information used to notify the operator. To add an operator using SQL
Server Management Studio, expand SQL Server Agent in the Object
Explorer, right-click the Operators folder, and select New Operator from
the context menu. This will open the New Operator dialog box shown in Figure 1.
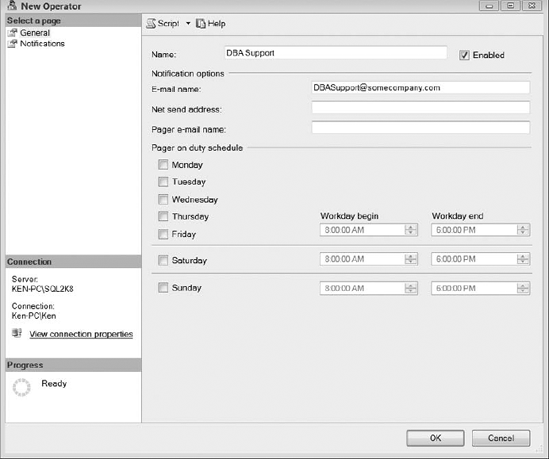
Enter an operator name and
email address, and click OK. Although you can configure net send and
pager information, these options are deprecated and will be removed in a
future version of SQL Server, so you should avoid using them. The only
information you should enter here is the name of the operator and the
email address that you will use to receive event notifications.
You can also add an operator using the sp_add_operator procedure located in the msdb. The following statement adds an operator named DBA Support and supplies an email address as the contact information.
EXEC msdb.dbo.sp_add_operator
     @name='DBA Support',
     @email_address='[email protected]'
2. Enabling SQL Server Agent Notifications
You have to enable the alert
system in SQL Server Agent before you can start receiving
notifications. Once you have configured Database Mail and added an
operator, the next thing you should do is enable the alert system and
designate a fail-safe operator. This is a designated operator that will
receive notifications in the event that the primary operator is
unreachable. In SQL Server Management Studio, right-click SQL Server
Agent and select properties from the context menu. This will bring up
the SQL Server Agent Properties dialog box. Select the Alert System
page, as shown in Figure 2.
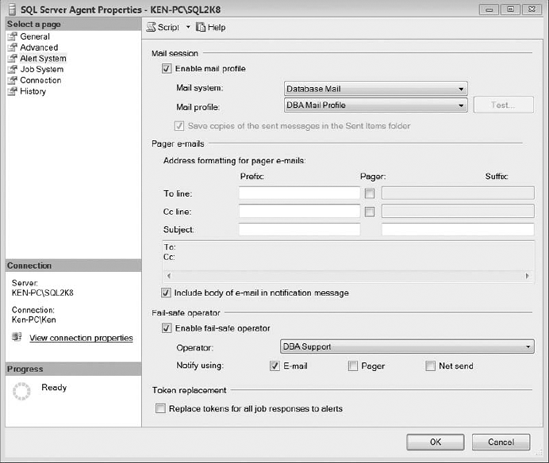
There are only a few settings on
this page you need to configure. Under the Mail Session section, select
Enable Mail Profile. This will allow you to select the mail system and
profile that SQL Server Agent will use to send notifications. You should
select Database Mail from the Mail System drop-down list. SQL Mail is
the other available mail system option; however, you should avoid SQL
Mail because it will be removed in a future release. Now select the
profile SQL Server Agent will use to send alert notifications from the
Mail Profile drop-down list.
The next thing you need to do
is select Enable Fail-Safe Operator under the Fail-Safe Operator
section. Now you can select the operator from the drop-down list that
you want to receive notifications in case the designated operator is
unreachable. SQL Server stores the fail-safe operator information in the
registry in case the operator tables in the msdb are unavailable. We are using an operator called DBA Support, as shown in Figure 13-10.
You should then select the E-mail check box to specify that the
fail-safe operator will receive notifications using email. Remember, you
should avoid the Pager and Net Send options, since they will no longer
be supported in a future release.
Select OK to close the SQL Server Agent Properties dialog box. You must restart SQL Server Agent before the new settings will take effect. You are now ready to start receiving automatic notifications from SQL Server Agent alerts and jobs.
3. Alerts
A SQL Server Agent alert is an
automatic response to a predefined event. You can configure SQL Server
Agent alerts to fire in response to SQL Server events, SQL Server
performance counters, and Windows Management Instrumentation (WMI)
events. Once an event has caused an alert to fire, you can respond to
the alert by notifying operators of the event or even running a job
after the event has occurred.
So, what kind of alerts
should you have in place that will lead to proactive maintenance? At the
very minimum, you should have a separate alert configured for fatal
errors, which are indicated by severity codes 19 through 25. Let's walk
through an example of creating an alert that will notify you of any
fatal errors encountered with the severity of 19 called "Fatal Error in
Resource." To add an alert using SQL Server Management Studio, expand
SQL Server Agent in the Object Explorer, right-click the Alerts folder,
and select New Alert from the context menu. This will open the New Alert
dialog box shown in Figure 3.
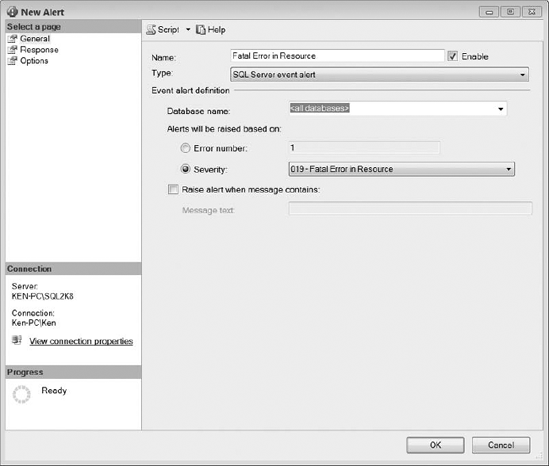
Give the alert a descriptive
name and make sure the Enable check box is selected. We will call this
alert "Fatal Error in Resource." Select SQL Server Event Alert from the
Type dropdown list. The Event Alert Definition section will change
depending on the type of alert you have selected. You can limit the
alert to a specific database by selecting it from the Database name
drop-down list; for this example, you should select <all
databases>. We want to monitor errors with a severity of 19, so
select the Severity option to enable the drop-down list, and then select
019 - Fatal Error in Resource. Select the Response page, as shown in Figure 4, to define the action that SQL Server Agent will perform when the event occurs.
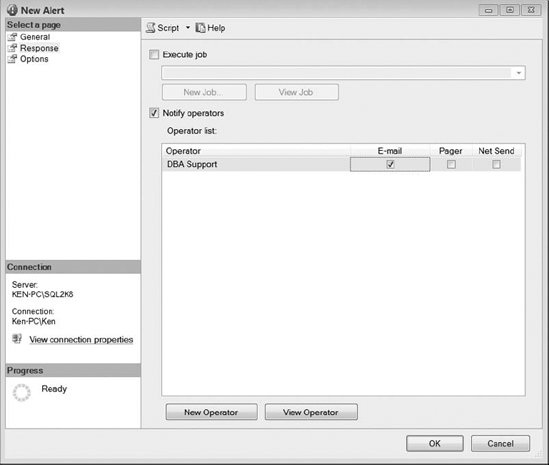
The Response page allows
you to perform two actions in response to an event: execute a job and
notify an operator of the event. You can select an existing job to run
from the Execute Job drop-down list, or select the New Job button to
open the New Job dialog box and create a new job. If you choose a job
from the drop-down list and select the View Job button, SQL Server will
display the Job Properties dialog box that will allow you to view and
edit an existing job.
All of the existing operators
are displayed in the Operator List area. Check the E-mail column for
each operator you would like to receive a notification email when the
alert is triggered. Remember, the Pager and Net Send options are
deprecated, so you should avoid these two options. You can select the
New Operator button to open the New Operator dialog box, or select the
View Operator button to open the Operator Properties dialog box for the
selected operator. We have chosen to notify the DBA Support operator we created in the previous "Operators" section. Select the Options page, as shown in Figure 5, to make the final configurations to the new alert.
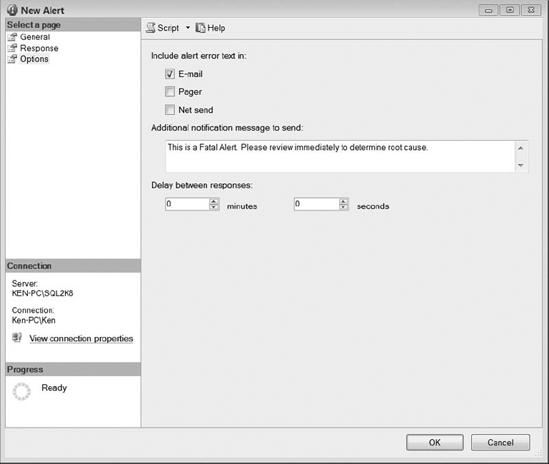
Select the E-mail check box
at the top of the Options page so the error text for the event will be
included in the email that the operator receives. The Additional
Notification Message to Send text box will allow you to send further
information or instructions along with the error text to the operator.
You can use the Delay Between Responses section to suspend additional
responses for the alert for a specified amount of time. Adding a delay
between responses is useful for error messages that may occur in rapid
succession; nobody wants to receive a hundred emails in five minutes.
Click OK to close the New Alert dialog box and create the alert.
You can repeat this process
for each alert you want to create on every SQL Server instance, or you
can create a T-SQL script you can quickly run on all of your SQL Server
instances. The code in Listing 1 will generate the same alert we just created for severity 19 using SQL Server Management Studio.
Example 1. Code to Create an Alert for Severity 19 Messages
USE msdb
GO
EXEC msdb.dbo.sp_add_alert
    @name=N'Fatal Error in Resource',
    @message_id=0,
    @severity=19,
    @enabled=1,
    @delay_between_responses=0,
    @include_event_description_in=1,
    @notification_message=N'This is a Fatal Alert. Please review immediately.'
GO

EXEC msdb.dbo.sp_add_notification
    @alert_name=N'Fatal Error in Resource',
    @operator_name=N'DBA Support',
    @notification_method = 1
GO
|
You can also define an alert
for a specific error number, regardless of the severity, by entering the
exact error number. We have seen some specific blog entries around the
need to create an alert for error 825, which deals with an IO issue. You
can read more on error 825 on Paul Randal's blog located at http://sqlskills.com/BLOGS/PAUL/post/A-little-known-signof-impending-doom-error-825.aspx.
For a complete list of messages and their severity codes, you can query the sys.messages catalog view. There are far too many messages in the sys.messages
catalog view to review each one manually. You can narrow down the
messages by limiting the results by language and only showing the
messages that SQL Server will log. You can also limit the results to
messages with a severity of less than 19, as shown in the following
query, since you should already be monitoring messages with a severity
of 19 and above. You can review the list returned by the following query
to determine if you want to add additional alerts for specific errors.
SELECT *
FROM sys.messages
WHERE language_id = 1033 and
            is_event_logged = 1 and
            severity < 19