Originally introduced as a supported feature with SQL
Server 2005, log shipping is an available HA feature in every SQL
Server edition except Express. Log shipping creates a secondary copy of the primary database by taking a
transaction log backup from the primary database and copying it to a
secondary database. The transaction log copy process needs to occur
regularly to keep the secondary database synchronized with its primary
source in case a disaster occurs and it is needed. One advantage of log
shipping is that once the backup of the transaction log is created in
the primary database instance, the remainder of the process occurs in
the secondary database instance, allowing the primary instance to return
to normal activities.
The Server Components of Log Shipping
Log
shipping requires at least two servers—a primary and a secondary—and
allows the use of an optional third server to monitor the log-shipping
operation.
Primary.
This is the database you want to back up to a SQL Server instance on a
separate server. All configuration of the log-shipping process must
occur on this server. You must back up the primary database using the
Full or Bulk-Logged recovery models for the backups to be used with log
shipping; log shipping is not available when the target database uses
the Simple recovery model. A target database can have only one primary
server, but you can ship its logs to multiple secondary servers for
redundancy. Secondary.
This is the database that functions as a separate backup copy of your
primary database. You must initially restore the secondary database from
a full backup of the primary database using either the Restore with No
Recovery or Restore with Standby options before you can update it with
transaction logs via log shipping. A single secondary server can host
multiple databases backed up via log shipping. Monitor.
This server lives up to its name by tracking all the activities of the
log-shipping process, such as transaction log backup dates, secondary
server transaction log copy and restore dates, and information on any
failures or errors that may occur. A monitor server is not required to
use log shipping, but if you do decide to use it, you should host it
somewhere other than your primary or secondary server. A single monitor
server can track multiple log-shipping configurations.
Log-Shipping Jobs
SQL Server executes four distinct SQL Server Agent jobs as part of the log-shipping process:
Backup.
The SQL Server Agent executes this job on the primary server to back up
the target database, log the action to the local server (as well as the
monitor server), and clean up any old backup files or logs created by
previous iterations of the job. This job kicks off the log-shipping
process; when it is finished, SQL Server initiates a Copy job on the
secondary server and returns the target database to normal processing.
By default, Backup is configured to run every 2 minutes, but you can
configure it to run more or less frequently based on your requirements. Copy.
The SQL Server Agent executes this job on the secondary server to copy
the transaction log backup from the primary server to the secondary
server. Its actions are logged on the secondary server and reported to
the monitor server, and then it deletes any old backup files or logs. |
Be careful to monitor the
size of any database and its transaction logs if you are using log
shipping. As these files grow, so does the amount of data that you need
to send over the network from your primary server to
the secondary server. The larger the transaction log, the longer it
takes for it to be copied from the primary to the secondary and the more
bandwidth that is being tied up over your network.
The good news is that solutions
are available to make the transfer of large log files more efficient
and better performing. Compressing transaction log backups, a feature
now available in SQL Server 2008 , can
reduce the size of the files that are sent over the network. Other
methods are also available to improve the act of copying the files from
point A to point B, such as the Windows Distributed File System with
Active Directory Domain Services, which can increase the throughput of
the copy activity.
|
Restore.
The SQL Server Agent executes this job to restore the copied
transaction log to the secondary database and bring it in line with the
content of the primary target database. Its actions are logged on the
secondary server and reported to the monitor server; then it deletes any
old files or logs associated with the job. Alert.
If a monitor server is configured for the log-shipping process, this
job is created on the monitor server and shared by all servers using the
monitor server. The SQL Server Agent executes this job to raise alerts
when any job within the log-shipping process fails to run successfully
to completion. Additional configuration must be completed for SQL Server
to deliver these alerts to an operator. If a monitor is not configured,
alert jobs must be configured individually on the primary and secondary
servers to report the result of the jobs run on each server.
How to Configure Log Shipping
Your environment must meet the following requirements to enable log shipping for one or more of your SQL Server databases:
Servers.
In addition to the server hosting your primary SQL Server database
instance, you must have a second database instance hosting on a separate
server to function as the secondary server. A third monitor server is
optional. File share.
A network file share must be available to store the backed up
transaction logs. Microsoft recommends, but does not require, that this
file share be located somewhere other than your primary or secondary
server in the interest of enhanced availability for your data. SQL Server license.
All servers participating in the log-shipping process must be running
one of the following versions of SQL Server: Server 2008 or 2008 R2
Workgroup Edition, Server 2008 or 2008 R2 Web Edition, SQL Server 2008
or 2008 R2 Standard Edition, SQL Server 2008 or 2008 R2 Datacenter
Edition, or SQL Server 2008 or 2008 R2 Enterprise Edition. Log shipping
is not available with SQL Server Express Edition. Case sensitivity. All servers participating in the log-shipping process must have the same SQL Server case sensitivity configuration. Recovery model. You must back up the database targeted for log shipping using the Full or Bulk-Logged recovery models. SQL Server Agent.
The SQL Server agent service must be running on each server for the
associated jobs to execute. In most cases this service is active by
default, but if it is not running, the log-shipping process is not fully
functional.
The following steps provide
an example of how to enable and configure SQL Server log shipping with a
primary and secondary server:
1. | Open
SQL Server Management Studio and right-click on the database you are
targeting for log shipping. Select the Properties item from the menu.
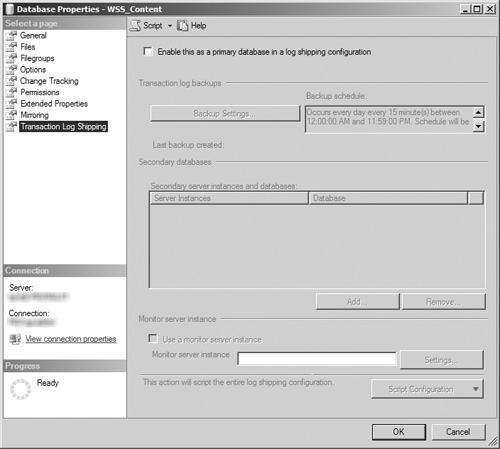
| 2. | When the Database Properties dialog box opens (see Figure 1), click the Transaction Log Shipping link in the left pane.

| 3. | This action opens the Transaction Log Shipping page (see Figure 2)
with most of its options disabled. Click the Enable This as a Primary
Database in a Log Shipping Configuration check box to enable the other
fields, buttons, and items in the page.
| 4. | To open the Transaction Log Backup Settings dialog box (see Figure 3), click the now enabled Backup Settings button.
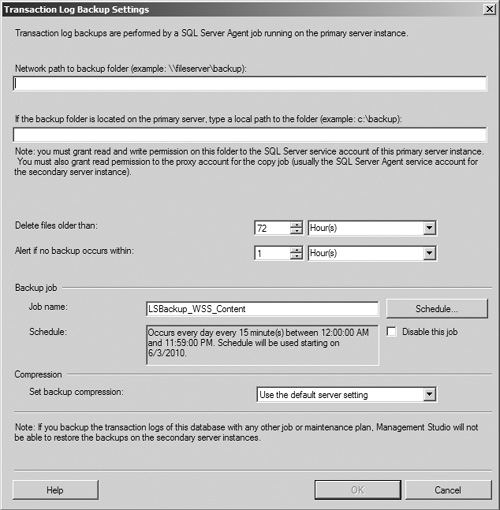
| 5. | In
the Network Path to Backup Folder text box, enter the Universal Naming
Convention (UNC) path for the network share you have designated as the
storage location for the backed up transaction logs. If you have chosen
to use a local folder on the primary server, leave this field blank and
enter the path to that directory in the If the Backup Folder Is Located
on the Primary Server, Type a Local Path to the Folder text box.
Note
Regardless of its
location, the primary server’s SQL Server service account must have read
and write privileges for the directory provided. In addition, the
secondary server’s SQL Server Agent service account must have read
privileges in the directory.
| 6. | Configure
the Delete Files Older Than and Alert if No Backup Occurs Within fields
according to the needs and requirements of your system. The first field
helps to keep your transaction log backups from overwhelming your
storage system, whereas the second warns your database’s operators if
its transaction logs are not being backed up on a regular basis.
Tip
Be
careful not to set too small of an interval on the deletion of your
backup files, or they may be deleted before the log-shipping Copy job
can create a copy of the files on the secondary server.
| 7. | In
the Backup Job section, you have the option of renaming the job used to
back up the target database if the default name provided is not
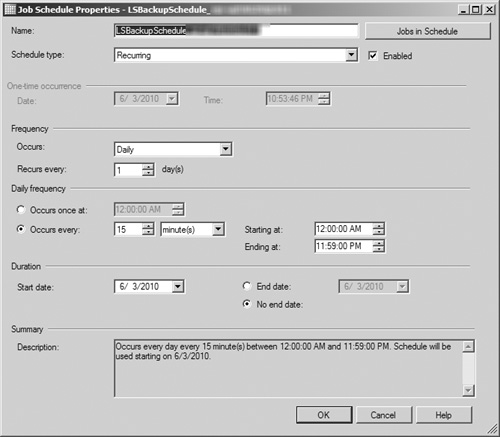
sufficiently descriptive. More importantly, clicking the Schedule button
opens the Job Schedule Properties dialog box (see Figure 4),
allowing you to configure how frequently the database’s transaction
logs are backed up and sent to the secondary server. You can modify the
various schedule settings for the backup in this window; be sure to
closely review the Summary text field to confirm that the settings match
your preferred schedule before clicking the OK button to save your
changes.
Tip
As
with any other scheduled activity within your farm, such as SharePoint
backups, search crawls, or other regular activities, be careful about
when you decide to have the transaction logs backed up and shipped to
the secondary server. These processes could incur some (if not
considerable) overhead for your environment and have the potential to
impact the experience for your end users, especially if there are other
resource-intensive activities running at the same time. It may be
difficult, but at a minimum you need to be aware of the possibility for
contention with these and other scheduled activities.
| 8. | To
save your changes to the Transaction Logs Backup Settings, click the OK
button. This returns you to the Transaction Log Shipping page of the
database’s Properties window.
| 9. | Now
that you have configured the backup of the primary database’s
transaction logs, click the Add button in the Secondary Databases
section to select a secondary server to receive the backed up logs.
Note
You must enter a storage location for the transaction log’s backups in step 5 for the Add button to be enabled.
| 10. | This opens the Secondary Database Settings dialog box (see Figure 5).
By default, most of the items are disabled when this dialog box first
opens; you must connect to the secondary server to be able to modify
them. Click the Connect button to open a SQL Server login screen, and
enter the connection data for the secondary server’s database instance
to proceed.
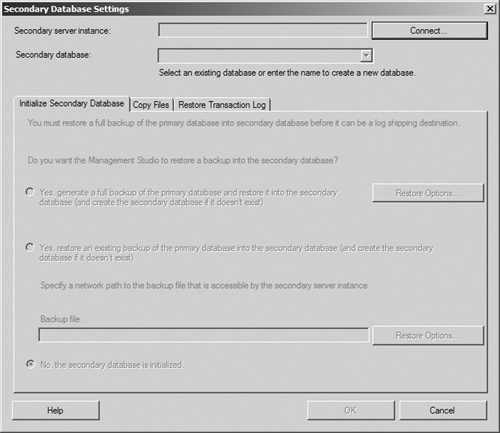
| 11. | The
Initialize Secondary Database tab is now enabled, allowing you to
select whether you want the secondary database initialized by a fresh
full database created by the log-shipping process, by an existing full
backup that has already been taken, or to inform SQL Server that the
database has already been initialized. Select the option button next to
the correct option for your system, configure any necessary Restore
Options, and then click the Copy Files tab.
| 12. | In the Copy Files tab (see Figure 6),
you must provide a destination directory on the secondary server for
the transaction log backup files copied from the primary server. (The
window’s OK button is not enabled until you enter a value in this
field.) You can also configure how long these log files are retained,
when operators should be alerted in case of an outage, and the schedule
by which the log files are copied from the primary server to the
secondary server. After you have completed the Copy Files configuration,
click the Restore Transaction Log tab to continue.

Tip
The schedule for copying
files to the secondary server should match the schedule for transaction
log backups as closely as possible. Copying the files with a greater
frequency can result in the same data being copied multiple times,
whereas a lesser frequency can result in the loss of transaction data if
backups are overwritten or deleted before they can be copied.
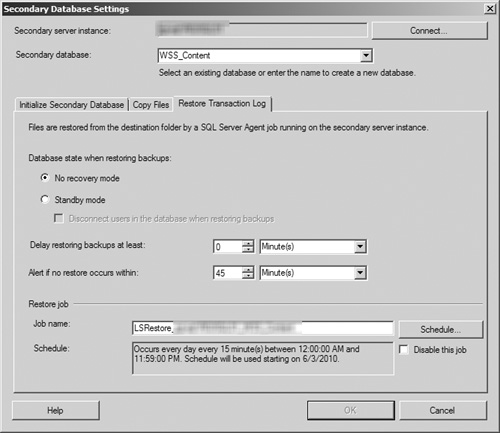
| 13. | In the Restore Transaction Log tab (see Figure 7),
you must select the state that the database is in while restoring
backups. The No Recovery Mode option is selected by default, but you can
also opt to place the database in Standby Mode. The tab also allows you
to delay a restore, alert an operator if a restore cannot be run, and
change the schedule for restore operations.
| 14. | After
you have completed your Secondary Database Settings configurations,
click the OK button to return to the Database Properties dialog box.
| 15. | If
you want to configure a monitor server for the log-shipping process,
select the Use a Monitor Server Instance check box in the Monitor Server
Instance section. This enables the Settings button in that section;
click it to open the Log Shipping Monitor Settings dialog box (see Figure 8.).
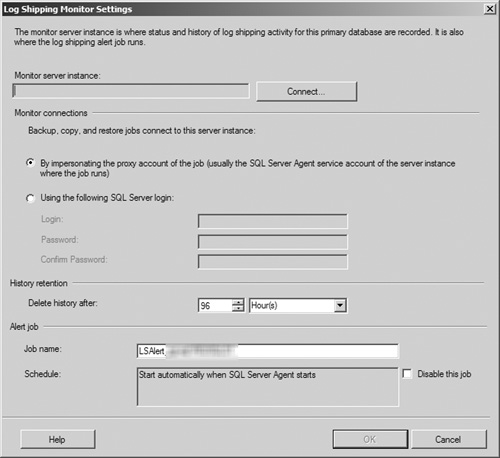
| 16. | When
the Log Shipping Monitor Settings dialog box opens, click the Connect
button to open a SQL Server login screen and enter the connection data
for the monitor server’s database instance to proceed. In this dialog
box, you can also configure which account is used to connect to the
monitor server, how long the monitor server retains history data, and
when alert jobs are scheduled to run. After you have completed your
configuration, click the OK button to return to the Database Properties
dialog box.
| 17. | After
you have completed the log-shipping configuration for the database,
click the OK button in the Database Properties dialog box to commit your
changes.
| 18. | To
verify that the log-shipping configuration was completed successfully,
review the status of the SQL Agent jobs on each server and confirm that
they are running as expected and without error. |
|
