1. Problem
You have created a BAM activity and view within a BAM Excel workbook and must deploy the BAM artifacts within your environment.
2. Solution
Successfully deploying a
BAM activity and view involves a number of steps, typically performed by
a few different users. After a business analyst creates the BAM
activity and view within the BAM Excel workbook, an administrator
deploys the artifacts to the BizTalk environment. The first set of steps
to use the BAM Management Utility to deploy the activity and view
defined in the BAM Excel workbook is as follows:
Open a command prompt by navigating to Start→Run, typing CMD, and clicking OK.
Navigate
to the folder containing the BAM Management Utility by typing the path
similar to the following line at the command prompt, and pressing Enter:
cd "C:\Program Files\Microsoft BizTalk Server 2010\Tracking\"
Use the deploy-all
command to deploy the BAM activity and view defined in your BAM Excel
workbook. For this solution, type the following line at the prompt, and
press Enter:
bm deploy-all -DefinitionFile:"C:\BAMWorkbook\BAMWorkbook.xls"
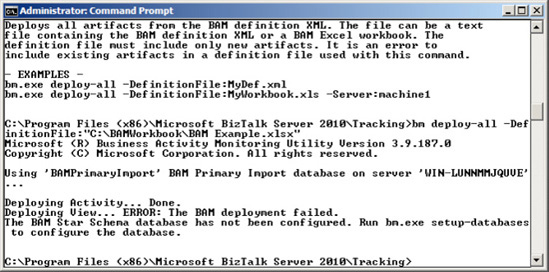
The status of the deploy operation appears in the console, as shown in Figure 1.
NOTE
If you get an error at
this stage stating that the BAM Star Schema database has not been
configured, this means that the Analysis Services has not been installed
on SQL Server. To enable tracking and use of the BAM Portal, Analysis
Services must be installed.
The
next set of steps is for either a developer or an administrator to use
the Tracking Profile Editor to define and deploy the mappings between
the activities defined in the BAM Excel workbook and actual BizTalk
artifacts, such as orchestrations and schemas. (BizTalk Server 2010 also
allows pure messaging solutions to feed BAM.)
Open the Tracking Profile Editor by navigating to StartPrograms => Microsoft BizTalk Server 2010 => Tracking Profile Editor.
Import
your BAM Excel workbook by clicking the Click Here to Import a BAM
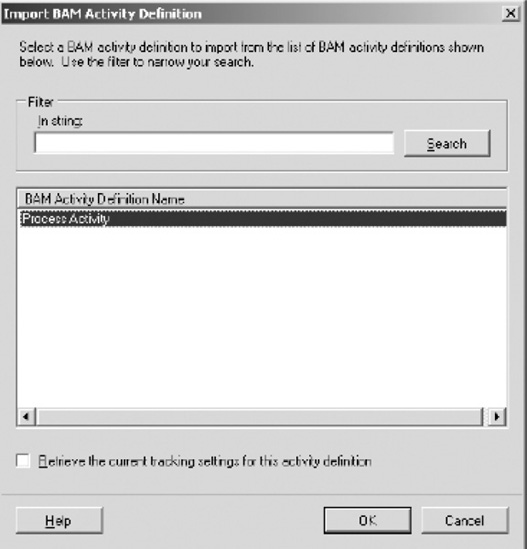
Activity Definition link. This link launches the Import BAM Activity
Definition dialog box. Select the appropriate activity definition from
the list. In this solution, select the activity definition named Process
Activity, as shown in Figure 2.
Select
the BizTalk artifacts you need to map the activity definitions to by
clicking the Click Here to Select an Event Source link. This link
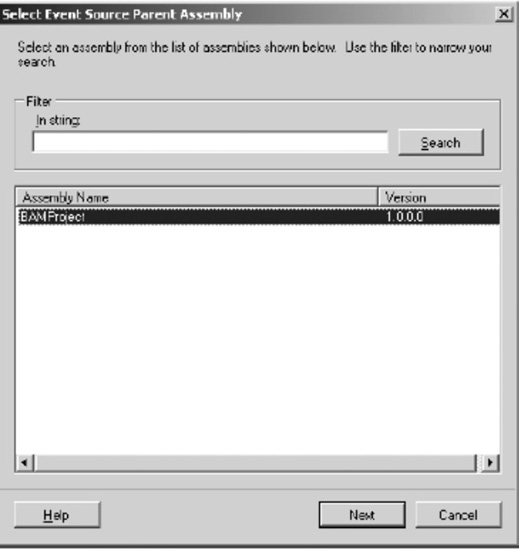
launches the Select Event Source Parent Assembly dialog box. Select the
appropriate BizTalk assembly containing the artifacts you will map to
the activity definitions; in this solution, select the assembly named
BAMProject, as shown in Figure 3. Click Next to proceed.
NOTE
The list of assemblies contains all those BizTalk assemblies that have been deployed within your BizTalk environment.
In
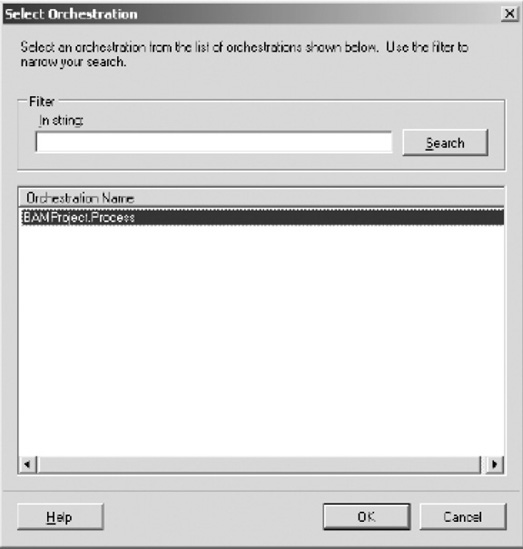
the Select Orchestration dialog box displayed next, select the
orchestration containing the workflow and the links to the schemas that
define the activity definitions. In this solution, select the
orchestration named BAMProject.Process, as shown in Figure 4. Click OK.
Now,
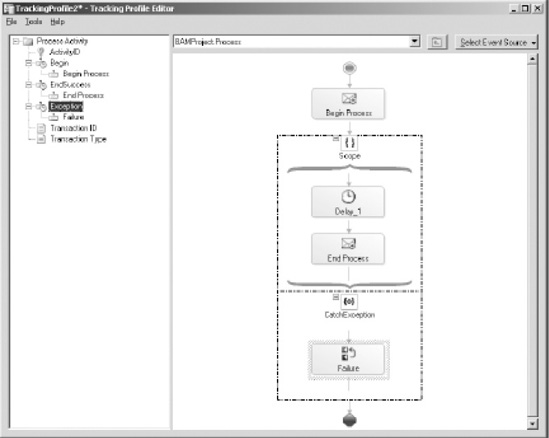
map the orchestration steps in the right pane to the activity
definition milestones in the left pane. Drag and drop the orchestration
shapes to the activity definition milestones, as outlined in Table 1. Figure 5
shows how the Tracking Profile Editor looks after the orchestration
steps have been mapped to the activity definition milestones.
Table 1. Activity Definition Milestone Mapping
| Activity Definition Milestone | Orchestration Step (Shape) |
|---|
| Begin | Begin Process (Receive Shape) |
| EndSuccess | End Process (Send Shape) |
| Exception | Failure (Expression Shape) |
Next,
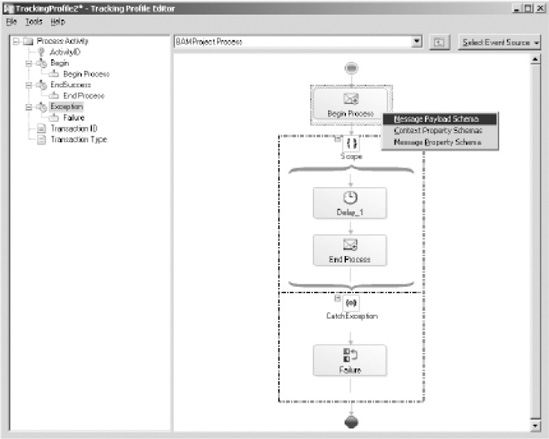
map the appropriate schema fields to the activity definition business
data. Since the message containing the schema data fields you need to
map is received by the Begin Process shape in the orchestration,
right-click this shape, and select Message Payload Schema, as shown in Figure 6.
Map
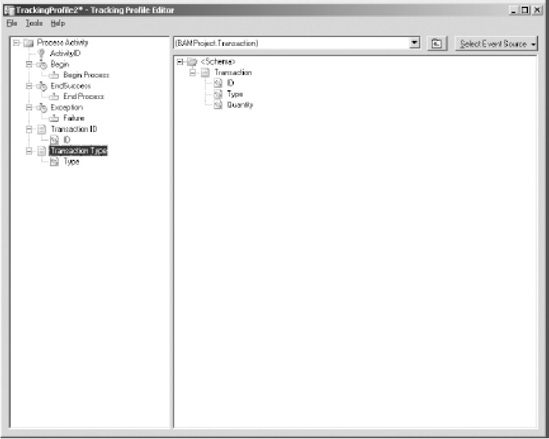
the appropriate schema fields in the right pane to the activity
definition business data fields in the left pane. Drag and drop the
schema fields to the activity definition business data fields as
outlined in Table 2. Figure 7
shows how the Tracking Profile Editor looks after the orchestration
steps and business data have been mapped to the activity definition
milestones.
Table 11.9. Activity Definition Business Data Mapping
| Activity Definition Business Data | Schema Field |
|---|
| Transaction ID | ID |
| Transaction Type | Type |
Save the tracking profile by selecting File => Save. Save the file as C:\BAMWorkbook\BAMTrackingProfile.btt.
Deploy the tracking profile by selecting Tools => Apply Tracking Profile. Click OK to confirm the successful deployment of the tracking profile.
3. How It Works
Deploying BAM activities
and views involves two BizTalk tools: the BAM Management Utility and the
Tracking Profile Editor. The BAM Management Utility is a command-line
tool used for managing your BAM environment. It includes a number of
commands, but the one we'll focus on is deploy-all. The deploy-all command takes the following parameters:
DefinitionFile:
Path and file name of the BAM Excel workbook (or the exported XML file
that can be generated from the BAM Excel workbook) containing the
activities to deploy.
Server: Name of the server to which to deploy the activities. If this parameter is not specified, the local server is used.
Database: Name of the database to which to deploy the activities. If this parameter is not specified, the BAMPrimaryImport database is used.
This command reads the BAM Excel workbook specified in the DefinitionFile
parameter and creates SQL Server database artifacts based on the
activities and view defined in the spreadsheet. Specifically, this
command creates the following:
Tables within the BAM primary import database for capturing activity data in the live BizTalk environment.
SQL
Server Integration Services packages for transferring data between the
live BizTalk databases and the SQL Server Analysis Services cubes.
SQL Server Analysis Services OLAP cubes.
A
live data copy of the Excel workbook in the same folder as the original
spreadsheet. Use the live data workbook to view up-to-date data within
BizTalk Server after completing the deployment steps (including those
involving the Tracking Profile Editor).
NOTE
The BAM
Management Utility has no update capabilities for BAM artifacts. You
must first remove the old artifacts and then deploy the updated ones.
Use the Tracking Profile
Editor to map the activities defined by the business analyst in the BAM
Excel workbook to actual BizTalk artifacts, such as orchestration
shapes and schema data fields. This task is absolutely critical in
ensuring that the deployed BAM artifacts communicate the appropriate
information. Although it is common to have a developer or administrator
perform this task, this user should have a strong understanding of the
business process. Applying the tracking profile places the hooks into
the BizTalk Server environment used to record the necessary milestones
and data fields, which map to the activities defined by the business
analyst. The Tracking Profile Editor in BizTalk Server 2010 also
provides functionality to feed BAM via pure-messaging scenarios (those
that do not use orchestrations). To access schemas directly, click the
Select Event Source drop-down list, and click Select Messaging Payload.
This launches the Select Event Source Parent Assembly dialog box. Select
the appropriate BizTalk assembly and then the appropriate schema.
Once the deployment steps
have executed, you can see the activity data either through the live
data copy of the BAM Excel workbook or through the BAM portal.