3. Administrating Managed Folders
You can use the Exchange Server 2010 Managed Folders MRM feature to specify
retention settings for default folders such as Inbox, Deleted Items, and Sent
Items. In addition, you can create custom managed folders and specify their
retention settings. Your users can classify messages for retention and move
these messages to appropriate managed folders based on their retention
requirements. You can define two types of managed folders:
Managed default
folders
These are managed folder objects created for default folders, such
as Inbox, Deleted Items, Sent Items, and so on. When you set up
Exchange Server 2010, you create a set of managed default folders
that are displayed on the Managed Default Folders tab in the EMC.
Optionally, you can create additional folders for different sets of
users.
Managed custom folders
These are managed folder objects you can use to create custom
folders in a user’s mailbox. Managed custom folders are
created under a top-level folder called Managed Folders. Each
mailbox that has managed custom folders requires an Exchange Server
Enterprise client access license (CAL).
Managed content settings specify the retention and journaling settings for a
managed folder. You can configure settings for a specific message class (for
example, email messages, calendar items, and tasks) or for all message classes.
You can specify multiple managed content settings for different message classes.
This lets you specify different retention settings for different types of items
in the same folder.
These retention settings include a message class, whether retention is enabled
for the specified message class, the retention age, and a retention action. The
retention age specifies the period for which a message is retained in the
mailbox. The retention action specifies the action to take after the item is
past its retention age. For example, you can create a managed content setting
for a managed default folder that moves all items to the Recovery Items folder
after 100 days.
You can select from one of the
following retention actions:
Move to the Deleted Items
folder
Move to a managed custom folder you have
previously created
Delete and allow recovery This
moves items to the Recoverable Items folder. Deleted items are available
for recovery from this folder until the specified deleted item retention
time for the mailbox database or the user mailbox elapses.
Permanently delete
Mark as past retention limit This
marks items as expired after they reach their retention age. Items
marked as expired are displayed by using strikethrough text in Microsoft
Outlook 2010 and Microsoft Office Outlook 2007.
You can also specify whether the retention age is calculated from when a
message is delivered to a mailbox or from when it is moved to the folder it
currently resides in. For calendar items and recurring tasks, the retention age
is calculated from the end date of the item.
3.1. Creating Managed Default Folders and Managed Custom Folders
Before you can create managed content settings, you must have at least one
managed default folder or one managed custom folder to which you can apply
these settings. A managed default folder is a mailbox folder (such as the
Inbox folder) that appears in Office Outlook 2007 and Office 2010 by default
and to which MRM has been applied. A managed custom folder is a managed
folder that is created by an Exchange administrator and placed in a user
mailbox for MRM purposes. To use the EMC to create a managed default folder,
carry out the following procedure:
Open the EMC and expand the Console tree.
Under Organization Configuration, click Mailbox.
In the Actions pane, click New Managed Default Folder. This starts
the New Managed Default Folder Wizard.
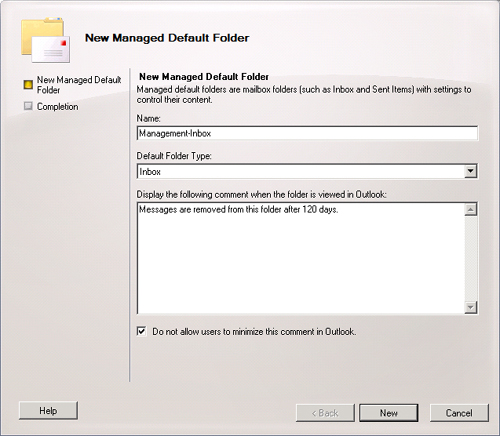
On the New Managed Default Folder page, shown in Figure 6, complete
the following fields:
Name
This is the name of the managed folder object in
Active Directory and does not change the standard name
of the default folder (such as Inbox) that appears in
user mailboxes. This name can be up to 65 characters in
length.
Default Folder
Type
Select
the type of default folder that you want to create (for
example, Inbox) from the list provided.
Display The Following Comment
When The Folder Is Viewed In
Outlook
A typical comment might be “Messages are removed
from this folder after 120 days.” The maximum
length of this comment is 255 characters. Note that you
can use the Set-ManagedFolder EMS
cmdlet to configure comments localized to, for example,
different countries.
Do Not Allow Users To
Minimize This Comment In Outlook
You should select this check box to prevent Outlook
users from minimizing the comment that you entered in
the preceding box.
Click New. On the Completion page, a status of Completed indicates
that the wizard completed the task successfully. A status of Failed
indicates that the task was not completed. If the task fails, review
the summary for an explanation and then click Back to make any
configuration changes required.
The settings shown in Figure 11-6 create a folder of
type Inbox named Management-Inbox. The comment “Messages are removed
from the Inbox folder after 120 days.” Is displayed on supported
clients, and users are unable to minimize the comment in Outlook. Note that
the retention period is determined by the settings of the default Inbox
folder and cannot be configured using this procedure.
You can also use the EMS to create a
managed default folder. The following command creates a managed default
folder named Corporate-Inbox with the comment “Messages are removed
from the Inbox folder after 120 days.”:
New-ManagedFolder -Name "Corporate-Inbox" -DefaultFolderType Inbox -Comment "Messages
are removed from the Inbox folder after 120 days" -MustDisplayComment $true
Figure 7 shows the output
from this command.

Note:
The New-ManagedFolder cmdlet creates a managed
folder but cannot be used to configure an existing one. You can use the
Set-ManagedFolder cmdlet to configure an
existing managed folder but not to create a new one.
The procedure to create a managed custom folder using the EMS is very
similar to the procedure described earlier for creating a managed default
folder, except that you click New Managed Custom Folder in the EMC Actions
pane and start the New Managed Custom Folder Wizard. The New Managed Custom
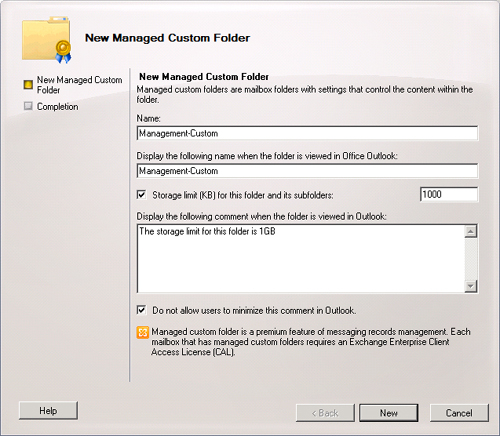
Folder page, shown in Figure 8, lets
you configure the following settings:
Name
This is the name of the new managed custom folder object in
Active Directory. It does not appear in users’ mailboxes.
This name can be up to 65 characters in length.
Display The Following Name When The
Folder Is Viewed In Office Outlook
This is the name that users see when they view the folder in
Outlook. By default, this is the same name as the one you enter
in the Name box. This name can be up to 255 characters in
length.
Storage Limit (KB) For This Folder
And Its Subfolders
You can select this check box and specify the maximum size for
the folder and its subfolders combined.
Display The Following Comment When
The Folder Is Viewed In Outlook
A typical comment might be “The storage limit for this
folder is 1 GB.” The maximum length of this comment is 255
characters. Note that you can use the
Set-ManagedFolder EMS cmdlet to
configure comments localized to, for example, different
countries.
Do Not Allow Users To Minimize This
Comment In Outlook
You should select this check box to prevent Outlook users from
minimizing the comment that you entered in the preceding
box.
As with managed default folders, you can use the
New-ManagedFolder EMS cmdlet to create a managed
custom folder, although different parameters are specified for the two types
of folders. For example, the following command creates the managed custom
folder Business Critical with a folder quota of 1.5 GB and enables a folder
comment:
New-ManagedFolder -Name "Business Critical" -FolderName "Business Critical"
-StorageQuota 1.5GB -Comment "This is a managed folder with a 1.5GB storage limit."
-MustDisplayComment $true
Figure 9 shows the
output from this command.

3.2. Creating and Configuring Managed Content Settings
Managed content settings are used to
define message retention settings and retention action for managed folders.
For example, the managed content settings that you apply to a user’s
Inbox folder could specify that its contents are automatically deleted or
moved to another folder after a specified number of days.
You can control message life span by controlling content retention and
removing content that is no longer needed and by automatically copying
important content to a separate storage location outside the mailbox. This
is known as journaling. The journaling storage location
can be any location that has a Simple Mail Transfer Protocol (SMTP) email
address, including another Exchange mailbox. When an item is journaled, a
label that indicates how the user classified the item is applied to it.
You can use the EMC or the EMS to create managed content settings and
configure journaling. The procedure using the EMC is as follows:
Open the EMC and expand the Console tree.
Under Organization Configuration, click Mailbox.
In the Result pane, click either the Managed Default Folders tab
or the Managed Custom Folders tab as appropriate. Click the managed
folder you want to configure.
In the Actions pane, under the name of the folder you have
selected, click New Managed Content settings to start the New
Managed Content Settings Wizard.
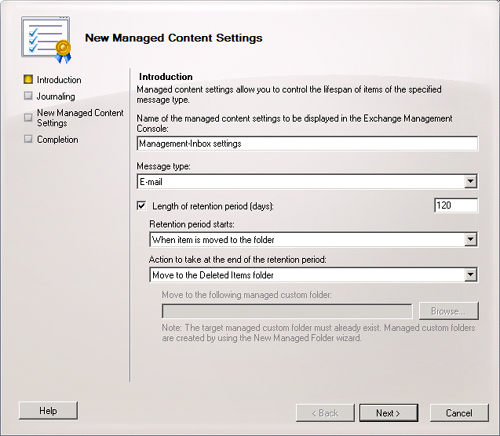
On the Introduction page, shown in Figure 10, complete
the following fields as appropriate:
Name Of The Managed Content Settings To Be Displayed In
The Exchange Management Console
Message Type
Length Of Retention Period (Days)
Retention Period Starts
Action To Take At End Of Retention Period
Click Next. You can use journaling to automatically forward a copy
of an item of the specified message type to another location. If you
want to do this, select the Forward Copies To check box and complete
the following fields on the Journaling page:
Assign The Following Label To
The Copy Of The Message
You can browse for a suitable recipient.
Format Of Copied Message
Attached To Journal Report
This can be Exchange Messaging Application Programming
Interface Message Format or Outlook Message
Format.
Click Next. On the New Managed Content Settings page, review your
configuration settings. If you are satisfied, click New to create
the managed content settings.
On the Completion page, review the status. If the status is
Completed, click Finish to close the wizard. Otherwise, click Back
to review your settings.
You can
use the New-ManagedContentSettings EMS cmdlet to create
managed content settings. For example, the following command creates managed
content settings for the managed default folder Calendar with the name
MyCalendarContentSettings, the message class CalendarItems, the age limit
for retention 30 days, and the retention action Move to Deleted
Items:
New-ManagedContentSettings -FolderName Calendar -MessageClass CalendarItems -Name
MyCalendarContentSettings -RetentionEnabled $true -RetentionAction MoveToDeletedItems
-AgeLimitForRetention 30
As with creating managed content settings, you can reconfigure existing
settings by using either the EMC or the EMS. To use the EMC to configure
managed content settings, carry out the following procedure:
Open the EMC and expand the Console tree.
Under Organization Configuration, click Mailbox.
Click either the Managed Default Folders tab or the Managed Custom
Folders tab (as appropriate) in the Result pane.
Expand the managed folder the contents of which you want to
reconfigure. Click the managed content settings.
Click Properties under the name of the managed content settings in
the Actions pane.
Note:
YOU CANNOT CREATE A NEW MANAGED FOLDER
BY ACCESSING THIS PROPERTIES DIALOG BOX
You cannot create a new managed folder by using this
procedure. If the managed folder does not exist, you need to use
the New Managed Custom Folder Wizard or the
New-ManagedCustomFolder EMS cmdlet (as
described previously in this section) to create it.
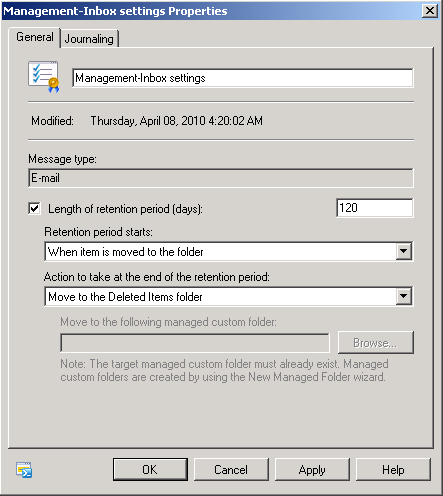
Click the General tab, shown in Figure 11, and
reconfigure managed content settings (for example, retention
period). The settings configurable on the General tab are the same
as those you specified when you configured managed content settings
earlier, for example, Name, Message Type, Length Of Retention Period
(Days), and so on.
Click the Journaling tab. This lets you amend the journaling
settings you configured earlier.
Click OK to confirm your changes and close the Properties dialog
box. Note that if you decide not to amend any settings, you will get
a warning to that effect.
You can also use the
Set-ManagedContentSettings EMS cmdlet to configure
managed content settings. The following command configures the managed
content setting “Management-Inbox settings” to apply a retention
age of 100 days, delete messages on expiration, and allow recovery.
Set-ManagedContentSettings -Identity "Management-Inbox settings" -RetentionEnabled
$true -AgeLimitForRetention 100 -RetentionAction DeleteAndAllowRecovery
Note:
The Set-ManagedContentSettings cmdlet amends
managed content settings you have already configured but cannot be used
to specify initial managed content settings for a managed folder. The
New-ManagedContentSettings cmdlet specifies the
initial managed content settings for a managed folder but cannot be used
to reconfigure existing managed content settings.
3.3. Creating and Reconfiguring a Managed Folder Mailbox Policy
You can use managed folder mailbox policies to create linked groups of
managed folders. When a managed folder mailbox policy is applied to
users’ mailboxes, all the managed folders that linked to the policy
are deployed in a single operation. You can create as many managed folder
mailbox policies as you need and add as many managed folders to each policy
as you want. However, each user mailbox can be linked to only one managed
folder mailbox policy.
If your organization has existing managed folders (including their
corresponding managed content settings), you can add them to the managed
folder mailbox policy as you create it. You can also add or remove managed
folders from a managed folder mailbox policy anytime after the policy is
created. After you assign a managed folder mailbox policy to a mailbox user,
the managed folders and settings are applied to the mailbox when the Managed
Folder Assistant (described earlier in this lesson) runs and processes the
mailbox.
Note:
THE ENTIRE MAILBOX MANAGED DEFAULT
FOLDER
Managed content settings that are applied to the Entire Mailbox folder
control every folder in the mailbox except managed custom folders (and
their subfolders) and managed default folders (and their subfolders). If
a default folder in a mailbox is not linked to a managed folder mailbox
policy, then the Entire Mailbox policy will apply to that default
folder.
To use the EMC to create a managed folder mailbox policy, carry out the
following procedure:
Open the EMC and expand the Console tree.
Under Organization Configuration, click Mailbox.
Click New Managed Folder Mailbox Policy in the Actions pane. This
starts the New Managed Folder Mailbox Policy Wizard.
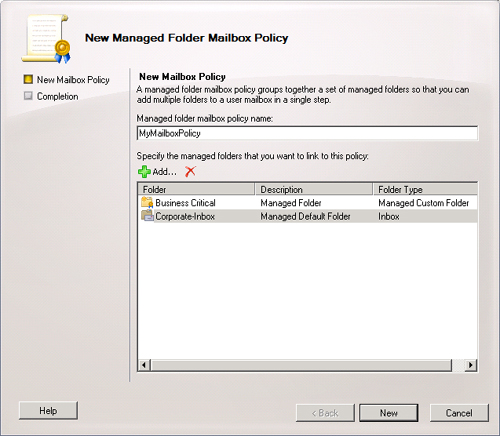
On
the New Mailbox Policy page, shown in Figure 12, in the
Managed Folder Mailbox Policy Name section, complete the Specify The
Managed Folders That You Want To Link To This Policy field. You can
click Add and use the Select Managed Folder dialog box to select the
managed folders that you want to link to the policy, or you can
select a managed folder from the list and then click the Remove
button (the red cross) to remove it from the policy. Note that only
one folder of a given default folder type (such as Inbox) can be
linked to a managed folder mailbox policy.
On the Completion page, review the status. If the status is
Completed, click Finish to close the wizard. Otherwise, click Back
to review your settings.
You can use the New-ManagedFolderMailboxPolicy EMS
cmdlet to create a managed folder mailbox policy. The following command
creates the managed folder mailbox policy MyManagedFolderMailboxPolicy and
links the Inbox managed default folder and the Business Critical managed
customer folder to the policy:
New-ManagedFolderMailboxPolicy -Name "MyManagedFolderMailboxPolicy" -ManagedFolderLinks
Inbox,"Business Critical"
When you have
created a managed folder mailbox policy, you might subsequently want to
amend it. You can use both the EMC and the EMS to reconfigure managed folder
mailbox policy settings. To use the EMC for this purpose, carry out the
following procedure:
Open the EMC and expand the tree in the Console pane.
Under Organization Configuration, click Mailbox.
Click the Managed Folder Mailbox Policies tab in the Result pane,
expand the appropriate managed folder, and then click the managed
folder mailbox policy you want to configure.
In the Actions pane, click Properties under the name of the
managed folder mailbox policy you want to configure. Note that the
Properties dialog box lets you amend a policy. You cannot use this
procedure to create one.
On the General tab, you can view or configure the following
managed folder mailbox policy settings:
Name
This unlabeled box lets you view and, if required,
modify the policy name.
Modified
This field displays the most recent date and time that
the managed folder mailbox policy was modified. You
cannot edit it.
Managed Folders That Are
Associated With This Policy
You can add or remove folders with the same procedure
that you used to specify folders when you set up the
policy.
You can also use the EMS to configure managed folder mailbox policies.
Note that you use the Set-ManagedFolderMailboxPolicy
cmdlet to amend an existing policy. If you want to create a new policy, you
need to use the New-ManagedFolderMailboxPolicy cmdlet.
The following command adds the Calendar managed default folder to the
managed folder mailbox policy MyMailboxPolicy:
Set-ManagedFolderMailboxPolicy -Identity MyMailboxPolicy -ManagedFolderLinks Calendar
3.4. Applying a Managed Folder Mailbox Policy to Users
When you apply a managed folder mailbox policy to user mailboxes, all the
managed folders linked to the policy are deployed in a single operation. As
with retention policies, you can assign only one managed folder mailbox
policy to a user mailbox. If you assigned a managed folder policy to a
mailbox that already had a managed folder policy (or a retention policy)
assigned, the new retention settings would override the existing
settings.
To use the EMC to
apply a managed folder mailbox policy to a user mailbox, carry out the
following procedure:
Open the EMC and expand the Console tree.
Under Recipient Configuration, click Mailbox.
In the Result pane, click the user mailbox to which you want to
apply the managed folder mailbox policy.
Click Properties in the Actions pane.
In the Properties dialog box, click the Mailbox Settings
tab.
Click Messaging Records Management and then click
Properties.
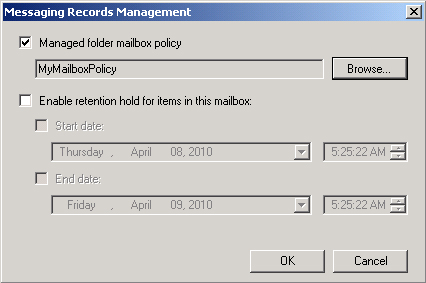
In the Messaging Records Management section, select the Managed
Folder Mailbox Policy check box. Click Browse.
In the Select Managed Folder Mailbox Policy dialog box, select the
managed folder mailbox policy that you want to apply to the mailbox
and then click OK.
The policy you select appears in the Messaging Records Management
dialog box, as shown in Figure 13. Click OK.
Click OK again to close the Properties dialog box. If you see a
Message box warning you that these settings are not compatible with
Outlook 2007 or earlier, click OK to close the box.
You can also use the Set-Mailbox EMS cmdlet to apply
a managed folder mailbox policy to a user mailbox. The following command
applies the mailbox policy MyManagedFolderMailboxPolicy to the Don Hall
mailbox:
Set-Mailbox -Identity "Don Hall" -ManagedFolderMailboxPolicy
MyManagedFolderMailboxPolicy