The flipside of backup is
restore, and carrying out restore operations is one of those things that
tends to peg the average administrator’s stress meter. In many cases,
restore operations are being carried out under duress and on a tight
timeline; given these facts, it makes sense that you should practice
them when you have the opportunity. As you repeatedly execute restore
operations, you get better, more efficient, and ultimately more
comfortable with them.
Many
administrators prefer Central Administration for restore operations
simply because it tends to offer a better end user experience compared
to command line operations. Selection of restore targets tends to be
much easier, quicker, and less error prone when done through a GUI.
Central Administration also provides quite a bit of feedback at each
step of a restore; this feedback can reassure and help in
troubleshooting measures if something does go awry.
Restoring a Full Farm
Full farm restoration is
usually associated with the disaster scenario you never want to find
yourself in. If you have to restore a complete SharePoint farm from a
catastrophic backup, something has gone very, very wrong.
Note
In SharePoint 2010, you
still cannot use a full farm restore to clone an entire farm. A
configuration-only restore can address this need to a large extent, but
it doesn’t cover all the configuration settings, properties, and items
of interest.
What a Full Farm Restore Really Is
First, you need to be aware of
one important fact: SharePoint’s full farm restore capabilities do not
support bare-metal recovery scenarios. In addition, there is one
prerequisite you must address before you can consider a full farm
recovery; specifically, the servers that are the target of the farm
recovery operation need to already be set up as a functional SharePoint
farm. The farm also needs to be running a version of SharePoint that
matches the version of the full farm catastrophic backup that you are
going to restore.
Did you catch
that part about needing a functional SharePoint farm? This may seem
highly contradictory; after all, why would you need to create a farm to
restore a farm? Doesn’t that defeat the purpose of a full farm restore
in the first place?
If you think about it for a
moment, you probably realize that the answer is “no.” Executing any sort
of restore operation from the Central Administration site requires a
functional farm. After all, Central Administration doesn’t run as a
stand-alone site. In addition, the SharePoint catastrophic backup and
restore APIs require some form of functional SharePoint instance to
execute against. Like Central Administration, the SharePoint APIs don’t
run in a vacuum.
In reality, a full farm
restore is more appropriately thought of as a “restore as much farm as
possible” operation. A full farm restore is intended to restore Service
Applications, content, and as much portable configuration as possible
while leaving the target restore farm intact. Full farm restores are not
intended to completely overwrite every aspect of the farm they target.
This may also help you
understand why a full farm restore doesn’t restore the SharePoint farm
configuration or Central Administration content databases. Overwriting
the configuration database wholesale effectively destroys the target
farm, whereas overwriting the Central Administration content database
disrupts SharePoint because the Central Administration site is hosting
the restore operation.
Executing the Full Farm Restore
To perform a catastrophic
farm restore from a full farm catastrophic backup that you have, ensure
that you are logged into Central Administration with an account that is a
member of the Central Administration server’s local Administrators
group, and execute the following series of steps:
1. | Open
a browser and navigate to the Central Administration site.
|
2. | Depending
on the configuration of both the SharePoint farm and your client
browser, you may be prompted to log into the Central Administration
site. If you are so prompted, supply both your user name and password.
In most cases, your user name and password are your domain login
credentials.
|
3. | When
the Central Administration site loads, navigate to the Backup and
Restore page by clicking the Backup and Restore link in the Quick Launch
menu along the left side of the page.
|
4. | Click
the Restore from a Backup link. It is the second link under the Farm
Backup and Restore section in the main zone of the page, and it takes
you to the backup selection page for restore operations.
|
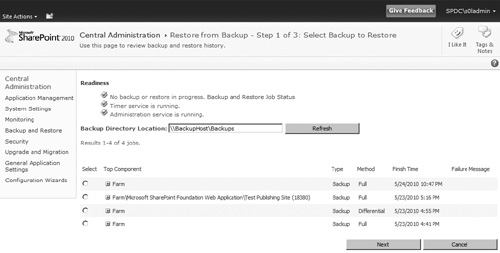
5. | The Backup and Restore History page appears as seen in Figure 1.
The Backup Directory Location text box initially contains the farm’s
default backup file location, and the backup sets that are stored at the
location specified are shown below the text box in order from the most
recent backup set to the oldest backup set.
Tip
If you don’t like all the
clicking around, you can navigate directly to the backup selection page
if you have the correct URL. For the fictitious farm being used in this
example, the URL is http://spdev:18080/_admin/BackupHistory.aspx?restore=1&filter=1. Combine your Central Administration site’s protocol and host name information with the /_admin/Backup.aspx?restore=1&filter=1 path to construct the appropriate endpoint URL for your farm. Omitting the ?restore=1&filter=1
query string changes the look of the page slightly, but you are still
able to perform a restore operation, albeit in a slightly different
fashion. Leaving off the query string is also equivalent to simply
clicking the View Backup and Restore History link from the Backup and
Restore page.
|
6. | Ensure
that the Backup Directory Location points to the location containing
the catastrophic backup set you want to use for the restoration. If you
change the location in the text box, click the Refresh button to
populate the page with a list of the backup sets present at the new
location.
|
7. | Locate
the catastrophic backup set you want to use for the farm restoration in
the list that appears below the Backup Directory Location text box. If
you have a large number of backup sets in the location selected, you may
find it easier to locate the desired backup set by reviewing some of
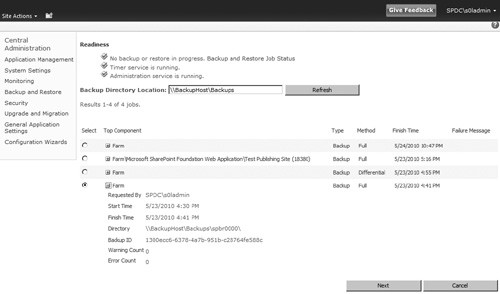
the details for each set. Figure 2 shows a full farm catastrophic backup with expanded details that has been selected for restore.
|
8. | Once
you have selected the desired catastrophic backup set, click the Next
button to advance to the Select Component to Restore page.
|
9. | The Select Component to Restore page appears.
The page displays the hierarchy of components that were available for
backup in your farm when the catastrophic backup set was created.
Components that you can select for the restore operation you are
conducting have check boxes next to them. Assuming that the backup set
you selected on the previous page was from a full farm catastrophic
backup, all components starting at the farm level and proceeding down
the hierarchy should be available for selection. If the backup set that
you selected wasn’t a full farm catastrophic backup, only the subset of
farm components that were captured in the backup are selectable for
restore.
|
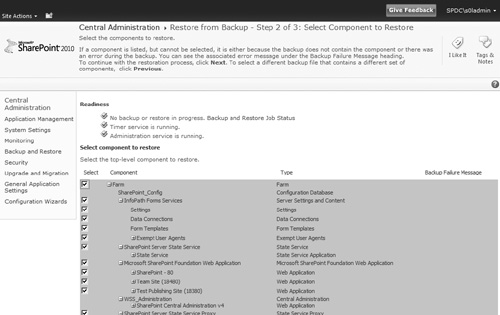
10. | Select
the check box next to the Farm node in the component hierarchy to
select the entire farm for restore. All objects that are selected for
restore are shaded, as shown in Figure 3.
When you have reviewed the selected components and determined that you
are ready to continue, click the Next button at the bottom of the page.
|
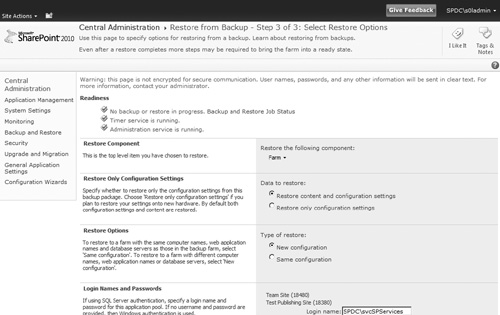
11. | The Select Restore Options page appears, as shown in Figure 4.
Don’t be alarmed if you begin scrolling down the page and find it to be
long and intimidating. If you are performing a full farm restore and
want to bring your farm back to the state it was in at the time the
backup set was created, most of the settings on the page can be left as
is. The first thing you need to do, though, is change the Type of
Restore selection from New Configuration to Same Configuration. Making
this change displays a dialog box warning you about component overwrites
that occur during Same Configuration restores. Click the OK button to
accept the warning and move on.
|
12. | The
second task you must perform on the Select Restore Options page is to
verify each of the application pool login names in the Login Names and
Passwords section. You must also supply the password for each of the
accounts associated with an application pool before proceeding. The
number of accounts you must verify and supply passwords for varies
according to the number of application pools that were established for
your content Web applications and SharePoint’s own Service Applications.
|
13. | If
you wanted to perform a configuration-only restore, the Data to Restore
option could be changed from Restore Content and Configuration Settings
to Restore Only Configuration Settings. Since the restore in this
example is a full farm recovery, leave the Restore Content and
Configuration Settings option selected.
|
14. | The
text boxes in the New Names section are associated with the farm
components that are being restored; frankly, there tend to be a lot of
them with a full farm restore. For a Same Configuration restore, these
text boxes are disabled. If you needed to change properties for one or
more of the backup components during the restore operation, a New
Configuration Type of Restore (specified in step 11) could be selected.
Specifying a New Configuration restore allows you to do things like
change the SQL Server to which databases are restored, change database
names, alter service names, and more. Because this example is a full
farm restore using the Same Configuration, though, the text boxes remain
disabled.
|
15. | When
you have verified your settings on the Select Restore Options page and
ensured that no red exclamation marks appear in the Readiness area of
the page, click the Start Restore button at the bottom of the page.
SharePoint proceeds to create a timer job instance,
configure it with the restoration parameters you specified, and
schedule the job for one-time execution. It then redirects your browser
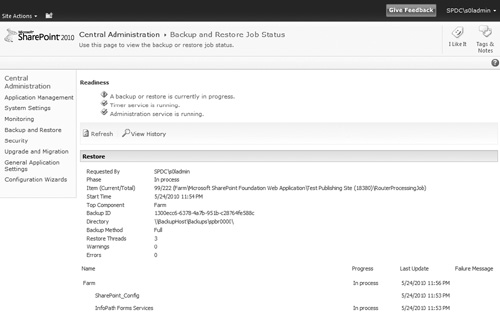
to the Backup and Restore Job Status page. Figure 5 shows the status page after the restore operation has gotten underway.
|
16. | The
Backup and Restore Job Status page refreshes every 30 seconds so that
you can track the execution of the restore operation. When the restore
operation has completed, you can review the status of each component
that was restored on the status page. If additional detail is desired,
you can review the log file that is generated in the specific folder of
the catastrophic backup set that was used for the restore operation. The
file containing additional restore detail is named sprestore.log.
|
17. | Review
your farm’s services and Service Applications following the restore to
determine if you need to start one or more of them. To do this, click on
the Application Management link in the Quick Launch on the left side of
the page. When the Application Management page appears, click on the
Manage Services on Server link under the Service Applications section in
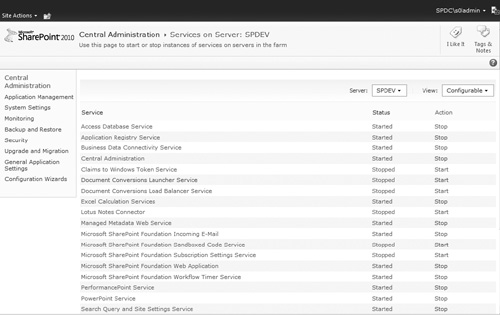
the main page area. This opens the Services on Server page, as shown in
Figure 6.
If any of the listed services or Service Applications should be running
but aren’t, click on their associated Start links under the Action
column to start them. At the same time, be aware that a limited subset
of the services and Service Applications may require some manual
reconfiguration for properties and settings that could not be restored
from the catastrophic backup set. Probably the most common example
of such is the Secure Store Service Application. Before it functions
following a restore, you must supply to the Secure Store Service
Application the passphrase that was active (and manually captured) when
the backup set was created. Without the pass-phrase, you cannot decrypt
and use credentials stored by the Service Application.
Note
The Services on Server page in Figure 6
displays services for only one server at a time. If your farm has
multiple SharePoint servers, you need to review and restart services and
Service Applications on potentially each server in the farm. You can
use the Server drop-down box just above the Status column to ascertain
and select the active server.
|
18. | Finally,
reestablish any trust relationships you need if your farm is publishing
services for other SharePoint 2010 farms to consume or is consuming
services from another farm. Note that establishing trusts is beyond the
scope of the farm restore operation being conducted.
|
The process of restoring a
farm from backup can take substantial time, and much of that time is
spent in step 16. Although you don’t need to wait on the status page
because the restore operation is being conducted in the background, you
are somewhat limited in other activities that you can conduct across the
farm. After all, the farm is in the process of changing quite a bit
while the
restore is being performed. As a rule of thumb, it’s best to avoid
making changes and conducting operations throughout the farm until the
restore has finished to avoid potential restore collisions and issues.
Restoring a Content Database for Subsequent Unattached Recovery Operations
You can restore
individual content components from a catastrophic backup set using the
same basic steps that were outlined for a full farm restore. The key for
such restores is to select a specific component or group of components
rather than the entire farm in step 9 of the walk-through.
A slight variation on the
component restore theme is created when you want to restore a content
database to leverage SharePoint 2010’s unattached content database
recovery capabilities. In this scenario, the only component to restore
is an individual content database. The twist, though, is that you cannot
use the Same Configuration option during the restore. Doing so would
overwrite the existing production database. Instead, you need to restore
the content database using the New Configuration option to change the
name of the database.
In the example that follows, a
content database for the Test Publishing Site (18380) Web application
is restored using a different database name. Before continuing, ensure
that you are logged into Central Administration with an account that is a
member of the local Administrators group on the server that houses the
Central Administration site:
Execute
steps 1 through 7 of the full farm restore walk-through. Execution of
these steps leaves you in a position to select the backup set that is
used for the restore operation.
Select
the catastrophic backup set that contains the desired version of the
publishing site’s content database. In the case of the backup sets
displayed in Figure 9.31, the backup set with a top component of Farm\Microsoft SharePoint Foundation Web Application\Test Publishing Site (18380) is selected.
Click
the Next button, and the Select Component to Restore page appears. Then
select for restore the content database for the Test Publishing Site
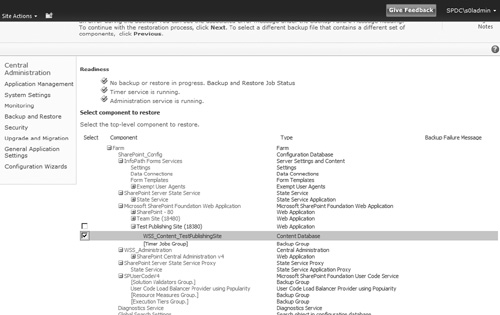
(18380) Web application, as shown in Figure 7.
One detail worth noting in this example is that only the Test
Publishing Site (18380) component and its subcomponents are available
for selection. This is because the Test Publishing Site (18380) Web
application was the only component selected for catastrophic backup when
the backup set was generated. Even though the entire farm component
hierarchy is displayed, you cannot restore components if they weren’t
actually backed up and part of the backup set.
Click
the Next button at the bottom of the page to advance to the Select
Restore Options page. Compared to the Select Restore Options page that
appeared in the case of the previous full farm restore walk-through, the
current page is relatively uncluttered. Because only a single content
database has been selected for restore, only that database’s limited set
of configuration items is available for modification.
The
intention of this example is to restore the content database as a copy
of the current production database, so ensure that the New Configuration
option is selected as the Type of Restore.
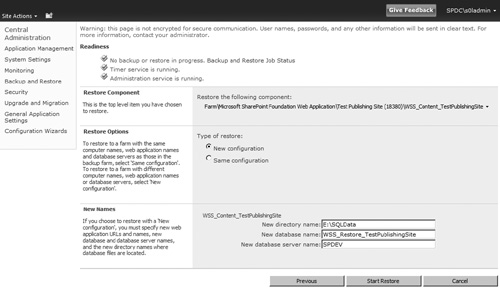
The
New Names section gives you the option of changing the directory name,
database name, and database server for the content database during
restoration. In this example, only the name of the content database is
changed to WSS_Restore_TestPublishing-Site, as shown in Figure 8.
Both the target SQL Server and the local directory on the SQL Server
where the database is going to be created remain the same.
Click
the Start Restore button at the bottom of the page. This results in the
creation, configuration, and scheduling of a one-time restore job
instance to carry out the selected restore operation. You are then taken
to the Backup and Restore Job Status screen.
The
execution of the restore job may take minutes or longer to execute, and
the Backup and Restore Job Status screen refreshes every 30 seconds to
keep you apprised of the progress being made.
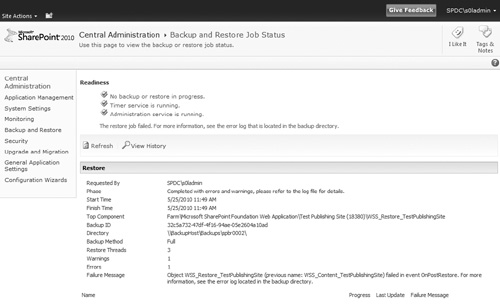
Somewhat counterintuitively, the job completes but indicates failure, as shown in Figure 9.
If you scroll down the page to locate the actual Failure message, you
see that the failure was caused by SharePoint’s inability to attach the
restored content database
to the farm. This is expected behavior; after all, the restored content
database has the same identifier as an existing production database.
Two content databases with the same identifier cannot be attached to one
SharePoint farm—that’s why SharePoint 2010 comes with unattached
content database recovery capabilities.
Even
though you can’t attach the content database to the SharePoint farm, it
exists within SQL Server and is available for use as WSS_Restore_TestPublishingSite.
To continue with an export of content from the database, use the new
database name with the Unattached Content Database Data Recovery and
Exporting Content walk-throughs described earlier.
Restoring a Site Collection or Exported Content
Unfortunately, no mechanism
exists within Central Administration to restore a site collection from a
backup file (commonly with a .bak extension) or import a content migration package (typically one or more files with a .cmp extension) that was generated through a content export operation.