5. Managing Administrator Audit Logging
Administrator audit logging enables you to create a log entry each time an EMS
cmdlet that you specify is run. The log entries tell you which cmdlet was run,
which parameters were used, who ran the cmdlet, and what objects were affected.
When you keep a log of the cmdlets that are run, you can attribute a change to
the person who made it, augment your change logs with detailed records of
changes, and comply with regulatory requirements and requests for
discovery.
Changes in audit log configuration are refreshed every 60 minutes on computers
that have the EMS open at the time a configuration change is made. If you want
to apply changes immediately, close and then open the EMS on each
computer.
5.1. Specifying the Cmdlets to Audit
By default, audit logging creates a log entry for every cmdlet that runs.
If you are enabling audit logging for the first time and want to audit all
cmdlets, you do not have to change the cmdlet audit list. If you previously
specified cmdlets to audit and now want to audit all cmdlets, you would
enter the following command:
Set-AdminAuditLogConfig -AdminAuditLogCmdlets *
If you want to specify a list of cmdlets to
audit, you can use the AdminAuditLogCmdlets parameter of the
Set-AdminAuditLogConfig cmdlet. You can provide
single cmdlets, cmdlets with wildcard characters (*), or a mix of both. For
example the following command specifies all cmdlets that start with
“Set-Transport,” all cmdlets that contain
“Management,” all cmdlets that end with
“TransportRule,” and the
New-MailboxDatabase cmdlet:
Set-AdminAuditLogConfig -AdminAuditLogCmdlets Set-Transport*,*Management*,*TransportRule,
New-MailboxDatabase
5.2. Specifying the Parameters to Audit
By default, audit logging creates a log entry for every parameter of every
cmdlet that it audits. If you have previously specified parameters to audit
and now want to audit all parameters, you would enter the following
command:
Set-AdminAuditLogConfig -AdminAuditLogParameters *
You can specify which parameters you want to audit by using the
AdminAuditLogParameters parameter of the
Set-AdminAuditLogConfig cmdlet. You can provide
single parameters, parameters with wildcard characters (*), or a mix of
both. Each entry in the list is separated by commas. For example, the
following command specifies that you want to audit all parameters that start
with “Custom,” contain “Address,” or end with
“Region,” in addition to all instances of the Database
parameter:
Set-AdminAuditLogConfig -AdminAuditLogParameters Custom*,*Address*,*Region,Database
The command must include at least one parameter that exists on at least
one cmdlet you have specified for auditing. Otherwise, the audit log entry
will not be created.
5.3. Specifying the Auditing Mailbox
You can use the AdminAuditLogMailbox parameter of the
Set-AdminAuditLogConfig cmdlet to specify the SMTP
address of the mailbox where you want to store administrator audit logs. The
SMTP address should be a mailbox in your Exchange 2010 organization. For
example, the following command stores the audit logs in the mailbox with the
SMTP address [email protected]:
Set-AdminAuditLogConfig -AdminAuditLogMailbox [email protected]
5.4. Enabling and Disabling Administrator Audit Logging
If you have not previously configured administrator audit logging, you
need to specify the cmdlets and parameters you want to be audited (or accept
the defaults) and to specify an auditing mailbox before you enable
administrator audit logging.
You can enable administrator audit logging by setting the
AdminAuditLogEnabled parameter of the
Set-AdminAuditLogConfig cmdlet to $True. To disable
administrator audit logging after it has been enabled, you can set the same
parameter to $False. The following command enables administrator audit
logging:
Set-AdminAuditLogConfig -AdminAuditLogEnabled $True
The
following command disables administrator audit logging:
Set-AdminAuditLogConfig -AdminAuditLogEnabled $False
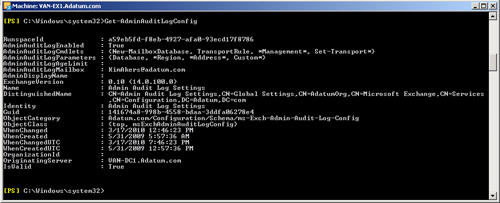
5.5. Viewing Administrator Audit Logging Settings
You can view the administrator audit logging settings that you have
configured for your organization by entering the following command:
Get-AdminAuditLogConfig
Figure 5 shows the
output of this command for the configuration settings discussed earlier in
this section.
6. Managing Routing Table Logging
Routing table logging records a snapshot of the routing table used by a
computer running Microsoft Exchange Server 2010 that has the Hub Transport or
Edge Transport server role installed. The routing table is used to route
messages to their destinations. The routing table log is recorded periodically
after a fixed time interval, whenever the Microsoft Exchange Transport service
is started, and after a routing configuration change is detected. You can use
the routing table log to help troubleshoot mail flow and routing issues.
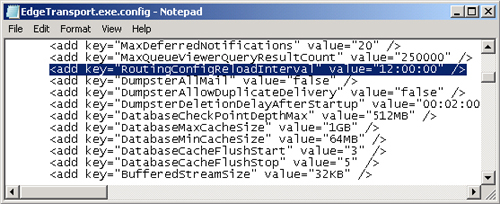
You can control the automatic routing table recalculation interval in the
EdgeTransport.exe.config application configuration file. The routing table
recalculation interval controls how frequently the routing table is
automatically recalculated and how frequently the routing table is logged. As shown in Figure 6, the default interval
is 12 hours. However, recalculation may occur sooner than scheduled if one of
the other trigger conditions (for example, the Microsoft Exchange Transport
service starts) occurs.
You can perform all other routing table log configuration tasks using the
Set-TransportServer EMS cmdlet. For example, the
following command sets the maximum size of the routing table log directory to 70
MB (the default is 50 MB) on the Hub Transport server VAN-EX2:
Set-TransportServer -Identity VAN-EX2 -RoutingTableLogMaxDirectorySize 70MB
The default maximum age for the routing table log files is seven days. You can
change this value using the RoutingTableLogMaxAge parameter of the
Set-TransportServer EMS cmdlet. The valid input range
for this parameter is 00:00:00 through 24855.03:14:07. Setting the value of the
RoutingTableLogMaxAge parameter to 00:00:00 prevents the automatic removal of
routing table log files because of their age. The following command changes the
maximum age of a routing table log file to 14 days on the Hub Transport server
VAN-EX2:
Set-TransportServer -Identity VAN-EX2 -RoutingTableLogMaxAge 14.00:00:00
By default, the routing table log files exist in the directory C:\Program
Files\Microsoft\Exchange Server\V14\TransportRoles\Logs\Routing. You can change
this path using the parameter RoutingTableLogPath. However, the directory must
be local to the Exchange Server 2010 computer.
The following command changes the location of the routing table log to
C:\Logfiles\RoutingTable on the Hub Transport server VAN-EX2:
Set-TransportServer -Identity VAN-EX2 -RoutingTableLogPath C:\Logfiles\RoutingTable
By default, Exchange Server 2010 uses circular logging to limit the routing
table logs based on file size and file age to help control the hard disk space
used by the log files.
6.1. Viewing Routing Table Logs
You can use the Routing Log Viewer in the EMC to view and search routing
table logs. You access this tool by clicking Toolbox on the EMC Console,
clicking Routing Log Viewer, and clicking Open Tool on the Actions pane. On
the File menu, you click Open Log File, then either
specify a Transport server or click Browse Local Files and navigate to the
routing table log directory (by default, C:\Program Files\Microsoft\Exchange
Server\V14\TransportRoles\Logs\Routing). You can then select a file and
click Open.
The Routing Log Viewer has four tabs:
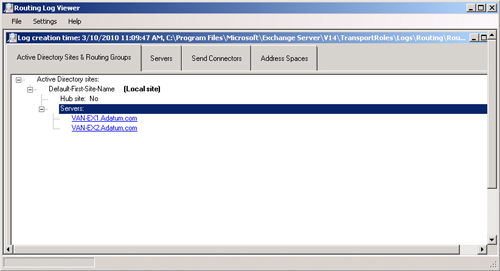
On the Active Directory Sites & Routing Groups tab, shown in Figure 7, you can obtain a
listing of Active Directory sites and routing groups in the Exchange
organization. Only those Active Directory sites that have Exchange servers
are listed. If a site is enabled as a hub site, this is indicated on this
tab. The server names have hyperlinks to other tabs.
The Servers tab, shown in Figure 8, displays a list
of all Exchange servers in the Exchange organization. The local server where
the routing logs were generated is identified. The following information is
generated for each server when you access the Servers tab:
The distinguished name (DN) of the server
The server’s proximity to the local server
The Active Directory site or routing group that the server belongs
to
The server roles installed, such as Mailbox or Hub
Transport
The total AD cost
The message databases available
The Legacy DN
Whether you are using Exchange Server 2007 or a subsequent version
(in this case Exchange Server 2010)

Some properties, such as Site, have hyperlinks that link to their
counterpart in related tabs.
The Send Connectors tab, shown in Figure 9,
displays a list of all SMTP connectors, foreign connectors, and routing
group connectors available in the Exchange organization. Legacy gateway
connectors on legacy servers are also listed.
Information for each connector type includes some or all of the
following:
Name
GUID
DN
Proximity to the local server
Maximum message size of a message that passes through a connector
(the default is unlimited)
Total site cost to reach the connector
Whether this is scoped connector
Address spaces
Whether DNS routing is enabled
What smart hosts are defined
If the connector uses connected routing groups, this information is
available on the Connected Domains property. For foreign connectors, the
value specified by the drop directory (not shown in the figure) is also
provided.
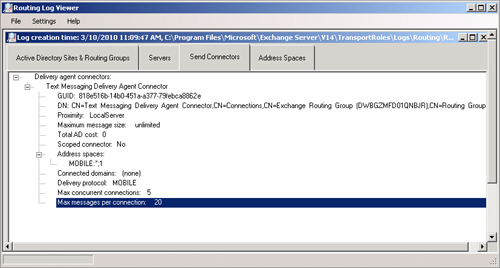
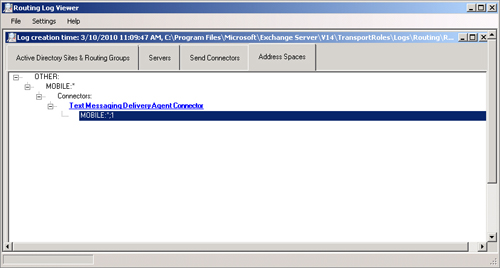
The Address
Spaces tab provides a list of all address spaces in the Exchange
organization, separated by the address type, such as SMTP. Each address
space lists all the associated connectors with their cost. As Figure 10 demonstrates, a small, isolated test
network does not provide many address spaces. The Test Messaging Delivery
Agent Connector, shown on the tab in Figure 10,
provides a hyperlink that links to its properties on the Send Connectors
tab.
You can use the information in the Routing Log Viewer to, for example,
find the lowest cost path to a site or to find the preferred connector for a
specific address.
6.2. The Structure of the Routing Table Log Files
The naming convention for the routing table log files is
RoutingConfig#[email protected]. For example, a routing table log
file may be named RoutingConfig#1@03_20_2010 10_52_06.xml. This file was
created on March 20, 2010, at six seconds after 10:52 AM.
The routing table log is a snapshot of the routing table stored in memory.
Routing table log files are text files that contain data in XML format. They
contain a large amount of information. However, their actual file size
depends on the size and complexity of the Exchange organization.
The routing table log is composed of several sections. Each section
identifies a particular element of the Exchange organization, such as the
routing table identity, Exchange topology, connectors, address spaces,
Active Directory site, and so on. The information defined in one section is
connected to the information defined in another section to build a complete
routing table for the whole Exchange organization.
