7. Specifying Diagnostic Logging Levels
Protocol logging, described earlier in this lesson, has only two logging
levels, Verbose and None. However, diagnostic logs such as Agent logs can be
configured with one of five logging levels. The logging level for each Exchange
process determines which events are written to the Application event log in
Event Viewer. Event sources can include the MSExchangeAL service, the
MSEXchangeTransport service, and so on.
Changing the diagnostic logging level for a given process may cause additional
events to be written to the event log, depending on the actions being performed
by the current process and the Event Viewer logging levels associated with a
specific diagnostic logging level. Table 2 shows the relationship
between Exchange diagnostic logging levels and Event Viewer logging levels. The
default logging level is Lowest.
Table 2. Exchange Diagnostic Logging Levels and Events Logged
|
Logging Level
|
Events Logged
|
|---|
|
Lowest
|
Critical events, error events, and events with a logging
level of zero (0)
|
|
Low
|
Events with a logging level of 1 or lower
|
|
Medium
|
Events with a logging level of 3 or lower
|
|
High
|
Events with a logging level of 5 or lower
|
|
Expert
|
Events with a logging level of 7 or lower
|
To use the EMC to set logging
levels, carry out the following procedure:
Open the EMC and expand the tree on the Console pane.
Under Server Configuration, click Mailbox. On the Result pane, click
the server you want to configure.
On the Actions pane, click Manage Diagnostic Logging
Properties.
On the Manage Diagnostic Logging Properties Wizard page, expand the
Exchange service for which you want to change the logging level (for
example, MSExchangeAL). Click the process that you want to configure
(for example, Account Management).
Select the logging level (for example, High).
Click Configure. (Note that you can return to the default logging
levels by selecting Reset All Services To Default Logging Levels and
then clicking Configure.)
If the status on the Completion page indicates that the wizard
completed successfully, click Finish to close the wizard. Otherwise,
click Back and review your settings.
You can also use the EMS to examine and set logging levels. The following
command identifies all processes and their current logging levels:
Get-EventLogLevel
This command generates a large amount of information, and you may find it
convenient to redirect its output into a text file.
The following command changes the MSExchangeTransport\Agents logging level to
High:
Set-EventLogLevel -Identity "MSExchangeTransport\Agents" -Level High
Note:
RETURN LOGGING LEVELS TO THEIR DEFAULT
SETTINGS
Microsoft recommends that you return logging levels to their default
settings after completing your troubleshooting activities.
8. Managing Message Tracking
Message tracking records the SMTP transport activity of all messages
transferred to and from a Hub Transport, Edge Transport, or Mailbox server. You
can use message tracking logs to analyze mail flow, generate reports, and locate
problems.
By default, message tracking is enabled on Hub Transport, Edge Transport, and
Mailbox servers. You can use the EMC to disable or enable message tracking on
Hub Transport and Edge Transport servers but not on
Mailbox servers. You can use the EMS to disable or enable message tracking for
all three server roles. For example, to use the EMC to enable or disable message
tracking on a Hub Transport server, carry out the following procedure:
In the Console tree, expand Server Configuration and click Hub
Transport. In the Actions pane, click the Properties link directly under
the server name.
Click the Log Settings tab on the Properties dialog box. This tab is
shown in Figure 11.
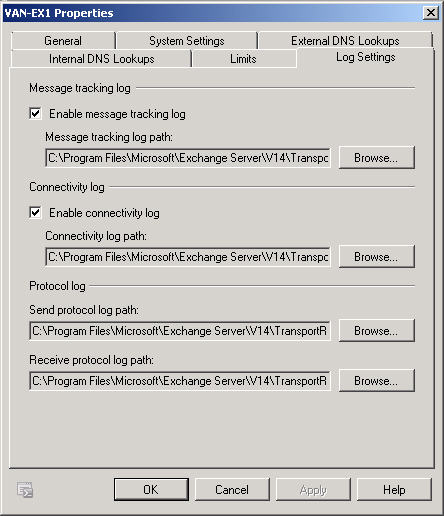
In the Message Tracking Log section, select or clear the Enable
Message Tracking check box as appropriate.
You can use the EMS to enable or disable message tracking on Edge Transport,
Hub Transport, and Mailbox servers. For example, the following command disables
message tracking on the Hub Transport server VAN-EX2:
Set-TransportServer -Identity VAN-EX2 -MessageTrackingLogEnabled:$false
The following command enables message tracking on the Mailbox server VAN-EX1
(assuming this has previously been disabled):
Set-MailboxServer -Identity VAN-EX1 -MessageTrackingLogEnabled:$true
8.1. Configuring Message Tracking Log Location
By default, message tracking logs are
located in the folder C:\Program Files\Microsoft\Exchange
Server\V14\TransportRoles\Logs\MessageTracking. You can use the EMC to
reconfigure the message tracking log location on Hub Transport and Edge
Transport servers but not on Mailbox servers. You can use the EMS to
reconfigure the message tracking log location for all three server roles.
For example, to use the EMC to reconfigure the message tracking log location
on a Hub Transport server, carry out the following procedure:
Open the EMC and access the server Properties dialog box, as
described in the previous procedure. This tab was shown in Figure 10-33.
In the Message Tracking Log section, click Browse next to Message
Tracking Log Path.
In the Browse For Folder window, browse to the new location where
you want to store the message tracking log files. If you want to
create a folder, select a parent folder, click Make New Folder, and
then type the name of the new folder.
Click OK to close the Browse For Folder window.
You can use the EMS to reconfigure the message tracking log location on
Edge Transport, Hub Transport, and Mailbox servers. For example, the
following command changes the message tracking log location on the Hub
Transport server VAN-EX2 to C:\Logfiles\MessageTracking:
Set-TransportServer -Identity VAN-EX2 -MessageTrackingLogPath C:\Logfiles\
MessageTracking
The following command changes the message tracking log location on the
Mailbox server VAN-EX1 to C:\Logfiles\MessageTracking:
Set-MailboxServer -Identity VAN-EX1 -MessageTrackingLogPath C:\Logfiles\MessageTracking
Note:
DISABLING MESSAGE TRACKING
If you set the value of the MessageTrackingLogPath parameter to $null,
this effectively disables message tracking. However, if you set the
value of the MessageTrackingLogPath parameter to $null when the value of
the MessageTrackingLogEnabled attribute is $true, this generates event
log errors. As a result, Microsoft does not recommend this procedure.
The preferred method of disabling message tracking is to use the
MessageTrackingLogEnabled parameter with the
Set-TransportServer cmdlet or the
Set-MailboxServer cmdlet.
8.2. Configuring the Size of Individual Message Tracking Log Files
By default, the maximum size for each message tracking log file is 10 MB.
When a message tracking log file reaches its maximum size, Exchange Server
2010 opens a new message tracking log file. This process continues until
either the message tracking log directory reaches its specified maximum size
or a message tracking log file reaches its specified maximum age. After the
maximum size or age limit is reached, circular logging deletes the oldest
message tracking
log files. You can use the EMS but not the EMC to change the maximum size of
each message tracking log file on Edge Transport, Hub Transport, and Mailbox
servers.
To change the maximum size of each message tracking log file on Hub
Transport and Edge Transport servers, you can use the
MessageTrackingLogMaxFileSize parameter of the
Set-TransportServer EMS cmdlet. For example, the
following command changes maximum size of each message tracking log file on
the Hub Transport server VAN-EX2 to 15 MB:
Set-TransportServer -Identity VAN-EX2 -MessageTrackingLogMaxFileSize 15MB
To change the maximum size of each message tracking log file on Mailbox
servers, you can use the MessageTrackingLogMaxFileSize parameter of the
Set-MailboxServer EMS cmdlet. For example, the
following command changes the maximum size of each message tracking log file
on the Mailbox server VAN-EX1 to 20 MB:
Set-MailboxServer -Identity VAN-EX1 -MessageTrackingLogMaxFileSize 20MB
8.3. Configuring the Maximum Size of the Message Tracking Log
Directory
By default, the maximum size of the message tracking log directory is 250
MB. Circular logging deletes the oldest message tracking log files when
either a message tracking log file reaches its specified maximum age or the
message tracking log directory reaches its specified maximum size. You can
use the EMS but not the EMC to reconfigure the maximum size of the message
tracking log directory on Edge Transport, Hub Transport, and Mailbox
servers.
For example, the following command changes the maximum size of the message
tracking log directory to 300 MB on Hub Transport server VAN-EX2:
Set-TransportServer -Identity VAN-EX2 -MessageTrackingLogMaxDirectorySize 300MB
The following command changes the maximum size of the message tracking log
directory to 400 MB on Mailbox server VAN-EX1:
Set-MailboxServer -Identity VAN-EX1 -MessageTrackingLogMaxDirectorySize 400MB
8.4. Configuring the Maximum Age of Message Tracking Logs
The maximum age for an individual message tracking log file is 30 days by
default. Circular logging deletes the oldest message tracking log files if
the message tracking log directory reaches its specified maximum size or a
message tracking log file reaches its specified maximum age. You can use the EMS but
not the EMC to reconfigure the maximum age for message tracking log files on
a Hub Transport, Edge Transport, or Mailbox server.
For example, to change the maximum age of message tracking logs on the Hub
Transport server VAN-EX2 to 25 days, you would enter the following
command:
Set-TransportServer -Identity VAN-EX2 -MessageTrackingLogMaxAge 25.00:00:00
To change the maximum age of message tracking logs on the Mailbox server
VAN-EX1 to 40 days, you would enter the following command:
Set-MailboxServer -Identity VAN-EX1 -MessageTrackingLogMaxAge 40.00:00:00
8.5. Configuring Message Subject Logging
By default, the subject line of an SMTP email message is stored in the
message tracking log. However, this setting can prove contentious. Some
users might not want you to be able to see the subjects of their email
messages, while others might ask you to find a message that they can
identify only by its subject. You may be required to disable message subject
logging to comply with increased security or privacy requirements. This is a
managerial decision, and you need to verify your organization’s policy
about revealing subject-line information. You can enable or disable message
subject logging on individual servers (but not on an individual user basis).
However, organizational policy typically dictates that you use the same
setting throughout an Exchange organization.
You can use the EMS but not the EMC to enable or disable message subject
logging in message tracking logs on Edge Transport, Hub Transport, and
Mailbox servers. For example, to disable message subject logging in message
tracking logs on the Hub Transport server VAN-EX2, you would enter the
following command:
Set-TransportServer -Identity VAN-EX2 -MessageTrackingLogSubjectLoggingEnabled $false
To enable message subject logging in message tracking logs on the Mailbox
server VAN-EX1 (assuming it had previously been enabled), you would enter
the following command:
Set-MailboxServer -Identity VAN-EX1 -MessageTrackingLogSubjectLoggingEnabled $true
Note:
It is important to know about message subject logging because it can
be a contentious issue in a production organization.
8.6. Viewing Message Activity and Tracking Messages
The Tracking Log Explorer, part of the
Troubleshooting Assistant, provides details of all message activity as
messages are transferred to and from an Exchange server that has the Hub
Transport server role, the Mailbox server role, or the Edge Transport server
role installed. Exchange servers that have the Client Access server role or
Unified Messaging server role installed (and none of the other three roles)
do not have message tracking logs.
You access the
Tracking Log Explorer by opening the EMC, clicking Toolbox, and
double-clicking Tracking Log Explorer. The Welcome screen is shown in Figure 12. By default, the
RECEIVE EventID is enabled with a 10-minute interval specified, depending on
when you opened the tool. You can specify parameters shown in the figure,
such as Recipients, Sender, Server, and so on. If message subject logging is
enabled, you can also specify Subject.
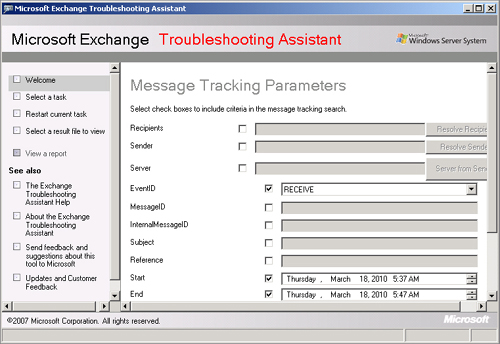
You can use the EMS to locate all messages with a RECEIVE EventID (there
are likely to be a lot of them, so you would probably specify other
parameters, such as Start, End, and Sender). The command to access the same
messages as would be listed by the settings displayed in Figure 10-34 is as
follows:
Get-MessageTrackingLog -EventID RECEIVE -Start 3/18/2010 5:37:00 AM -End 3/18/2010
5:47:00 AM
When you have specified all your search parameters on the Welcome screen,
you click Next. An Executing Message Tracking Request screen appears,
followed by a Message Tracking Results screen. If you want to repeat the
request but change the search parameters, you can click Restart Current Task
on the left pane, respecify your settings, and repeat the task. If the
request highlights message tracking problems, you can select a symptom and
obtain further information.
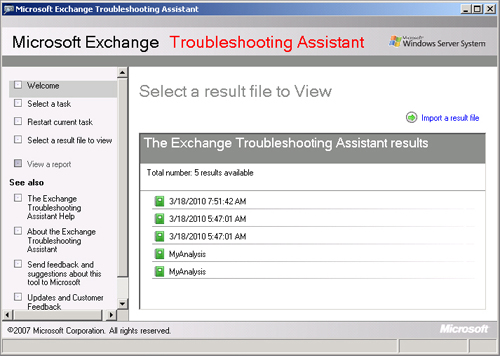
When the Tracking Log Explorer successfully completes a tracking request,
a result file is generated. You can view the results of previous tracking
requests by clicking Select A Result File To View on the left pane. This
aborts any tasks currently running (you receive a warning and click OK) and
accesses the Select A Result File To View screen, shown in Figure 13.
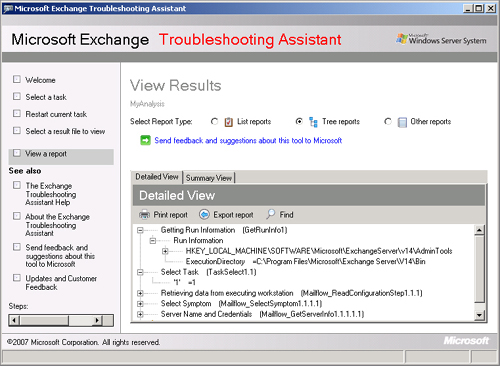
You can then double-click a report and either export it to a file for
further analysis by reporting software or click View Results. The View
Results screen lets you view List Reports, Tree Reports, or Other Reports. A
Tree Report is illustrated in Figure 14. You can export
the report, print it, or find a text string in the report.