Encrypted email communications can be sent by
manually configuring certificates, or by enabling the autoenrollment of
certificates for emails that are issued to users via Group Policy. Email
encryption can be automated to the point where users are effectively
issued certificates, the certificates are automatically installed, and
the user can immediately begin to send and receive messages using
encrypted communications.
If you have completed
the following steps for the autoenrollment of certificates for a user,
the certificate will automatically work for Exchange Outlook encryption.
Note that Exchange Server
2010 provides opportunistic TLS encryption, which essentially means that
the Exchange Server 2010 servers encrypt mail with outside
organizations if possible. The requirement is that the outside
organization supports the STARTTLS command. This is described in RFC
3207, “SMTP Service Extension for Secure SMTP over TLS,” and is
supported by a number of mail systems in addition to Exchange Server
2010. This encrypts only email between the servers, leaving the messages
in the users’ inboxes unencrypted. This protects the confidentiality of
the email while traveling over the Internet.
Note
Opportunistic TLS
encryption and the support for the STARTTLS command have been a huge
leap forward in the security of intercompany email communications. In
the past, most communications between companies were sent in clear-text
and completely unprotected, unless the companies spent considerable time
and effort to coordinate to secure their email communications. Now, it
just happens automatically using the STARTTLS command.
Opportunistic TLS does
not protect the confidentiality of the email while it is traveling from
the user’s desktop to the server, while stored on the server, or when
traveling from the receiving user’s server to their desktop. Also, there
is no guarantee that the email will be encrypted if the opportunistic TLS fails because
the email is then transmitted unencrypted. To ensure that the email is
truly secure end-to-end during the transmissions and storage, the
following procedures must be followed.
Configuring
Exchange Server User Certificates Using Autoenrollment
After Certificate Services
has been installed on the system, the administrator of the network can
issue certificates to users and computers. However, rather than manually
generating and issuing certificates, the best practice is to have the
certificate server automatically issue certificates to users and
computers in Active Directory. This is known as autoenrollment of
certificates.
Autoenrollment of
certificates requires the following processes to be followed:
1. | A certificate template needs to be created.
|
2. | The template needs to be added to the certificate of
authority server.
|
3. | A group
policy needs to be created to automatically deploy the certificate to
the user or computer.
|
With autoenrollment of
certificates, rules are created that define which certificates should
be issued to a user or computer. As an example, a rule can be created to
create the autoenrollment of a certificate that allows a user to have
his certificates automatically created for the encryption of data files.
With autoenrollment of encrypted files, the user can simply save files
to a shared location, and the files stored in the location will be
encrypted.
To have
certificates automatically installed for the Exchange Server users in
Active Directory, do the following:
1. | On the certificate server you just created, launch the
Certificate Template Microsoft Management Console (MMC) by clicking
Start, Run, typing mmc.exe in the Open text box, and then
clicking OK.
|
2. | Click
File and click Add/Remove Snap-in.
|
3. | Select Certificate Templates and then click Add.
|
4. | Click OK.
|
5. | Click the Certificate Templates folder.
|
6. | Right-click the Exchange User template, select
Duplicate Template and click OK.
|
7. | Select the desired certificate and authority version
for the template.
|
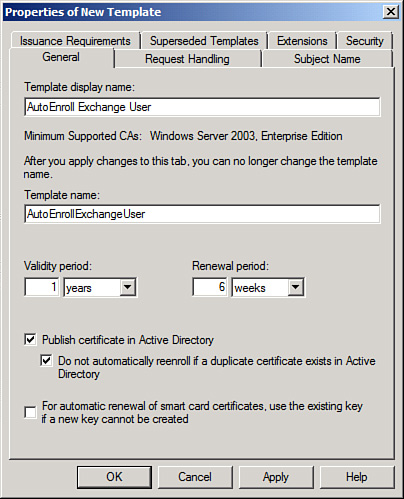
8. | In the
Template Display Name text box, type AutoEnroll Exchange User.
|
9. | Make sure the Publish Certificate in Active Directory
and the Do Not Automatically Reenroll if a Duplicate Certificate Exists
in Active Directory check boxes are both checked. The screen should look
similar to Figure
1.
|
10. | Select
the Subject Name tab.
|
11. | Select the Build from this Active Directory Information
and select Subject Name format as the Common name. Check the Include
E-Mail Name in the Subject name and E-mail name boxes.
|
12. | Click the Request Handling tab.
|
13. | In
the Purpose pull-down, select Signature and encryption.
|
14. | Click the Security tab.
|
15. | Highlight the Authenticated Users name and select the
check boxes in the Allow column for the Read, Enroll, and Autoenroll
permissions for the Authenticated Users.
|
16. | Click OK. |
