Exporting documents to MS Excel and MS Word
With release of version 5.0 in
NAV, Microsoft introduced an excellent feature of exporting all
documents to either MS Word or MS Excel with a click of a button. Of
course, copying and pasting was always available, but never before was
exporting the documents so easy. By simply clicking a button, Microsoft
Dynamics NAV can generate an XML document that exports the available
information to either MS Word or MS Excel. This is done using stylesheet
templates, which are already built for NAV 2009 Classic forms and NAV
2009 RoleTailored client (RTC) pages. If we want to modify these
templates or stylesheets, it can be done using a stylesheet toolkit and
can be done with a little knowledge of XML and C/AL programming.
Imagine we are working with an
open list in NAV and we want to export this list to MS Excel. By simply
clicking a button, the entire page with all filters, range, and columns
intact will be exported to a formatted Excel sheet with a worksheet for
each Header tab and a worksheet for lines.

The Send To Word or Excel function can be found under the Actions
menu on any page in NAV. Clicking this link will export the page in a
formatted Excel worksheet, as shown in the previous screenshot.
Creating a Customer Card stylesheet for MS Word
NAV offers flexibility to
customize or create new stylesheets according to our personalized
formats. This can be done using a stylesheet toolkit available through
our customer source access. We can download the toolkit from the
following link. We must check the customer source for latest updates on
links and versions to download at the following link: https://mbs.microsoft.com/customersource/downloads/servicepacks/NAVStyleSheetTool.
Once the toolkit is downloaded, unzip it and find the Style Sheet Tool 2.0.fob file for the NAV objects. Open the NAV Classic client to import all objects in our DB. Use the Replace ALL option to replace all the conflicting objects or to create new objects.
In this example, we will create a new Customer Card stylesheet.
To create a new stylesheet for the Customer Card and make the information on the item card available in Word, let's complete the following steps:
1. From the Object Designer, point to Forms and run Style Sheet Card (form 680).
2. Click Insert on the top menu or press F3 to create a new blank record.
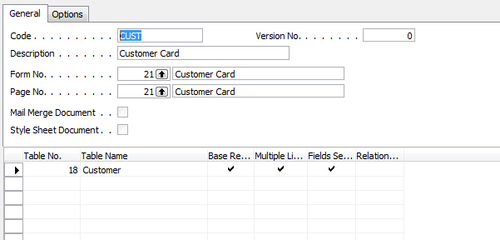
3. Fill the Code and description fields with the relevant stylesheet code and a description of the stylesheet, for example Customer Card. The code and description fields can contain a maximum of 10 and 50 characters respectively.
4. In the Form No. and the Page No. fields, select the form and page we want to use and the table associated with it, for example use 21 for the customer form and customer page.
(A form is used in the Classic client and an associated page is used in the RoleTailored client.)
5. In the lines select the relevant Table No., for example we can use Customer or table18. Select Base Record as Yes in this line, as this will be the base data item for the styelsheet. Select Fields from the next stylesheet menu and choose the fields we want to use in this stylesheet. Once the fields are selected, the Fields Selected box will be automatically checked.
The following screenshots show
how the field selection lines and the stylesheet form respectively
should look after the selections have been made:

The fields to use for this Customer Card and page have now been defined and we are ready to merge the selected fields into a Word document as Mail Merge fields.
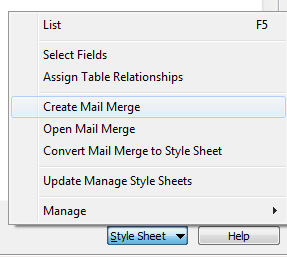
Creating a Mail Merge with the Customer Card stylesheet
1. As per the previous screenshot, on the stylesheet card that we just created, click Create Mail Merge from the following stylesheet menu:
2. In Word, click Mailings | Insert Merge Field and select each field one at a time.
3.
Design the document as necessary by adding our own text and pictures.
The following screenshot shows an example of what the Mail Merge could
look like:

4. Close Word when we are finished and return to Microsoft Dynamics NAV.
5. Click Yes to import the Mail Merge document and to convert the Mail Merge document to a stylesheet document.
6. Click Yes to update Manage Style Sheets. This will associate the stylesheet we just created with the Customer Card and Customer page.
7. In Microsoft Dynamics NAV, on the main menu, click Sales & Marketing, Order Processing & Customers to open the Customer Card.
8. Click the Send to Word button to export the Customer Card to the newly created Word document format.
