For example, in one example a column was
created that was named Project Name and used the Choice variety of
column, and had several values added to it: Project ABC, Project DEF,
and Project GHI. This is fine if that column needs to be used in only
one list or library, but if the administrator suddenly finds that this
column needs to be used in multiple lists and libraries by the project
managers, for example, several things can be done:
The
administrator can manually create the same column in the other lists and
libraries that need it. If changes are needed to the settings of the
column, the administrator will need to manually make the changes in each
list and library.
The
administrator can create a template of the entire document library or
list and then use that template to create a new list or library and it
will contain the Project Name column and choice values. If changes are
needed to the settings of the column, the administrator will need to
manually make the changes in each list and library.
The
administrator can create a site column that can be referenced by
different lists and libraries and even different sites within the site
collection. Changes can be made to the site column that will be
immediately reflected in the locations where this column is used. The
column can also be modified from the libraries and lists where it is
used.
The
administrator can create a site column, and also create a content type
that uses the site column. This allows the benefits of the site column
capabilities and leverages the content type’s capabilities.
Follow these steps to
create a site column called Project Name and then add it to a list, and
then experiment with making changes to the site column from the list to
verify these changes do not go “upstream”:
1. | Access
the Site Settings page for the top-level site of a site collection
where the site column will be used using an account that is a member of
the Site Collection Owners group.
|
2. | Click Site Columns in the Galleries section.
Note
To create or manage a site
column, the user must have web designer privileges on the site
collection. If an administrator does not have the appropriate access
rights to a child site, the push-down process to that child site will
fail.
|
3. | The
Site Columns page will display. Note that there are a large number of
site columns already in existence for the site collection, many of which
are self-explanatory. Click the Create link on the toolbar.
|
4. | Enter the title Project Name
and choose the Choice column type. Note that there are several columns
types that may be new to the administrator. These include Full HTML
Content with Formatting and Constraints for Publishing, Image with
Formatting and Constraints for Publishing, and Hyperlink with Formatting
and Constraints for Publishing.
|
5. | Scroll down to the Group section and click the circle next to New Group and enter the name Company ABC Columns.
|
6. | Scroll
down to the Additional Column Settings section and enter in several
choices for the project names. In this example, enter Project ABC, Project DEF, Project GHI. Select Yes under Allow Fill-In Choices, and clear the text in the Default Value field.
|
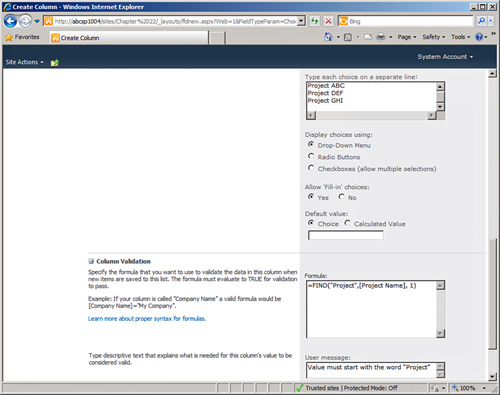
7. | Expand the Column Validation section, and enter the following formula, as shown in Figure 1:
=FIND("Project",[Project Name], 1)

|
8. | Enter text in the User Message section: Value must include the word "Project".
|
9. | Click
OK to save. The Site Columns page will now show the new site column. If
needed, the name of the site column can be clicked and the settings
modified.
|
Now that the site column has
been created, it can be used in a list or library. Follow these steps
to use the site column in a list and to test the addition of values:
1. | Create a Tasks list and title it Site Column Test.
|
2. | Click List Settings from the List tab on the Ribbon.
|
3. | Click Add from Existing Site Columns in the Columns section.
|
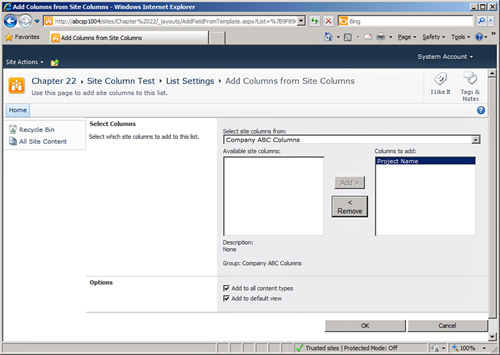
4. | On
the Add Columns from Site Columns page, access the group Company ABC
Columns created in the previous exercise. Click Project Name entry in
the Available Site Columns pane and click the Add button, as shown in Figure 2. Click OK to save.

|
5. | Click the name of the list in the breadcrumb to return to the list and click the Add New Item link.
|
6. | Create a new task with the title of Task 1;
leave the default values and scroll down to where the field Project
Name is visible. Note that there is a drop-down list with the field
values defined in the previous exercise. Verify that Project ABC,
Project DEF, and Project GHI appear.
|
7. | Click the circle next to Specify Your Own Value and enter the text Project JKLMNOP and click Save.
|
8. | Now
see whether the new value added modifies the site column by navigating
to the Site Settings page by accessing Site Settings from the Site
Actions drop-down menu and clicking Site Columns.
|
9. | Click Project Name in the Company ABC Columns section and verify that the new project name was not added to the site column.
|
Now that the site column
has been created and it is referenced in a list, the administrator can
experiment with further modifications to get a better sense for the
connectivity between the site column and the list. For example, the
following tests will be revealing:
Modify the title of
the column in the list where it is used. Note that this doesn’t change
the site column settings in the Site Column Gallery.
Modify
the type of column (for example, change it from Choice to Single Line
of Text) and verify this doesn’t change the site column settings in the
Site Column Gallery.
Add
a new value to the site column in the Site Column Gallery and verify
that it populates to the instance of the site column in the test list.
Remove
a value from the site column choice fields that is actually used in the
list, and verify that the value in the list still remains even after
the site column has been modified.
Note
When pushing down site
column changes, the entire list column definition is overwritten with
the current site column definition. Therefore, any changes you have made
to the list column are overwritten. If errors are encountered, the
process will move on to the next use of the site column and report
errors.