Several versions of the same element typically exist.
These versions might emanate from various layers or revisions in
version control, or they could be modified versions that exist in
memory. Dynamics AX has a built-in Compare tool that highlights any
differences between two versions of an element.
The comparison shows changes to elements, which can be modified in three ways:
A metadata property can be changed.
X++ code can be changed.
The order of subnodes can be changed, such as the order of tabs on a form.
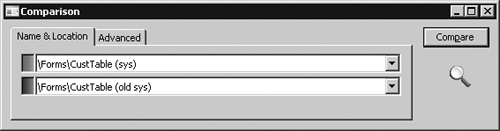
Starting the Compare Tool
You open the Compare tool
by right-clicking an element and then clicking Compare on the Add-Ins
submenu. A dialog box allows you to select the versions of the element
you want to compare, as shown in Figure 1.
The versions to choose from come from many sources. The following is a list of all possible types of versions:
Standard layered version types These include sys, syp, gls, glp, hfx, sl1, sl2, sl3, bus, bup, var, vap, cus, cup, usr, usp.
Old layered version types (old sys, old syp, and so on)
If .aod files are present in the Old Application folder (located in
Program Files\Microsoft Dynamics AX\50\ Application\Appl\Standard\Old),
elements from the files are available here. This allows you to compare
an older version of an element with its latest version.
Version control revisions (Version 1, Version 2, and so on)
You can retrieve any revision of an element from the version control
system individually and use it for comparison.
Best practice washed version (Washed)
A few simple best practice issues can be resolved automatically by a
best practice “wash.” Selecting the washed version shows you how your
implementation differs from best practices. To get the full benefit of
this, select the Case Sensitive check box on the Advanced tab.
Export/Import file (XPO)
Before you import elements, you can compare them with existing elements
(which they overwrite during import). You can use the Compare tool
during the import process (Command\Import) by selecting the Show Details
check box in the Import dialog box and right-clicking any elements that
appear in bold. Objects in bold already exist in the application;
objects not in bold do not.
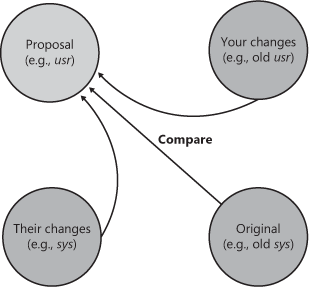
Upgraded version (Upgraded)
MorphX can automatically create a proposal for how a class should be
upgraded. The requirement for upgrading a class arises during a version
upgrade. The Create Upgrade Project step in the Upgrade Checklist
automatically detects customized classes that conflict with new versions
of the class. A class is conflicting when you’ve changed the original
version of the class, and the publisher of the class has also changed
the original version. MorphX constructs the proposal by merging your
changes and the publisher’s changes to the class. MorphX requires access
to all three versions of the class—the original version in the Old
Application folder, a version with your changes in the current layer in
the Old Application folder, and a version with the publisher’s changes
in the same layer as the original. The installation program ensures that the right versions are available in the right places during an upgrade. The conflict resolution is shown in Figure 2.
Note
You
can also compare two different elements. To do this, select two
elements in the AOT, right-click, point to Add-Ins, and then click
Compare. |
Figure 3 shows the Advanced tab, on which you can specify comparison options.
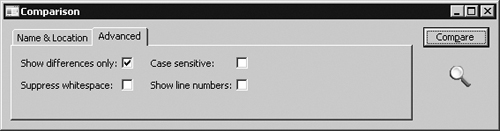
The comparison options shown in Figure 3 are described in the following list:
Show Differences Only All equal nodes are suppressed from the view, making it easier to find the changed nodes. This option is selected by default.
Suppress Whitespace
White space, such as spaces and tabs, is suppressed into a single space
when comparing. The Compare tool can ignore the amount of white space,
just as the compiler does. This option is selected by default.
Case Sensitive
Because X++ is not case-sensitive, the Compare tool is also not
case-sensitive by default. In certain scenarios, case sensitivity is
required and must be enabled,
such as when you’re using the best practice wash feature mentioned
earlier in this section. The Case Sensitive option is not selected by
default.
Show Line Numbers
The Compare tool can add line numbers to all displayed X++ code. This
option is not selected by default but can be useful during an upgrade of
large chunks of code.
Using the Compare Tool
After you choose elements
and set parameters, you can start the comparison by clicking Compare.
Results are displayed in a three-pane dialog box, as shown in Figure 4.
The top pane is the element selection, the left pane is a tree
structure resembling the AOT, and the right pane shows details of the
tree selection.
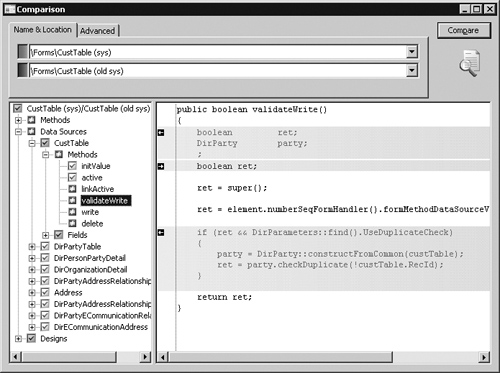
The icons in the tree
structure indicate how each node has changed. A red or blue check mark
indicates that the node exists only in a red or blue element. Red
corresponds to the sys
layer, and blue corresponds to the old sys layer. A gray check mark
indicates that the nodes are identical but one or more subnodes are
different. A not-equal-to symbol (≠) on a red and blue background
indicates that the nodes are different in the two versions.
Note
Each
node in the tree view has a context menu that provides access to the
Add-Ins submenu and the Open New Window option. The Open New Window
option provides an AOT view on any element, including old layer
elements. |
Details
of the differences are shown in the right pane. Color coding is also
used in this pane to highlight differences. If an element is editable,
small action icons appear. These icons allow you to make changes to
source, metadata, and nodes, which can save you time when performing an
upgrade. A right or left arrow removes or adds the difference, and a
bent arrow moves the difference to another position. These arrows always
come in pairs, so you can see where the difference is moved to and
from. An element is editable if it is from the current layer and checked
out if a version control system is used.
Compare APIs
Although
Dynamics AX uses the comparison functionality for development purposes
only, the general comparison functionality can be used more widely. The
available APIs allow you to compare and present differences in the tree
structure or text representation of any type of entity.
The Tutorial_CompareContextProvider
class shows how simple it is to compare business data by using these
APIs and presents it by using the Compare tool. The tutorial consists of
two parts:
Tutorial_Comparable This class implements the SysComparable interface. Basically, it creates a text representation of a customer.
Tutorial_CompareContextProvider This class implements the SysCompareContext-Provider interface. It provides the context for comparison. For example, it lists a tutorial_ Comparable class for each customer, sets the default comparison options, and handles context menus.
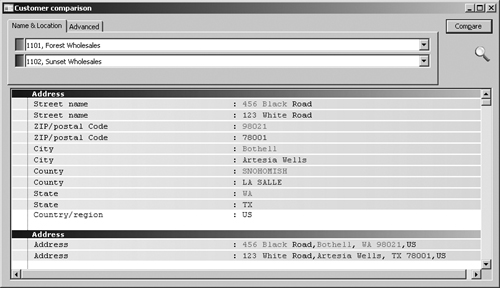
Figure 5 shows a comparison of two customers, the result of running the tutorial.
You can also use the line-by-line comparison functionality directly in X++. The static run method on the SysCompareText
class, shown in the following code, takes two strings as parameters and
returns a container that highlights differences in the two strings. You
can also use a set of optional parameters to control the comparison.
public static container run(str _t1,
                     str _t2,
                     boolean _caseSensitive      = false,
                     boolean _suppressWhiteSpace = true,
                     boolean _lineNumbers        = false,
                     boolean _singleLine         = false,
                     boolean _alternateLines     = false)
|
Refer to the Microsoft Dynamics AX 2009 SDK for documentation of the classes.
