AppLocker is a new feature that allows administrators
to focus on client-side software restrictions. It is not so much new
feature functionality, as it is an expansion and improvement on a
previously existing feature set. In earlier iterations of Windows
Server, an Active Directory (AD)-based Group Policy configuration set
called Software Restriction Policies granted administrators the
capability to control Windows XP workstations and regulate the software
that was allowed to execute.
Being able to
prevent applications from running grants an administrator a centralized
control over software execution in the environment. This control
mechanism may be used in countless ways across many different
environments and scenarios. For example, in some environments, drastic
workstation restrictions may be appropriate, especially where users are
known for installing unauthorized applications on company systems.
Whereas in other environments denying settings for particular ActiveX
controls or specific software applications may be all that is required.
Regardless of the user-based restrictions, the ability to control
software may be a handy feature in any environment where rouge software
exists.
Software Restriction
Policy settings allow administrators to control software executions by
file extension as well as through trusted publisher lists. By being able
to indicate which publishers are trusted allows administrators to
enforce consistent trust lists across the enterprise, extending into
digitally signed applications.
With the introduction of
Windows Server 2008 R2, the feature set known as Software Restriction
Policies was revised to become the now named AppLocker. AppLocker
provides the same conceptual feature set as Software Restriction
Policies; however, it extends the capabilities by allowing for more
intricate specifications and additional robust features. A key point to
be aware of with AppLocker is that it is only applicable to Windows 2008
R2 servers and Windows 7 clients. To allow the administration of other
Windows clients, Windows 2008 R2 AD has retained the original Software
Restriction Policies. Since they exist in tandem, environments with
multiple client operating systems existing in parallel will have to work
with both sets of policies to attempt to enforce software restrictions
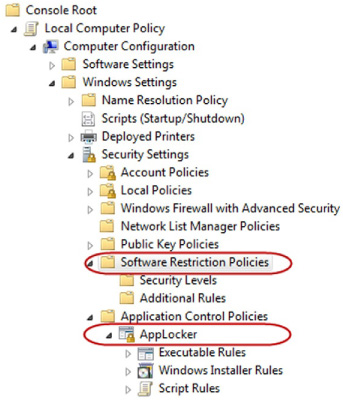
across varied platforms. You can see both the Software Restriction
Polices and the AppLocker sections side by side within a policy (see Figure 1). Something to keep in mind is that if both AppLocker and Software Restriction Policies exist within the same Group Policy,
only then will the AppLocker settings be used. You must create separate
Group Policy Objects (GPOs) for AppLocker and Software Restriction
Policies. In the following sections, we will focus on AppLocker in more
detail.
Enabling AppLocker
For AppLocker policies to be
applied to a machine, the first point to be aware of is that there is a
local service that must be running on each client machine. AppLocker
relies on the Application Identity service, and by default on Windows 7 machines, the Application Identity
service is stopped and set to manual startup. For AppLocker to be able
to enforce the configuration settings, you must modify the startup type
to Automatic and then start the service.
Once you have gotten the
service started, you are half-way there. Before AppLocker will impact a
machine, the enforcement mode for the computer must be configured. The
enforcement mode is configured through policy settings. AppLocker policy
settings are available in the Local Computer Policy as well as from AD
GPOs under the Application Control Policies section and can be
configured from either policy type. In this section, AppLocker will be
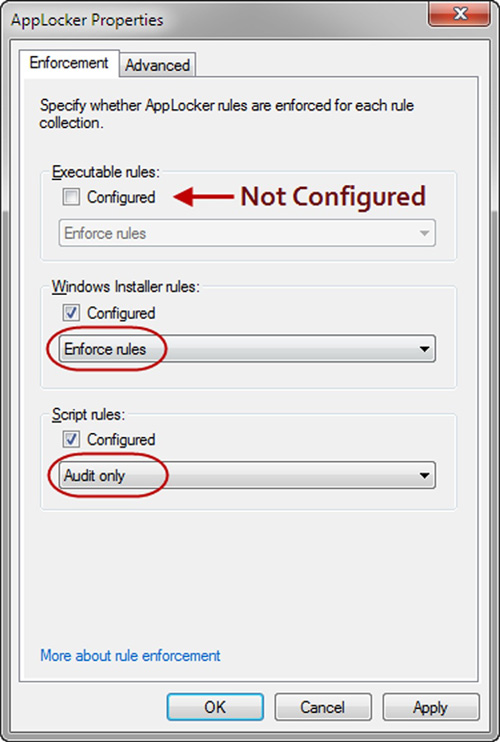
discussed as if it is being enforced through the AD GPOs. The AppLocker section of a GPO is made up of rules that have three enforcement modes:
Not Configured
Enforce Rules
Audit Only
Each of these settings allows the administrator different control over the workstations impacted by the GPOs. Not Configured
is the default setting, and simply indicates that the rules within this
GPO are allowed to be merged with other GPOs; but if conflicting
settings exist, then an Enforce Rules will override the setting on the Not Configured
policy. Keep in mind that if rules have been created within this GPO,
they will still be enforced on workstations. When the enforcement mode
is set to Not Configured, it does not negate the existence of the rules.
The next possible setting is Enforce Rules.
Just as the setting name implies, by configuring this within the GPO,
all of the rules within that GPO are enforced on the affected
workstations. Rules can be enforced irrespective of the fact whether
users are logged on interactively or not. By setting a rule set to Enforce Rules, these rules will override other GPOs that have their enforcement mode set to Not Configured.
The final choice for enforcement mode configuration is Audit Only.
Again, as the name implies, this is an audit mode and it does not
enforce any rules onto the workstations. This audit mode is very useful
for testing new policies to ensure that they perform the desired effect
before they are deployed. When Audit Only
is selected for a policy, and a user on a workstation attempts to run a
program identified by a rule in the AppLocker settings, the result of
the attempt is logged in the AppLocker event log within Event Viewer. As
the system administrator, the log will provide value information for
you to collect and review which will allow you to determine if the
policy is ready to be toggle to Not Configured or Enforce Rules, or if some adjustments are required first. Figure 2
displays the three enforcement modes available within a GPO for
AppLocker. Now that you understand how to enforce AppLocker rules on
workstation machines, the next thing that you need to understand is what
is controllable through AppLocker. In the next section, we will take a
look at the “configuration of AppLocker” rules.
Configuring AppLocker
The first step in
configuring AppLocker involves figuring out what applications it is that
you want to control. Depending on the environment, the need to restrict
applications can come from very different places. In some
environments, restrictions may be driven by security concerns where the
security group within an organization defines the guidelines for the
organization, and sets forth what is considered acceptable to execute.
In another organization, the acceptable applications type may be driven
by the legal department or from within an application group. The same
types of applications may have different implications in varied
environments.
Performance
is another key factor that may drive your application restriction
settings. For instance, if there is a limited amount of bandwidth
available to your organization for Internet-based traffic, you may want
to restrict superfluous Internet-bound applications to keep bandwidth
usage down. Regardless of the rationale behind your choices, before you
begin to restrict with AppLocker, you first need to have an
understanding of what you are required to restrict or allow.
Ok, now that you have your
application list in hand, you can just about get started. You have your
GPO created, you have decided on an Enforce Rules
strategy for your enforcement mode, and now you are on to configuring
the applications you want to impact. To do this, you need to create an
AppLocker rule. AppLocker rules are broken down into four main
collections:
Executable Rules
Windows Installer Rules
Script Rules
DLLs
Each of these
collection types is associated with particular file extension types.
Depending on the file extension that you are targeting, you need to
configure the rule within the appropriate collection. Table 1 lists the collections and their associated extension types:
Table 1. Collection Types and Their Corresponding Extensions
| Collection | Associated Extensions |
|---|
| Executable | .exe
.com |
| Scripts | .ps1
.bat
.cmd
.vbs
.js |
| Windows Installer | .msi
.msp |
| DLL | .dll
.ocx |
Default rules
Microsoft has included a group
of default rules for each of the collection types. The default rules
are not present until an administrator evokes them. To do so, you must
right-click on a collection type and select Create Default Rules from the menu. This will cause the system to automatically create three preconfigured Allow rules.
The default rules are
partially meant to protect the administrator from accidentally locking
themselves out by configuring overly restrictive settings. The other
major function of default rules is to allow users to execute
applications that exist in Windows default folder locations. Depending
on the collection, the default rules will vary slightly, but in general,
they all serve these same purposes. It is recommended to configure the
default rules when working with AppLocker. Once added, the default rules
will be visible from the details pane and can be edited as required.
The following tasks are a representation of the default rules broken down by collection:
Executable:
Allow members of the local Administrator’s group to run all applications.
Allow members of the Everyone group to run applications that are located in the Windows folder.
Allow members of the Everyone group to run applications that are located in the Program Files folder.
Windows Installer:
Allow members of the local Administrator’s group to run all Windows Installer files.
Allow members of the Everyone group to run digitally signed Windows Installer files.
Allow members of the Everyone group to run all Windows Installer files located in the Windows\Installer folder.
Script:
Allow members of the local Administrator’s group to run all scripts.
Allow members of the Everyone group to run scripts located in the Program Files folder.
Allow members of the Everyone group to run scripts located in the Windows folder.
DLL:
Allow members of the local Administrator’s group to run all DLLs.
Allow members of the Everyone group to run DLLs located in the Program Files folder.
Allow members of the Everyone group to run DLLs located in the Windows folder.
Custom rules
As
an administrator, one of the best capabilities that can be granted is
the ability to customize feature sets. AppLocker is no exception, and if
you find yourself staring at the default rules and not seeing where
they really fit into your plans for application restriction, do not
worry, the capability to customize is present just for you.
When building a
customized rule with AppLocker, the first step involves determining
which collection is the most appropriate for your new rule. This will be
driven by the file extension type that you are trying to control. The
collections and their associated file extensions are listed earlier in
this section.
So, once you have
determined which collection is the most appropriate for your rule, the
next preparation step before you can begin configuring rules is to logon
to a machine that has your targeted applications installed on it. The
reason this is required is that during the creation of the rule, the
AppLocker wizard will request information about your application. You
must be able to browse to and select the application as it would be
installed on client machines. By having the application locally
available, this allows you to configure the settings exactly as it would
be on client workstations.
Ok, let us finally get down to it. To begin creating your rule, you must right-click on the collection name and select Create New Rule... (see Figure 3). This will trigger the rules wizard which will walk you through the remainder of the process of rule creation.
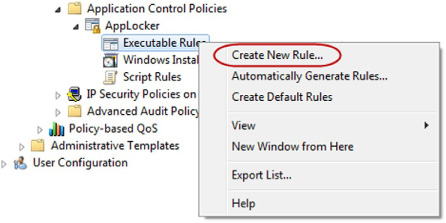
The process of custom rule
creation is similar across the collections. The first thing you must
select is whether this will be an Allow or a Deny rule and which user or
group it will apply to. The preferred configuration choice is Allow,
and then you will have the ability to configure exceptions to the Allow.
Deny rules may also be chosen, but have the chance to be circumvented
and are not the best choice of deterrent.
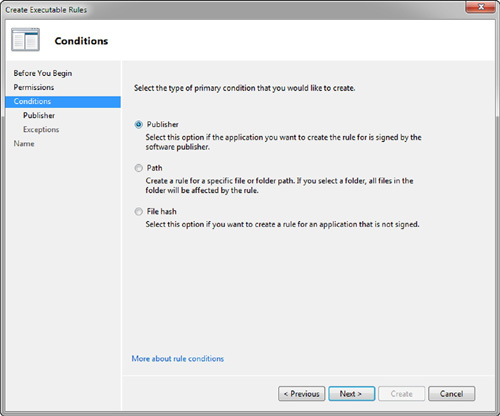
The
next wizard screen asks you to select a condition. A condition
specifies the mechanism that the system will use to identify the
application in order to enforce restrictions. There are three different
conditions that can be utilized to identify your application. The three
conditions which are displayed in Figure 4 are Publisher, Path, and File hash.