With some dimensions built, the next step is to run
the cube wizard to create the cube itself. Remember that at this stage
all we want to do is build a very simple cube so that we can test-drive
the data, so we're not going to do anything other than run the wizard.
You'll be doing a lot of work in the Cube Editor in the next stage of
development, but if you've set up the DSV in the way we recommend, then
you'll find that when you've finished running the wizard, you will have
something that you can deploy, process and browse immediately with no
changes required.
Using the 'New Cube' wizard
On the Select Creation Method step of the wizard, as with the same step of the New Dimension wizard, choose the Use an Existing table option—the Create an Empty Cube and the Generate Tables in the Data Source
options can be ignored for now. The former is useful in more advanced
scenarios but regarding the latter, we'll repeat what we said earlier:
you should model your data properly in the data warehouse before you
start building anything in Analysis Services. On the Select Measure Group Tables step, just select the fact table you chose earlier as the basis for the simple cube you want to build. Then on the Select Measures
step, select one or two columns from that fact table that represents
commonly used measures, which can be aggregated by summation. On the Select Existing Dimensions,
select all the dimensions that you've just built that join to the fact
table you've chosen. Don't bother creating any new dimensions on the Select New Dimensions step. Finally, on the Completing the Wizard Step, enter the name of the cube and click Finish.
When you're As was the case when creating dimensions, it's worth
putting some thought into the name of your cube. Try to make the name
reflect the data the cube contains, make sure the name is meaningful to
the end users, and keep it short as you'll probably have to type this
name hundreds of times over the lifetime of the project.
Deployment
With the wizard complete, go to the Build menu in the main Visual Studio menu bar and select 'Deploy <MyProjectName>'. Deployment is actually a two-stage process:
First the project is
built. You can think of this as being similar to compiling some .NET
code, except instead of an executable or a dll the end result is four
files containing the XMLA representation of the objects in your project,
and information on how the project should be deployed. You can find
these files in the bin directory of your Visual Studio project
directory.
Then
the project is deployed. This takes the XMLA created in the previous
step, wraps it in an XMLA Alter command and then executes that command
against your Analysis Services server. Executing this command either
creates a new Analysis Services database if one did not exist before, or
updates the existing database with any changes you've made.
It's quite common for
deployment to fail as a result of you making a mistake somewhere in your
cube or dimension designs. If this happens, you should see all of the
errors you need to correct in the Error List window. When you go to the
appropriate editor to correct the error, you should also see a red
squiggly line underneath whichever object it is that needs fixing as
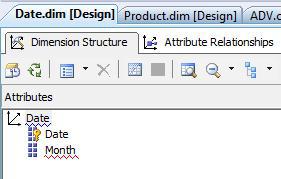
with the Month attribute in the following screenshot:

Warnings and Blue Squiggly Lines
Even if you don't see any red
squiggly lines anywhere and your project deploys successfully, it's
likely that you'll see warnings in the Error List window and blue
squiggly lines in various places in BIDS (see for example the Date
dimension node in the screenshot above). These design warnings will
occur where you have built something that works but does not reflect
best practice. A few of the warnings concern quite trivial things but,
in general, it's a good idea to pay attention to them. If you want to,
though, you can dismiss warnings by right-clicking on them in the Error
List window and clicking Dismiss,
while leaving a comment explaining why you've done this for future
reference. You can also manage which warnings appear, and see which ones
have been dismissed by right-clicking on the project in the Solution
Explorer, by clicking on Edit Database to open the Database Editor and going to the Warnings tab.
Processing
Assuming you've set the Processing Option project property to Do Not Process,
then the result of deployment will be a new Analysis Services database
on the server containing a cube and several dimensions. You won't be
able to browse the cube yet though, as all that has been created are
empty structures which need to be loaded with data from your data
warehouse. In order to load the data, you have to process the objects
and you can do this easily from within BIDS by going to the Database
menu and clicking Process. Once you've done this, the Process Database dialog appears. Leave the Process Options column showing Process Full, click Run, and everything in the database should be processed.
As an Analysis Services
database is nothing more than a collection of objects, processing a
database involves nothing more than processing all of the cubes and
dimensions in the database. In turn, cubes are made up of measure
groups, which are made up of partitions, and dimensions are made up of
attributes, and all of these objects have their own discrete processing
operations. As a result, processing a database can kick off a lot of
individual processing jobs and by default, Analysis Services will try to
do a lot of this processing in parallel to reduce the overall time
taken. A Process Full
will always drop any data currently in an object and reload its data
from scratch.
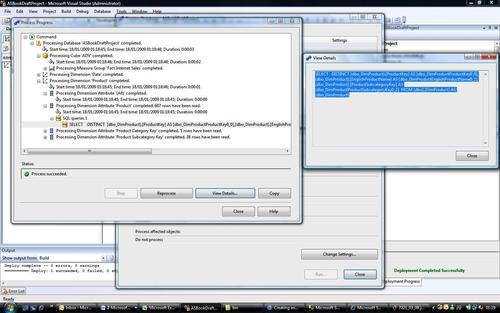
You can watch all of these processing jobs executing in the Process Progress window that appears after you click Run
in the Process Database dialog. You'll see each object that is being
processed listed, as well as the time processing started and ended. If
you expand each object, you'll eventually find the SQL queries run to
retrieve data from the data warehouse. If you select any node and click
the View Details
button, you'll see a new window appear, containing all of the text for
the node, and this is very important when it comes to viewing long SQL
queries or messages.
As you can't do anything
else in BIDS while processing is taking place, it can be a good idea to
just do a Deploy from there, and then start processing separately in SQL
Management Studio. This way you can carry on developing while
processing is taking place.

Processing errors are unfortunately as common as deployment errors, and they are caused by four basic types of problem:
Changes
in the underlying relational schema mean that Analysis Services contains
invalid references. For example, you might build a measure from a
column in a fact table that is subsequently renamed. You'd only find
this out if you refreshed your DSV or at processing time when Analysis
Services generated SQL that used the old name.
Key errors—You
can think of Analysis Services as performing an inner join between
tables in a snowflaked dimension, or between dimension tables and fact
tables, although it very rarely does so in the SQL it generates. For
example, if it finds a dimension key value in a fact table that doesn't
exist in the dimension table, by default, it will raise an error and the
processing will fail. You should try to ensure this never happens in your ETL, even if some
accidents are inevitable. You can configure processing so that key
errors are ignored, or unknown keys are assigned to a special unknown
member on a dimension by clicking the Change Settings button in the Process dialog to show the Change Settings dialog and going to the Dimension Key Errors
tab. However, we do not recommend you do this except as insurance
against these accidents. You'll get a lot more flexibility with a custom
solution. That said, at this stage of the cube development process, it
can be useful to ignore errors just to get the cube to process so you
can show it to your users.
Processing
objects in the wrong order— For example, if you process a dimension,
then update the underlying relational data so that there are new rows in
the dimension table and new rows related to them in the fact table, and
then process your cube without reprocessing the dimension again first,
you'll again run into key errors.
MDX
Script errors—it's very often the case that when you make structural
changes to a cube or a dimension, these changes break MDX calculations
on the cube. For example, you might rename a dimension but still have
MDX code where the old dimension name is referenced. When a cube is
processed, the last thing that happens is that all of the code on the
MDX Script is executed and if it now contains syntax errors, the whole
processing operation will fail. This is extremely frustrating when it
happens, and it can lead to a lot of wasted time. If you are making a
lot of structural changes it can be a good idea to comment out the whole
of the MDX Script before you do any processing, and only uncomment it
when you have successfully processed your cube.