The most important part of any migration to SBS 2011
involves properly preparing your existing SBS server. The time and
thought you spend on a full and careful preparation of your existing SBS
server has a direct impact on the success of your migration. Don’t just
start a migration without first preparing.
The steps for preparing your server are as follows:
Do a full and complete backup of the existing SBS server.
Install all current service packs and other updates on the server.
Configure your network for the migration.
Configure Active Directory.
Run the Best Practices Analyzer (BPA) to verify the health of the existing SBS network.
Clean up and optimize the current Microsoft Exchange mailboxes.
Use the Migration
Preparation Tool to extend the Active Directory schema, modify the
Microsoft Exchange Server mode, and extend the time that both versions
of SBS can be running to 21 days.
Identify line-of-business applications running on the existing SBS server, and plan for their migration.
1. Before You Start
You’re going to need
certain tools during this process, and they may or may not already be on
your source server. To simplify things and make sure you have
everything ready and available, we suggest you download the following
ahead of time:
Also, collect any other tools
you generally like to have available during the build process. If you
create an ISO file of these or burn them to a DVD, they’ll be available
whenever and wherever you need them. For ISO creation, we like the
simplicity of ISO Recorder (http://isorecorder.alexfeinman.com/isorecorder.htm). It’s simple, it does the job really well, and it’s free.
Go ahead and install Windows PowerShell 2.0, MBCAv2, and the BPA on your source server. They usually don’t trigger a reboot.
2. Back Up Your Existing SBS Server
The first and most
important step in any migration is making sure you have a full and
verified backup. We all do backups, and we hope that we never need to
use them. But if you aren’t taking steps to actually verify that your
backup can be restored, you haven’t really got a backup you can count
on. Before beginning any SBS migration, it’s essential that you
establish a sound fallback position that will allow you to recover in
case something goes wrong.
In addition
to doing a conventional backup using SBS Backup, we strongly suggest
making an image backup of at least the system volume of your existing
SBS server and any other volumes that are used to store core SBS data
files, such as Microsoft Exchange data files. This will allow for a
faster full recovery in the event that you have to cancel the migration
for some reason. Products we’ve used for this image backup include
StorageCraft, Acronis, and Windows Home Server. Currently, we’re using,
and really liking, Windows Storage Server 2008 R2 Essentials to back up
the virtual hard disks (VHDs) of SBS.
Whatever backup methods you use, you should verify the integrity
of the backup by doing a test restore. For image backups, this means
restoring the entire partition image to a disk of equal or greater size
and, at a minimum, verifying that files can be read and opened. For an
SBS Backup test, you should restore multiple files from different
locations to an alternate location and verify that the files can be
opened and read.
3. Install Current Updates
It seems obvious to us, but bears
repeating nonetheless—bring your current SBS server up to date,
installing all current service packs and security updates. If you’re
running SBS 2003 R2 or later, with built-in Windows Server Update
Service (WSUS), this
should be happening automatically. But even if you’re sure you are up
to date, connect to Microsoft Update to verify.
The migration process
expects minimum levels of service packs, and not being fully “patched
up” can create issues in the migration. Given that the migration is a
one-way process, you really don’t want to get well into it and find you
have a blocker. We hope the tools in this preparation stage will enable
you to catch any blockers before you start, but it’s still just a really
good idea to get all your updates installed before you start.
4. Network Configuration
Before you can migrate to
SBS 2011, you need to configure your existing SBS server for a single
NIC. This means a significant change for most SBS 2003 networks, because
the preferred configuration for SBS 2003 calls for two NICs—one
connected to the external Internet and one connected to the internal SBS
network. All traffic on the internal network actually passes through
the SBS server to get to the Internet, as shown in Figure 1.
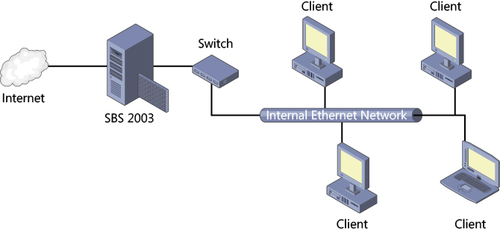
This configuration also uses SBS as the firewall
for the SBS network—something it does quite well when running SBS 2003
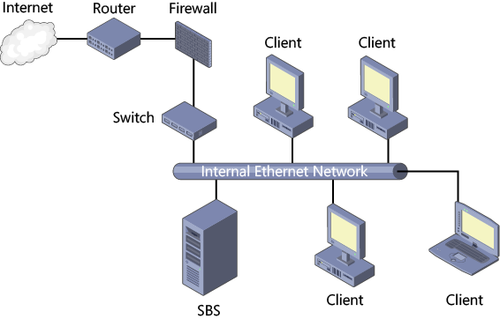
Premium Edition with ISA 2004. Because SBS 2011 requires a single NIC
configuration, you need to change your SBS 2003 configuration before the
migration. In a single NIC configuration, as shown in Figure 2, you’ll need to add a router
and firewall to your existing SBS network, along with reconfiguring the
default gateway and other settings for your client computer and
devices.
Most consumer-grade routers include minimal firewall capabilities, but they really aren’t sufficient to properly protect an SBS network. You should either add a firewall appliance in addition or buy a true firewall router, such as one of the TZ series firewalls from SonicWALL (http://www.sonicwall.com/us/products/TZ_Series.html). Other possibilities include WatchGuard firewalls (http://www.watchguard.com) and NETGEAR ProSecure firewalls (http://www.prosecure.netgear.com/products/prosecure-utm-series/models.php).
The basic process of network reconfiguration uses the following steps:
Reconfigure DHCP for shorter license times (optional), and save the DHCP database.
Disable or remove the Internet-facing NIC in your existing SBS server.
Run the Configure E-Mail And Internet Connectivity Wizard (CEICW) to reconfigure networking.
Install a router/firewall, and connect to Internet.
Connect the router/firewall to a switch on the internal Ethernet.
Run the Remote Access Wizard to disable virtual private networks (VPNs) and reconfigure Routing And Remote Access (RRAS).
Reconfigure client computers and devices with fixed IP addresses and verify DHCP configuration.
4.1. DHCP Reconfiguration
Although it’s not absolutely
required, you can simplify DHCP address reconfiguration on your SBS
network if you shorten the lease time in advance of beginning the migration.
This will allow client computers and devices on your network to get
updated network information without a reboot in a reasonable time frame.
The default DHCP lease duration is eight days. To change the duration,
follow these steps:
Log on to your existing SBS server with an account that has administrative privileges.
Open the DHCP console (dhcpmgmt.msc).
In the left pane, drill down and select the scope you want to change.
Select Properties from the Action menu to open the Scope Properties dialog box shown in Figure 3.
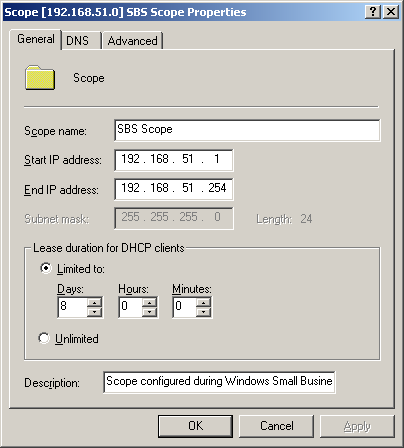
Change the Lease Duration For DHCP Clients values to a shorter time. We like to set an 8-hour lease here.
Click OK to close the Scope Properties dialog box and return to the DHCP console. Close the DHCP console.
Another useful step to take
at this point is to back up the DHCP database. If you are using a
standard SBS DHCP with no reservations or other customizations, don’t
bother—the wizards will take care of it. But if you have done
significant configuration, you should probably back up your DHCP
database to make it easier to restore that configuration. See the
Microsoft Knowledge Base article at http://support.microsoft.com/kb/962355.
4.2. Disable or Remove the Second NIC
The first essential step in reconfiguring your SBS 2003 network
from a two NIC SBS network to a single NIC network is to disconnect the
externally facing NIC from your existing Internet connection and
disable or remove the network card. You can get away with disabling it,
but then you’ll have more complaints from the SBS wizards, so we prefer
removing it physically from the server. After you’ve removed the network
card, you need to reconfigure your SBS network to the IP address range
you’ll use for your Internet connection.
Note:
You can skip this entire
section if you’re migrating from SBS 2008 or SBS 2011, because you’re
already configured for a single NIC with appropriate settings.
After you’ve decided the range for your new SBS network, you can complete the reconfiguration by following these steps:
Shut down the SBS server.
Disconnect the Internet-facing network cable from the server, open the server enclosure, and remove the network card.
Turn on the server. It will likely take longer than usual to restart—be patient.
Log on to the server with the main Administrator account.
In
the left pane of the Server Management console, click Internet And
E-mail to display the Manage Internet And E-mail page as shown in Figure 4.
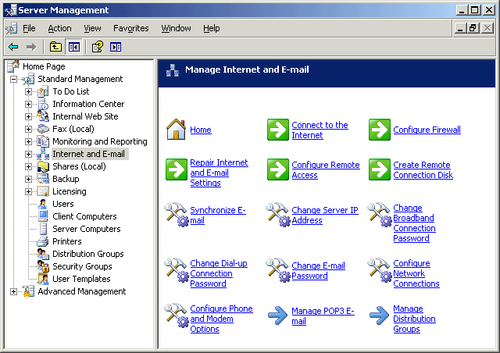
Click Connect To The Internet to open the CEICW.
Click Next to open the Connection Type page of the CEICW, as shown in Figure 5.
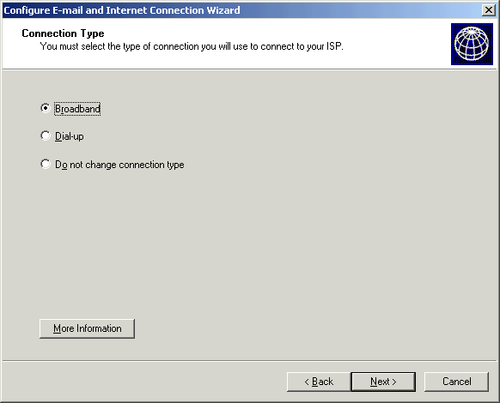
Select Broadband, and click Next to open the Broadband Connection page, as shown in Figure 6. Select A Local Router Device With An IP Address from the My Server Uses drop-down list.
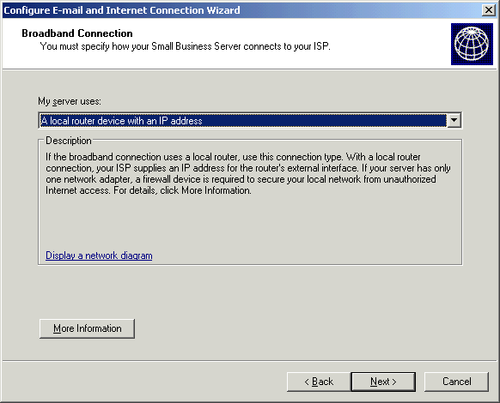
Click Next to open the Router Connection page shown in Figure 7. Type in the IP address you’ll be using with your new router/firewall and the IP addresses for your ISP’s DNS servers.
Note:
If your router/firewall does DNS
forwarding, you can use the IP address of the router/firewall for the
Primary DNS Server address and leave the Secondary DNS Server address
blank. If you want to always use root hints for DNS, you can leave both
addresses blank.
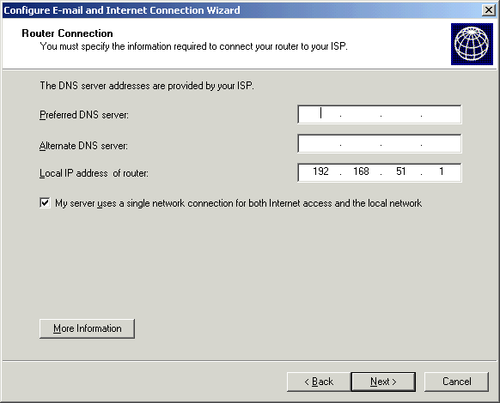
Select the My Server Uses A Single Network Connection For Both Internet Access And The Local Network check box.
Click
Next. If the IP address of the router/firewall is in a different
address range from your previous internal address, you’ll see the
message shown in Figure 8.
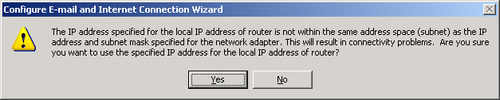
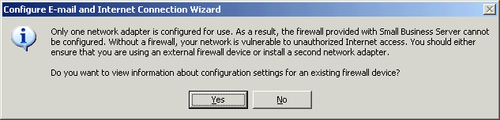
Click Yes to open the information message shown in Figure 9. Because we’re not connected to anything at this point, click No.
On
the Web Services Configuration page, select the services that you want
to be available when your existing SBS server is back online.
Click Next twice more, and then click Finish to complete the wizard.
Click Close when the CEICW finishes.
If you’ve chosen to use a different IP address range for your SBS network than the one you’re currently configured to use, now is a good time to change it by following these steps:
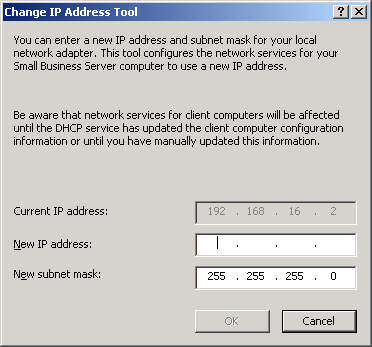
On
the Manage Internet And E-mail page of the Server Management console,
click Change Server IP Address to open the Change IP Address Tool dialog
box shown in Figure 10.
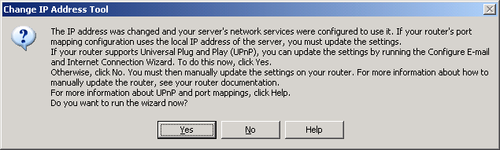
Type in the new IP address for the server and click OK. When the tool completes, you’ll see the message shown in Figure 11.
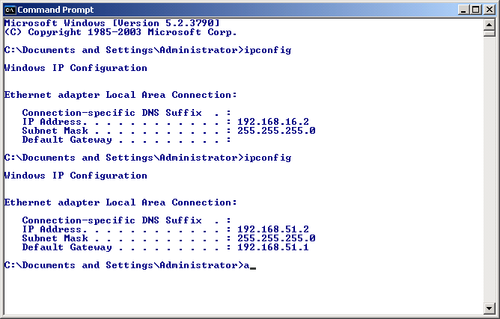
Click No to complete the process and close the Change IP Address Tool dialog box. As shown in Figure 12, the IP address has been reconfigured to point to the new router/firewall that we will install at 192.168.51.1.
Note:
If you have fixed IP devices on your network,
you’ll need to manually reconfigure their default gateway. This won’t
matter for devices that don’t need to connect to the Internet, such as
printers, but if you have additional servers or workstations that use
fixed IP addresses, you should reconfigure them now to point to the new router.
