9. Running the Migration Preparation Tool
There are several tasks that need
to be done on all SBS 2003 networks to prepare for the actual
migration, including the following:
Upgrade the Active Directory schema.
Set the Microsoft Exchange Server mode.
Extend the time that two SBS servers can coexist in the same network.
To make life easier, these tasks are automated with the Migration Preparation Tool.
There’s one other task we’ll
cover in this section—synchronizing the time source. On most SBS
networks, this should already be OK, but it’s critical for the proper
migration to the new SBS 2011 server, so make sure it’s correct and
synched to an external source.
Warning:
IMPORTANT The changes made by the Migration
Preparation Tool are irreversible. You should ensure that you have a
fully tested backup of your existing SBS 2003 server before running the Migration Preparation Tool. The only way to return to your original configuration is to restore your backup.
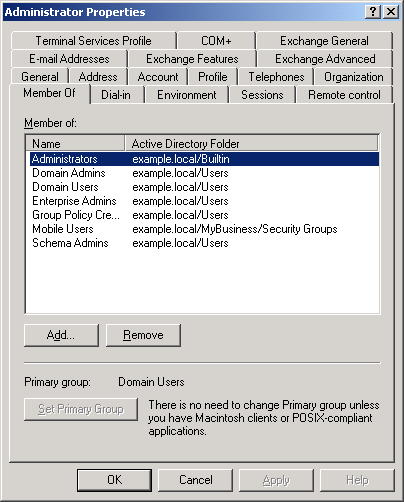
Before you start the
migration, you need to upgrade the Active Directory schema to align with
the schema used by SBS 2011. To upgrade the schema, you must
be logged on to the existing SBS server with an account that is a
member of the Domain Admins, Enterprise Admins, and Schema Admins
groups. The default Administrator account is in all three groups. To
verify that the account you are using is in the necessary groups, open
Active Directory Users And Computers and double-click the account you
are using. Click the Member Of tab to see a list of groups the account
belongs to, as shown in Figure 25.
To run the Migration Preparation Tool, use the following steps:
Log on to your source server with an account that has Domain Admins, Enterprise Admins, and Schema Admins privileges.
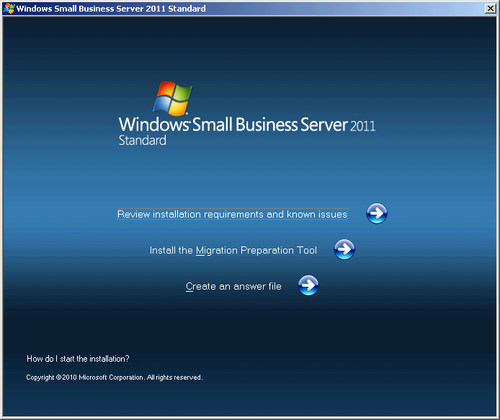
Insert
the first SBS 2011 DVD into the DVD drive of the source server. If you
have autorun enabled on the source server, you’ll see the screen shown
in Figure 26.
Note:
If you don’t have a DVD drive on
your existing SBS server, insert the DVD in a client workstation and
copy the entire tools directory to a location on the server and run
SourceTool from there.
Click Install The Migration Preparation Tool.
Acknowledge the End-User License Agreement (EULA), and click Install and then Finish. (Leave the Run The Migration Preparation Tool option selected.)
On
the Get Important Updates screen, choose either Download And Install
Updates (Recommended) or Do Not Download Updates. Personally, we avoid
downloading any additional updates at this point, though the official
Microsoft recommendation is to always download updates.
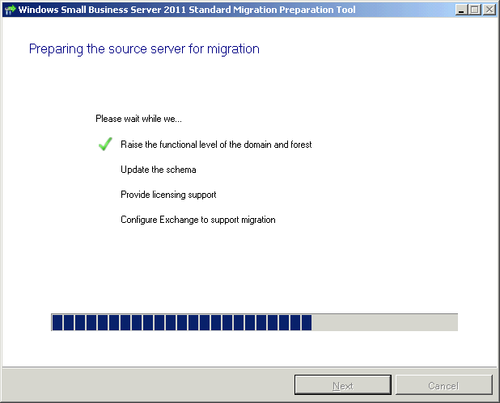
On
the Prepare Your Source Server For Migration page, select the I Have A
Backup And Am Ready To Proceed check box and then click Next. The tool
will start updating your schema, extending your coexistence time, and
configuring Exchange Server as shown in Figure 27. The process takes several minutes, so just be patient. The largest chunk of time is for the schema upgrade.
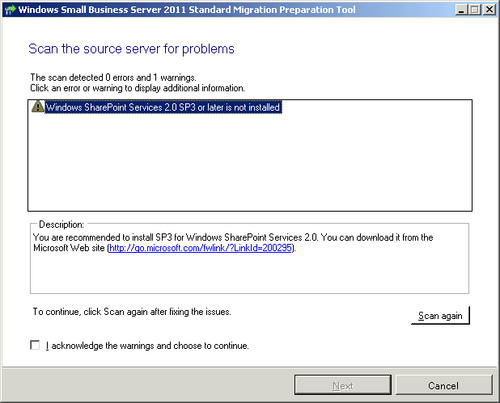
When
the tool completes its tasks, click Next and the source server will be
scanned for any additional problems. If any are identified, as shown in Figure 28, correct them before continuing.
Review
the Migration Guide, select the check box for it, and then click Create
An Answer File. See the steps under Creating A Migration Answer File. After you’ve finished creating it and storing it
on the USB or other media you’ll use, click Finish to close the Windows
Small Business Server 2011 Standard Migration Preparation Tool.
When you exit the Migration Preparation Tool, you’ll be prompted to reboot. You should reboot your server before going any further.
After you reboot, you need to
make sure your existing SBS 2003 server is correctly synchronized with
an external time source. To set the time synchronization on your SBS
server, use the following steps:
Log on to your existing SBS server with an account that has Domain Admins privileges.
Open a command window (cmd.exe). Type the following commands in the window, as shown in Figure 29:
w32tm /config /syncfromflags:domhier /reliable:no /update

net stop w32time

net start w32time
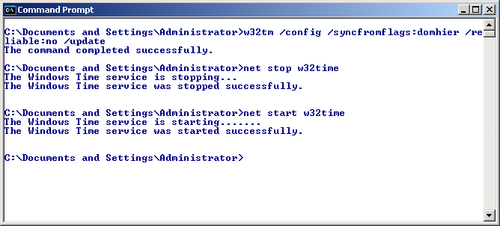
Close the command window.
Warning:
IMPORTANT
If you are running SBS 2003 and SBS 2011 in virtual machines on a
Hyper-V server, the parent partition must have the same time zone, date,
and time as the child partitions.
Finally, before you can
migrate your existing SBS 2003 server, ensure that any line-of-business
applications are moved off the main SBS server, or that you have a clear
migration path to move them to another server on your SBS network after the migration
completes. Remember that once you migrate to SBS 2011, your old SBS
server must be completely decommissioned and removed from the network.
Before you can return it to the SBS network, you need to format the
system disk and reinstall an operating system. The old and new SBS
servers can co-exist on the network for a maximum of only 21 days.
