In our increasingly connected world, most users want
to be able to access e-mail, calendars, contacts, and scheduled tasks no
matter what time it is or where they are. With Microsoft Exchange
Server 2010, you can make anywhere, anytime access to Exchange data a
real possibility. How? Start by using Exchange's built-in Web and mobile
access features to allow users to connect to Exchange over the Internet
and from cellular networks. Afterward, configure your network to allow
direct dial-up or secure anywhere connections from Microsoft Office
Outlook 2007 or Outlook 2010, and then create Microsoft Outlook profiles
that use these configurations.
Web access, mobile access,
and secure anywhere access are implemented as separate features that are
available when you install the Client Access server role for Exchange
Server 2010. These features include Exchange ActiveSync, Outlook Web
App, and Outlook Anywhere. Although Exchange ActiveSync and Outlook Web
App (then called Outlook Web Access) were available in Exchange Server
2003 and earlier releases of Exchange Server, Outlook Anywhere is an
enhanced feature that builds on the remote procedure call (RPC) over
Hypertext Transfer Protocol (HTTP) feature introduced in the previous
Exchange Server release.
Mastering Outlook Web App Essentials
Outlook Web App is a
standard Exchange Server 2010 technology that allows users to access
their mailboxes using a Web browser. If public folders are hosted by
Exchange 2010, users will be able to access public folder data as well.
The technology works with standard Internet protocols, including
Hypertext Transfer Protocol (HTTP) and Secure HTTP (HTTPS).
When users access
mailboxes and public folder data over the Web, a Client Access server is
working behind the scenes to grant access and transfer files to the
browser. Because you don't need to configure Outlook
Web App on the client, it's ideally suited for users who want to access
e-mail while away from the office and may also be a good choice for
users on the internal network who don't need the full version of
Microsoft Outlook. Outlook Web App is automatically configured for use
when you install the Client Access server role for Exchange Server 2010.
This makes Outlook Web App easy to manage. That said, there are some
essential concepts you should know to manage it more effectively, and
this section explains these concepts.
1. Getting Started with Outlook Web App
Outlook Web App (OWA) is
installed automatically when you install the Client Access server role
for Exchange Server 2010. In your Exchange organization, you must
install at least one Client Access server in each Active Directory site
containing an Exchange 2010 Mailbox server. If users will be accessing
Outlook Web App over the Internet, then one of the Client Access servers
you install must be Internet facing. This server accepts connections
from external clients on an external Uniform Resource Locator (URL).
In most cases, you need to open only TCP port 443 on your organization's firewall, to allow users to access mailboxes and public folder data over the Web.
After that, you simply tell users the URL path that they need to type
into their browser's Address text box. The users can then access Outlook
Web App when they're off-site.
Outlook Web App is optimized for screen resolutions of 800 by 600 or higher. Two different versions are available
Light Provides a basic experience with a simplified user interface that supports accessibility for blind and low-vision users. No Standard-only
features are available. In addition, calendar options are limited and
messages can be composed only as plain text. OWA shortcut menus are not
displayed when you right-click. The OWA toolbar has slightly different
options, and the Options page itself is simplified as well.
Standard
Provides a rich experience with performance that closely approximates
Outlook 2007 and Outlook 2010, including a folder hierarchy that you can
expand or collapse, drag-and-drop functionality, move and copy
functionality, and shortcut menus that you can access by right-clicking.
In addition, you can use all of the following features: appearance
color schemes, calendar views, file share integration, notifications,
personal distribution lists, public folder access, reading pane, recover
deleted items, reminders, search, secure signed and encrypted e-mail
with Secure Multipurpose Internet Mail Extensions (S/MIME), server-side rules, spelling checker, voice mail options, and WebReady Document viewing. Standard does not, however, support accessibility for blind and low-vision users.
Outlook Web App uses Hypertext Markup Language (HTML) 4.0 and JavaScript [European Computer Manufacturers Association (ECMA)]
script. Unlike earlier implementations of OWA, the standard version of
Outlook Web App is available on Windows and Linux using Internet
Explorer 7, Internet Explorer 8, and Firefox 3.0.1, and on the Mac using
Safari 3.1 or later.
Outlook Web App for Exchange Server 2010 has many features and enhancements, including:
Instant messaging
Users can chat with any contact listed in their Contacts list simply by
double-clicking a contact's name. (Requires Office Communications
Server and some integration DLLs on your Client Access servers.)
Inbox rules
Users can create inbox rules to automatically sort incoming e-mail into
folders. Users create rules on the Inbox Rules tab or by right-clicking
a message they want to base a rule on and selecting Create Rule.
Message attachments
Users can attach files, meeting requests, and other messages to
messages by clicking the attach file icon on the toolbar. Users can even
drag and drop attachments into messages if they are using Internet
Explorer and install the S/MIME control.
Delivery reports
Users can generate delivery reports to search for delivery information
about message they've sent or received during the previous two weeks.
Personal groups Users can create personal groups that will appear in their address book.
Public groups Users can create public groups that will appear in the global address book for everyone to use.
When it comes to supported
OWA features, Firefox 3.0.1 or later and Safari 3.1 or later have
feature parity with Internet Explorer 7.0 and Internet Explorer 8.0. The
one exception is support for the S/MIME control, which only Internet
Explorer supports.
2. Connecting to Mailboxes and Public Folder Data over the Web
With Outlook Web App, you
can easily access mailboxes and public folder data over the Web and the
corporate intranet. To access a user's mailbox, type the Exchange
Outlook Web App URL into your browser's Address text box, and then enter
the user name and password for the mailbox you want to access. The
general steps are as follows:
In a Web browser, type https://servername.yourdomain.com/owa, where servername is a placeholder for the Web server hosted by Exchange Server 2010 and yourdomain.com is a placeholder for your external domain name. For example, if your ClientAccess server is configured to use mail as the external DNS name and your external domain is cpandl.com, you type https://mail.cpandl.com/owa.
At
the security prompt, the user needs to specify whether he is using a
public or shared computer, or a private computer. If the browser
supports the standard version of Outlook Web App, the user can elect to use Outlook Web App Light by selecting the Use Outlook Web App Light check box.
Type the user name in domain\username format, such as cpandl\williams, or User Principal Name (UPN) format, such as [email protected].
Type the password for the previously specified account, and then click the Log On button.
Exchange Server uses the
computer type (as specified by the user) to determine the period of
inactivity to allow before logging the user off automatically. With a
private computer, the user will be allowed a longer period of inactivity
before being logged off. With a public or shared computer, Exchange
Server will log the user off more quickly to prevent the user's data
from being compromised.
Note:
By default, Client
Access servers are configured to use Secure HTTP (HTTPS) for Outlook Web
App. When you install Exchange Server 2010, a self-signed security
certificate is issued for the Client Access server automatically.
Because this default certificate is not issued by a trusted certificate
authority, users will see a warning that there is a problem with the Web
site's security certificate. At the warning prompt, the user can click
the Continue To This Website link. The user will see this warning
continuously until you install a certificate on the server from a
trusted source.
After a user has accessed her mailbox in OWA, she can access public
folders data that is available as well as long as the public folders
are hosted on Exchange 2010. To access public folders, follow these
steps:
In the left pane of the OWA window, click Public Folders.
Under Public Folders, you'll see a list of the available top levels to which you have access.
Select folders to navigate their contents and open items by double-clicking.
3. Working with Outlook Web App
After you enter the
Exchange Outlook Web App URL into Internet Explorer's Address text box
and enter the user name and password for the mailbox you want to access,
you'll see the view of Outlook Web App compatible with your browser. Figure 1
shows the full-featured view of Outlook Web App. Most users with
Internet Explorer 7.0 or Internet Explorer 8.0 see this view of Outlook
Web App automatically. If their browsers don't support a necessary
technology for the full-featured view, or if this technology has been
disabled, they might see the Light view instead. If they can right-click
and see a shortcut menu, they have the full-featured view.
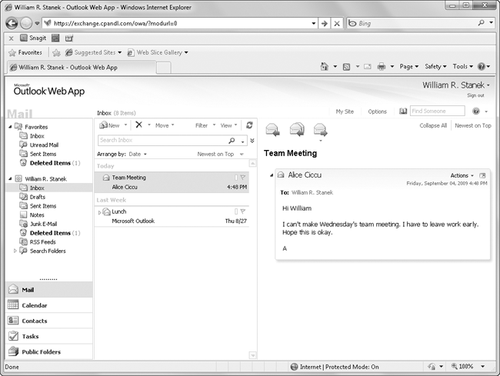
As shown in Figure 1, the latest version of Outlook Web App has a toolbar that provides quick access to the following key features:
Address Book
Displays the Address Book, which provides quick access to address lists
and contacts. Any tracked resources, such as conference rooms or
projectors, are available as well. If you click a contact or resource in
an address list, the e-mail address and availability information are
displayed.
Address Book Search
Search the Address Book for a specific contact or resource. Simply
enter as much of the name as is necessary to uniquely identify the
contact or resource, and then press Enter. If multiple matches are
found, you'll see a shortcut menu with a list of matches. Clicking a match displays the properties for that item.
Options
Takes you to the Exchange Control Panel. Use the Select What To Manage
list to choose what you want to manage, including yourself, your
organization, or another user's mailbox. When you are managing your own
account, you can configure Outlook Web App properties or view current
configuration details.
Help
Shows the help page, which provides information on setting up e-mail,
using instant messaging in OWA, creating rules for managing incoming
e-mail, adding attachments and meeting requests to e-mail, and more.
Help, About If you click the options
button to the right of the Help button while viewing the mailbox, you
can select the About option. This option lists the current configuration
being used by the Client Access server and the Outlook Web App client. This information is useful for troubleshooting.
Example 1 shows an example of the details on the About page, which can be helpful for troubleshooting. If a user is having problems with
Outlook Web App, you can instruct the user to click Options, scroll
through the options, and then select About. If he has a problem that is
not related to e-mail and is able to send e-mail, he can click Copy To
Clipboard, and then paste the contents of the Clipboard into an e-mail
message by pressing Ctrl+V.
Example 1. Outlook Web App Configuration Details
Mailbox owner: William Stanek [[email protected]]
User-Agent: Mozilla/4.0
(compatible; MSIE 8.0; Windows NT 6.1; WOW64; SLCC2;
.NET CLR 2.0.50727; .NET CLR 3.5.30729; .NET CLR 3.0.30729)
Outlook Web App experience: Standard
User language: English (United States)
User time zone: (GMT-08:00) Pacific Time (US & Canada)
Exchange mailbox address: /o=First Organization/ou=Exchange
Administrative Group (FYDIBOHF23SPDLT)/cn=Recipients/cn=williams
Host address: https://mailserver25.cpandl.com/owa
Version: 14
Host name: mailserver25.cpandl.com
Exchange Client Access server name: MAILSERVER25.cpandl.com
Exchange Client Access server .NET Framework version: 2.0.50727.3521
Client Access server operating system version: Microsoft Windows NT 6.1.7600 Service Pack 1
Client Access server operating system language: en-US
Microsoft Exchange Client Access server version: 14
Client Access server language: en-US
Client Access server time zone: Pacific Standard Time
Client Access server platform: 64bit
Mailbox server name: MAILSERVER25.cpandl.com
Mailbox server Microsoft Exchange version: 14
Other Microsoft Exchange server roles currently installed on the Client
Access server: Mailbox, Hub Transport, Unified Messaging
Authentication type associated with this Outlook Web App session: Basic
Public logon: No
|
In addition to being able to
manage their inbox, calendar, contacts, public folders, and mailbox
rules, users can set the following Outlook Web App options by clicking
Options in the task pane, making whatever changes are desired, and then
clicking Save:
Account
Allows users to view and edit their general information as well as
their contact location and contact numbers in the address book.
Organize Email, Inbox Rules Allows users to create and manage inbox rules.
Organize Email, Automatic Replies
Allows users to create and manage automatic replies. Separate messages
can be configured for internal recipients and external recipients. With external recipients, you have the option of sending auto-reply messages only to those in your contacts list.
Organize Email, Delivery Reports Allows users to search for messages they've sent or received.
Groups Allows users to create and manage public
groups. They can create new public groups that will be available to
other users in the address book. They can join or leave groups unless
membership restrictions apply.
Phone, Mobile Phone
Allows users to manage mobile devices. You can remove mobile devices
you are no longer using, display a device password, and retrieve related
access logs. If you lose a mobile device, you can start a remote device
wipe to protect your information. All data is removed the next time the
device connects to Exchange Server, returning the device to its factory
default condition. If a user initiates a remote wipe in Outlook
Web App, she receives a confirmation e-mail when the device
acknowledges the remote wipe request. If an administrator initiates a
remote wipe on a user's behalf, the administrator and the user receive a
confirmation e-mail when the device acknowledges the remote wipe
request.
Phone, Text Messaging
Allows users to send e-mail and calendar notifications to their mobile
phone as text messages. Before a user can send notifications, he needs
to configure calendar settings for text messaging.
Settings, Mail Allows you to set key messaging options.
You can edit your e-mail signature, preferred message format, and
preferred font to use for messages. The default font is 10-point Tahoma.
Read receipts options
allow you to specify how to respond to requests for read receipts.
Reading pane options allow you to specify whether and how messages are
marked as read in the reading pane. There are also settings for the
conversation reading pane, message format, and message options.
Settings, Spelling Allows you to set options for the spelling checker, including the dictionary language. The default language is set according to the browser's language setting.
Settings, Calendar
Allows you to specify when the first day of the week is and when the
work day starts and ends for the purposes of calendar scheduling.
Reminder options allow you to enable or disable reminders for calendars
and tasks. Automatic processing options specify how meeting requests,
notifications, and responses are handled.
Settings, General Allows you to configure e-mail name resolution, and accessibility
options. E-mail name resolution options allow you to specify whether
the global address list or your personal contacts are checked first when
resolving e-mail addresses in messages you are composing. By default,
the global address list is checked first. Appearance options allow you to select the color scheme used by Outlook Web App. The default color scheme is blue.
Note:
Under General Settings, accessibility options allow you to optimize Outlook Web App for blind
and low-vision users. By selecting Use The Blind And Low Vision
Experience, you ensure that Outlook Web App Light is used rather than
the standard version of Outlook Web App.
Settings, Regional Allows you to set the language, dates, and time formats to use with Outlook Web App.
Settings, Password
Allows users to change their domain passwords. After changing their
passwords, users might need to re-enter their credentials and log on
again.
Settings, S/MIME Allows users to download the S/MIME control. They can then use this control to encrypt and digitally sign e-mail.
Block or Allow Allows you to filter junk e-mail and manage the Safe Senders and Recipients list as well as the Blocked Senders list.
When you are working
with the Options page, you can use the Select What To Manage list to
choose what you want to manage. If you choose Myself, you can manage
your user mailbox. If you choose My Organization, you can manage
Exchange mailboxes, groups, contacts, and roles. If you choose Another
User, you can select a mailbox to manage. If you have been granted
permission to access another mailbox or delegated permission to access a
folder within a mailbox,
you can open the mailbox and access any authorized folders by selecting
Another User, clicking the mailbox name, and then clicking OK.
The Sign-Out option logs
off the current user, and ends the Outlook Web App session. As a
recommended best practice, you should advise all users to log off from
their Outlook Web App sessions when they are finished.
3.1. Enabling and Disabling Web Access for Users
Exchange Server 2010 enables
Outlook Web App for each user by default. If necessary, you can disable
Outlook Web App for specific users. To do this, complete the following
steps:
In Exchange Management Console, expand Recipient Configuration and then select Mailbox.
You
should now see a list of users with Exchange mailboxes in the
organization. Double-click the user's name to open the Properties dialog
box for the user account.
On the Mailbox Features tab, the enabled mailbox features for the user are displayed, as shown in Figure 2.
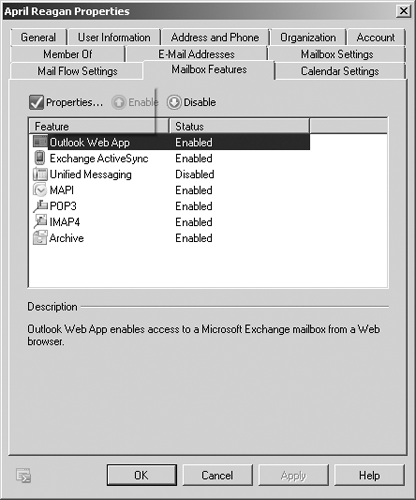
To disable Outlook Web App for this user, under Feature, select Outlook Web App, and then click Disable.
To enable Outlook Web App for this user, under Feature, select Outlook Web App, and then click Enable.
