Filtering on forms in Dynamics AX is implemented in a variety of ways. Dynamics AX provides generic filtering options like Filter By Selection, Filter By Grid, or Advanced Filter/Sort
located in the toolbar as a part of the standard application and they
are available for every form. Some of the existing application forms
already have custom filters implemented, which normally are placed at
the top of the form and represent the most often used search criteria.
But nevertheless, I noticed that standard filtering is not always
comfortable and user friendly and it is a very common request in every
Dynamics AX implementation to add additional customized filters to some
forms.
In this recipe, we will explore how to quickly add custom filters to a form. We will add three custom filters to the Customers form:
1. Stopped will toggle between inactive and all customers.
2. Customer group will allow displaying the customers belonging to a specific group.
3. Account statement will allow displaying customers categorized by how often their account statement is being sent.
Each filter control is based on a different form control type— CheckBox, StringEdit, and ComboBox respectively.
How to do it...
1. In AOT, find the CustAccountStatement base enum. Duplicate it and rename it to CustAccountStatementFilter. Create a new element at the top of the exiting elements with the following properties:
|
Property
|
Value
|
|---|
|
Name
|
None
|
|
Label
| |
|
Value
|
99
|
2. In AOT, locate the CustTable form and add a new group at the top of the form's design with the following properties:
|
Property
|
Value
|
|---|
|
Name
|
Filter
|
|
Caption
|
Filter
|
|
Columns
|
3
|
|
FrameType
|
Edged 3D
|
3. Add a new CheckBox control to the created group with the following properties:
|
Property
|
Value
|
|---|
|
Name
|
BlockedFilter
|
|
Label
|
Stopped
|
|
AutoDeclaration
|
Yes
|
4. Add a new StringEdit control to the same group:
|
Property
|
Value
|
|---|
|
Name
|
GroupFilter
|
|
ExtendedDataType
|
CustGroupId
|
|
AutoDeclaration
|
Yes
|
5. Add a new ComboBox control to the same group:
|
Property
|
Value
|
|---|
|
Name
|
StatementFilter
|
|
EnumType
|
CustAccountStatementFilter
|
|
AutoDeclaration
|
Yes
|
6. Override the modified() methods for each control in the filter group with the following code:
public boolean modified()

{
boolean ret;
;
ret = super();
if (ret)
{
CustTable_ds.executeQuery();
}
return ret;
}
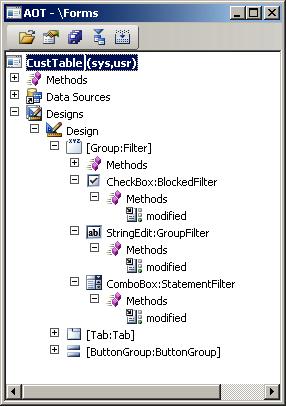
7. After all modifications, the CustTable form should look like this in AOT:
8. In the same form, override executeQuery() of the CustTable data source with the following code:
public void executeQuery()

{
QueryBuildRange rangeBlocked;
QueryBuildRange rangeGroup;
QueryBuildRange rangeStatement;
;
rangeBlocked = SysQuery::findOrCreateRange(
this.query().dataSourceTable(tablenum(CustTable)),
fieldnum(CustTable, Blocked));
rangeGroup = SysQuery::findOrCreateRange(
this.query().dataSourceTable(tablenum(CustTable)),
fieldnum(CustTable, CustGroup));
rangeStatement = SysQuery::findOrCreateRange(
this.query().dataSourceTable(tablenum(CustTable)),
fieldnum(CustTable, AccountStatement));
if (BlockedFilter.value())
{
rangeBlocked.value(
SysQuery::valueNot(CustVendorBlocked::No));
}
else
{
rangeBlocked.value(SysQuery::valueUnlimited());
}
if (GroupFilter.text())
{
rangeGroup.value(queryvalue(GroupFilter.text()));
}
else
{
rangeGroup.value(SysQuery::valueUnlimited());
}
if (StatementFilter.selection() !=
CustAccountStatementFilter::None)
{
rangeStatement.value(
queryvalue(StatementFilter.selection()));
}
else
{
rangeStatement.value(SysQuery::valueUnlimited());
}
super();
}
9. Finally, add the following line to the bottom of the form's init():
StatementFilter.selection(CustAccountStatementFilter::None);
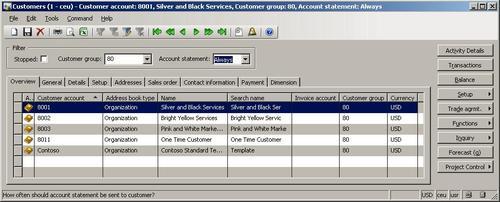
10. To test the filter, open Accounts receivable | Customer Details and start changing the newly created filters— the customer list should match your criteria:
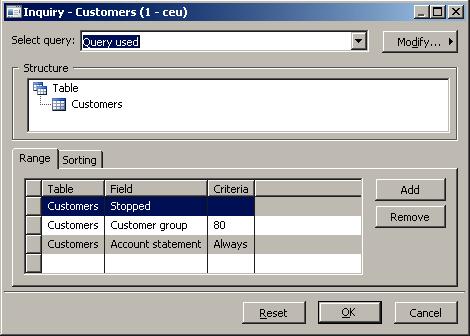
11. Click on the Advanced Filter/Sort Open button in the toolbar. You should see what filters are applied currently:
How it works...
To make things tidy, we create a separate group called Filter for holding all custom filters. We set some properties to change the appearance of this group. The number of Columns is 3, because there will be three controls inside it— one column for each control. FrameType is set to Edged 3D, so we have nice border around all the controls inside this group.
All three controls inside the Filter group must have the AutoDeclaration property set to Yes, which will allow accessing them from code later.
We are planning to place all filtering code in executeQuery() of the CustTable data source. So in each of the created filter controls, we override their modified() methods in order to call executeQuery() every time the user changes their value.
In executeQuery(), we place everything before its super().
This is because we have to apply the data source filters before the
query is executed. We start this method with initializing a QueryBuildRange object for each of the filter controls. We use finOrCreateRange() of the SysQuery
application class to get the range object. It is very useful, as we do
not have to worry about existing ranges— if the range already
exists, it will return it, if not then it will create a new one. It
accepts two arguments a QueryBuildDataSource object and the field number.
Next, we check each filter control and pass its value to the relevant range:
The first filter control is a CheckBox, so we check its value by using its value() method. Customer Stopped status could have three values: No, Invoice, and All. No means that the customer is active, Invoice means the customer is stopped for invoicing, and All
means that the customer is stopped for all operations. If the control
is checked, we set the range value to display everything that is not
active, that is, it is stopped for invoicing or for all operations. Here
we use valueNot() of the SysQuery
application class to format the correct criteria for us. If the control
is unchecked, we show all customers by clearing the range. We use valueUnlimited() of SysQuery for this purpose.
The second filter is a StringEdit and is the simplest one. We check its value by calling its text() and if it is not empty we pass it to the range. Otherwise, we clear the range. Notice that here we use the global queryvalue() function, which is actually a shortcut to value() of the SysQuery application class, to let the application property format input text.
The third filter is a ComboBox. We check the user-selected value by using its selection(). If it is not equal to CustAccountStatementFilter::None, we pass the value to the range, otherwise we clear the range.
Once again, the SysQuery
helper class is very useful when working with queries as it does all
kinds of data conversions to make sure they can be safely used. Here is a
summary of the SysQuery methods used:
valueNot() converts an argument to a safe string and adds a NOT statement in front of it.
valueUnlimited() returns a string representing an unlimited query range value, i.e. not a range at all.
queryvalue() is a shortcut to value() of SysQuery, which returns a safe string.
I would highly
recommend using this class when building custom functionality and it is
worth investigating the rest of the methods in it as they might be of
use in other situations.
There's more...
Normally, ranges added to QueryBuildDataSource use AND operators. Basically that means, in our example customers are filtered by stopped status AND by group AND by account statement sending period. But what if we need to show customers belonging to a specific group OR assigned to a specific account statement sending option?
Dynamics AX allows us to do that by passing more complex argument values to QueryBuildRange objects instead of simple ranges. Actually, QueryBuildRange accepts partial SQL statements representing the WHERE part of the statement.
To demonstrate that, let's edit the previous example to incorporate OR filtering between the customer group and account statement filters.
We only need to update executeQuery() with the following code:
public void executeQuery()
{
QueryBuildRange rangeBlocked;
QueryBuildRange rangeGroup;
QueryBuildRange rangeStatement;
str sql;
;
rangeBlocked = SysQuery::findOrCreateRange(
this.query().dataSourceTable(tablenum(CustTable)),
fieldnum(CustTable, Blocked));
rangeGroup = SysQuery::findOrCreateRange(
this.query().dataSourceTable(tablenum(CustTable)),
fieldnum(CustTable, CustGroup));
rangeStatement = SysQuery::findOrCreateRange(
this.query().dataSourceTable(tablenum(CustTable)),
fieldnum(CustTable, AccountStatement));
if (BlockedFilter.value())
{
rangeBlocked.value(
SysQuery::valueNot(CustVendorBlocked::No));
}
else
{
rangeBlocked.value(SysQuery::valueUnlimited());
}
if (GroupFilter.text() &&
StatementFilter.selection() !=
CustAccountStatementFilter::None)
{
sql = strfmt(
custom filterscustom filtersexecuteQuery(), updating'((%1 = "%2") || (%3 = %4))',
fieldstr(CustTable,CustGroup),
queryvalue(GroupFilter.text()),
fieldstr(CustTable,AccountStatement),
queryvalue(StatementFilter.selection()));
rangeGroup.value(sql);
rangeStatement.value(SysQuery::valueUnlimited());
}
else
{
if (GroupFilter.text())
{
rangeGroup.value(queryvalue(GroupFilter.text()));
}
else
{
rangeGroup.value(SysQuery::valueUnlimited());
}
if (StatementFilter.selection() !=
CustAccountStatementFilter::None)
{
rangeStatement.value(
queryvalue(StatementFilter.selection()));
}
else
{
rangeStatement.value(SysQuery::valueUnlimited());
}
}
super();
}
Here we made a couple of changes to this method. First, we added a new sql variable to the variable declaration section and second, we added an if statement right after processing the first range. The statement checks if both Customer group and Account statement controls contain values. If yes, new code is executed, otherwise the filters are processed as before.
In the new code, we are formatting the WHERE part of the SQL query. In SQL, it should be like this:
((CustGroup = "<value1>") || (AccountStatement = <value2>))
Field names and placeholders<value1> and<value2> are replaced with Customer group and Account statement values using global strfmt() function.
Using that kind of filter
value it does not matter which range to use, as the system is picking
up field names from the SQL and not the range. Here, we use the second
range to pass the formatted SQL string and we clear the third range to
make sure it does not interfere with the formatted SQL statement.
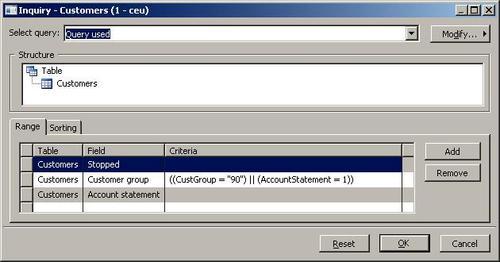
Now if we run the same form, Customer Group and Account statement filters should be applied using OR. Select some filter values and notice how the customer list changes:
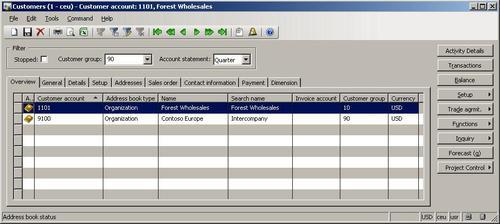
To double-check if the filter works correctly, open Advanced Filter/Sort from the toolbar. The customer group filter should be very similar to what we formatted in our code:
