Enhanced Performance Output
The Query Editor in SSMS
has an extensive set of options available for capturing and distributing
performance-related data. It contains many of the familiar performance
features that you may have grown accustomed to in SQL Server 2000 Query
Analyzer—plus more. If you’re familiar with the SQL Server 2005
performance output, you will find that that the SQL Server 2008
performance output has changed very little. The Execution Plan tab that
is displayed in the results window and the Results and Messages tab are
still there in SQL Server 2008. The Execution Plan tab can be populated
with two different types of plans: estimated plans and actual plans. The
actual execution plan shows the plan that was used in generating the
actual query results. The actual plan is generated along with the
results when the Include Actual Execution Plan option is selected. This
option can be selected from the SSMS toolbar or from the Query menu. Figure 4 shows an example of an actual execution plan generated for a query against the AdventureWorks2008 database.

The familiar treelike
structure that was also present in SQL Server 2000 is still used in SQL
Server 2005 and SQL Server 2008. The ToolTips displayed when you mouse
over a node in the execution plan include additional information; you
can see that information in a more
static form in the Properties window if you right-click the node and
select Properties. The display is generally easy to read and should be
read from right to left.
Note
The Manage Indexes
and Manage Statistics options available in the SQL Server 2000 Query
Analyzer are not present in the Query Editor in SQL Server 2008. Those
options in Query Analyzer were accessible by right-clicking a node in
the query plan. You can use the Database Engine Tuning Advisor (DTA) in
SQL Server 2008 to analyze the Query Editor statements or open the Table
Designer to manage the indexes on a specific table.
Query plans generated in the
Query Editor are easy to distribute in SQL Server 2008. You have several
options for capturing query plan output so that you can save it or send
it to someone else for analysis. If you right-click an empty section of
the Execution Plan window, you can select the Save Execution Plan As
option, which allows you to save the execution plan to a file. By
default, the file has the extension .sqlplan. This file can be opened using SSMS on another machine to display the graphical output.
The query plan can also be output in XML format and distributed in this form. You make this happen by using the SET SHOWPLAN_XML ON
option. This option generates the estimated execution plan in a
well-defined XML document. The best way to do this is to turn off the
display of the actual execution plan and execute the SET SHOWPLAN_XML ON
statement in the code pane window. Next, you set the Query Editor to
return results in grid format and then execute the statements for which
you want to generate a query plan. If you double-click the grid results,
they are displayed in the SSMS XML editor. You can also save the
results to a file. If you save the file with the .sqlplan extension, the file displays the graphical plan when opened in SSMS.
Using the Query Designer in the Query Editor
A graphical query design
tool is accessible from the query editor window where you write your
queries. This is a great option that was missing in SQL Server 2000.
With SQL Server 2000, you could access a graphical query designer by
opening a table in Enterprise Manager and selecting Query, but this
option was disconnected from the Query Analyzer environment, where the
queries were authored. This tool was introduced in SQL Server 2005 and
remains generally unchanged in SQL Server 2008.
With SQL Server 2008, you can
right-click in the query editor window and choose Design Query in
Editor. A dialog box appears, allowing you to add tables to the
graphical query designer surface. The selected tables are shown in a
window that allows you to select the columns you want to retrieve.
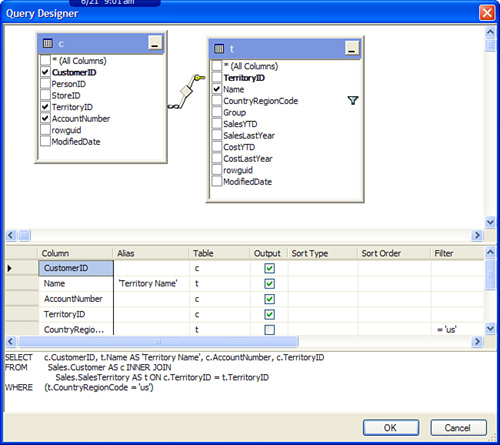
Selected columns appear in a SELECT statement displayed at the bottom of the Query Designer window. Figure 5 shows an example of the Query Designer window that contains two tables from the AdventureWorks2008 database. The two tables selected in this figure are related, as indicated by the line between them.

The
T-SQL statements are generated automatically as you select various
options on the Query Designer screen. If you select Sort Type, an ORDER BY
clause is added. If you choose an alias for a column, it is reflected
in the T-SQL. If tables are related, the appropriate joins are
generated.
When you click OK on the Query
Designer window, the related T-SQL is automatically placed in the query
editor window. You can edit the T-SQL as needed or use it as is. You can
imagine the time savings you can achieve by using this tool.
Tip
The Query Designer has a
very impressive feature that allows you to view a T-SQL query visually.
If you copy a valid T-SQL statement, open the Query Designer, and paste
the T-SQL into the SQL pane at the bottom of the Query Designer, it
tries to resolve the T-SQL into a graphical display. The tables in the FROM
clause are shown in the designer panel, and information related to the
selected columns is listed as well. The Query Designer cannot resolve
all T-SQL statements and may fail to generate a visual display for some
complex T-SQL.
Managing Projects in SSMS
Project management
capabilities like those available in Visual Studio are available in
SSMS. Queries, connections, and other files that are related can be
grouped into projects. A project or set of projects is further organized
or grouped as a solution. This type of organization is the same as in
the Visual Studio environment.
Projects and solutions
are maintained and displayed with the Solution Explorer. The Solution
Explorer contains a tree-like structure that organizes the projects and
files in the solution. It is a component window within SSMS that you
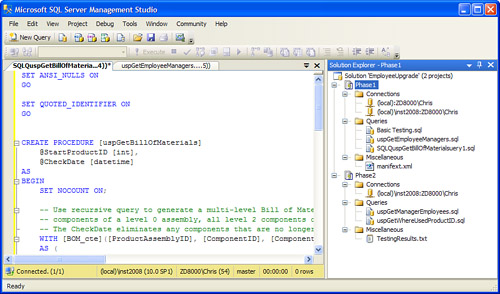
launch by selecting View, Solution Explorer. Figure 6 shows an example of the Solution Explorer. The solution in this example is named EmployeeUpgrade, and it contains two projects, named Phase1 and Phase2. Each project contains a set of connections, a set of T-SQL scripts, and a set of miscellaneous files.

The first thing to do when using
the project management capabilities in SSMS is to add a project. To do
this, you select File, New, and when the New dialog appears, you select
Project to add a new project. When adding the new project, you are given
a choice of the type of project, and you must select either SQL Server
Scripts, Analysis Services Scripts, or SQL Mobile Scripts. Each one of
these project types is geared toward the respective SQL Server
technology.
The solution that is related
to the project is created at the same time that the project is created.
The Solution Name is entered at the bottom of the New Project window
and an option to create a separate directory for the solution is
provided. There is no option to create the solution separately.
After the project is added, you can add the related connections and files. To add a new connection, you simply right-click the Connections node. The Connections
entries allow you to store SQL Server connection information that
relates to the project you are working on. For example, you could have a
connection to your test environment and another connection
to the production environment that relates to the project. When a
connection is included in the project, you can double-click it, and a
new query window for that connection is established.
SQL script files are added to a project in a similar fashion to connections: You right-click the Queries
node and select the New Query option. A new query editor window
appears, allowing you to enter the T-SQL commands. Any T-SQL script is
viable for this category, including those that relate to database
objects such as stored procedures, triggers, and tables.
You can also add existing files
to a project. To do this, you right-click the project node, select Add,
and then select Existing Item. The file types listed in the drop-down at
the bottom of the Add Existing Item dialog include SQL Server files (*.sql), SQL deadlock files (*.xdl), XML files (*.xml), and execution plan files (*.sqlplan). SQL Server files are added, by default, to the Queries node. All the other file types are added to the Miscellaneous node. The connection entries are not stored in a separate file but are contained in the project file itself.