Integrating SSMS with Source Control
SSMS has the capability
to integrate database project files into a source control solution.
Source control provides a means for protecting and managing files.
Source control applications typically contain features that allow you to
track changes to files, control and track who uses the files, and
provide a means for tagging the files with a version stamp so that the
files can be retrieved at a later time, by version.
SSMS can integrate with a
number of different source control applications. Visual SourceSafe is
Microsoft’s basic source control solution, but other source control
applications can be used instead. The source control client application
must be installed on the machine on which SSMS is running. When the
installation is complete, you can set the source control application
that SSMS will use within SSMS. To do this, you select Tools, Options
and navigate to the Source Control node. The available source control clients are listed in the Current Source Control Plug-in drop-down.
The link between SSMS and the
source control application is the database solution. After a solution is
created, it can be added to the source control. To add a solution to a
source control application, you open the Solution Explorer and
right-click the solution or any of the projects in the solution. You
then see the Add Solution to Source Control option. You must then log in
to the source control application and select a source control project
to add the solution to.
When the solution is added to a
source control application, all the related projects and project files
are added as well. The projects and files in the source control
application have additional options available in the Solution Explorer. Figure 7
shows a sample solution added to a source control application. A subset
of the source control options available when you right-click project
files are shown in this figure as well.
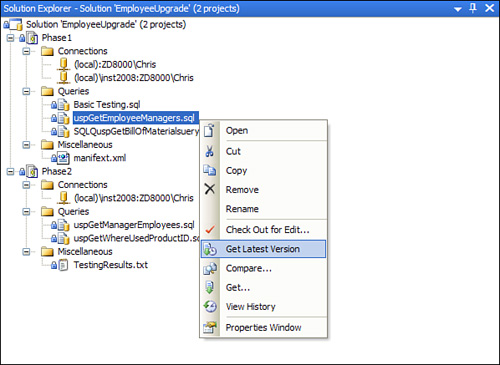
The options related to
source control are listed toward the bottom of the options list. The
options that are available depend on the status of the selected file.
For example, if a file has been checked out, additional options are
displayed that relate to checking the file back in. Following are some
of the common source control options:
- Check Out for Edit—This
option allows you to get a copy of the file from the source control
application so that you can modify the file. When you check out the
file, the source control provider can keep track of the user who has
checked out the file, and it can also prevent other users from checking
out the file.
- Check In—This
option copies the locally modified file into the source control
solution. The file must first be checked out for editing before you can
use the Check In option. A new version for the file is established, and
any prior versions of the file are retained as well.
- Get Latest Version—This
option gets a read-only copy of the latest version of the project file
from the source control application. The file is not checked out with
this option.
- Compare—This
option enables you to compare versions of source control files. The
default comparison that is shown is between the file in the source
control application and the local file on your machine.
- Get—This
option is similar to the Get Latest Version option, but it retrieves a
read-only copy of the file. With this option, a dialog box appears,
allowing you to select the file(s) that you want to retrieve.
- View History—This
option lists all versions of the files checked into the source control
application. The History dialog box has many options that you can use
with the different versions of the file. You can view differences
between versions of the files, view the contents of a specific version, generate reports, or get an older version of the file.
- Undo Checkout—This
option changes the checkout status in the source control application
and releases the file to other source control users. Any changes made to
the local copy of the file are not added to the source control version.
Other source control options
are available via the Source Control menu in SSMS. You select an item in
the Solution Explorer and then select File, Source Control. You can use
this menu to check the status of a file by using the SourceSafe
Properties option, set source control properties, launch the source
control application, and perform other source control operations.
Using SSMS Templates
Templates provide a
framework for the creation of database objects in SSMS. They are
essentially boilerplate files that help generate scripts for common
database objects. They can speed up the development of these scripts and
help enforce consistency in the generation of the underlying database
objects.
The Template Explorer is a
component window available in SSMS and replaces the Template tab
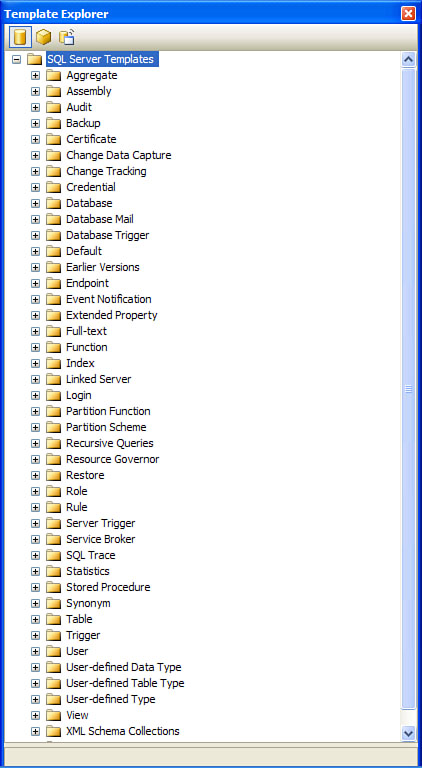
available in the SQL Server 2000 Query Analyzer. Figure 8
shows the Template Explorer and the available SQL Server template
folders. Separate templates also exist for Analysis Services and SQL
Server Mobile Edition. You can view them by selecting the related icon
at the top of the Template Explorer.
You access the
available templates by expanding the template folder in the Template
Explorer tree. For example, if you expand the Index
folder, you see six different types of index templates. If you
double-click one of the templates, a new query editor window appears,
populated with the template script. Figure 9 shows the template script displayed when you open the Create Index Basic template.
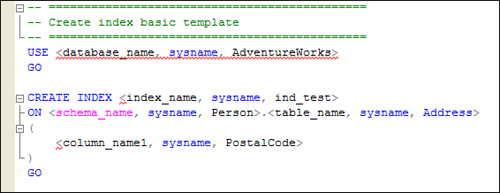
The template script contains template parameters that have the following format within the script:
<parameter_name, data_type, value>
You can manually replace these
parameters in the script, or you can use the Specify Values for Template
Parameters option from the Query menu to globally replace the
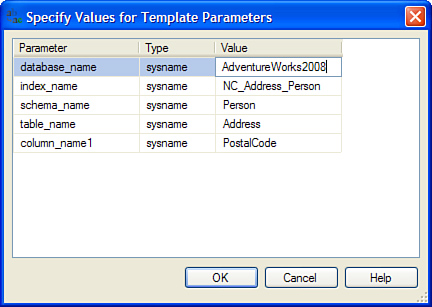
parameters in the script with the desired values. Selecting Query,
Specify Values for Template Parameters launches the Specify Values for
Template Parameters dialog box, which enables you to enter the parameter
values (see Figure 10).
Tip
When you use the Specify
Values for Template Parameters option, some parameters may be missed if
the parameter text has been altered. For example, if you add a carriage
return after parameter_name,
the Parameters dialog box does not list that parameter. It is best to
leave the template script unchanged before you specify values for the
parameters. You should make changes to the script after the values have
been specified.
After you enter the parameter values and click OK, the values are reflected in the script. For example, the values shown in Figure 10 for the basic index template result in the following script:
-- =============================================
-- Create index basic template
-- =============================================
USE AdventureWorks2008
GO
CREATE INDEX NC_Address_Person
ON Person.Address
(
    PostalCode
)
GO
You also have the option of
creating your own custom templates. These templates can contain
parameters just like those available with the default templates. You can
also create your own template folder that will be displayed in the
Template Explorer tree. To create a new template folder, you right-click
the SQL Server Templates node in
the Template Explorer tree and select New, Folder. A new folder appears
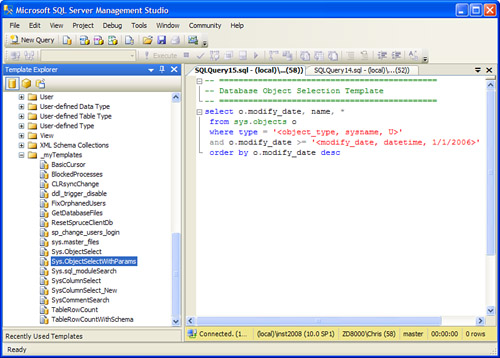
in the tree, and you can specify a new folder name. Figure 11 shows the Template Explorer with a set of custom templates found under the _mytemplates folder. The code pane in this figure shows the contents of a new custom template named sys.objectSelectWithParameters. This custom template contains two parameter declarations: object_type and modify_date.
When you select the Specify Values for Template Parameters options for
this custom template, you have the opportunity to change the values,
just as you can with the default templates.
Note
When you double-click a template
in the Template Explorer tree, you create a script based on the
template. Changes made to the script do not affect the template; they
affect only the script generated from the template. To change the actual
template, you need to right-click the template and select Edit. After
you complete your changes, you need to make sure to save the template.
Also,
you should keep in mind that there is no requirement to have parameters
in your templates. Templates are handy tools for accessing any code
snippet you might use. After the code snippet is added as a template,
you can open a new query editor window based on the template or simply
drag and drop the template from the Template Explorer to an existing
query editor window, and the code for the template is pasted into the
window.