Number sequences are
widely used through the system as a part of the standard application.
For using sequences in forms, Dynamics AX provides a special number
sequence handler class. It is called NumberSeqFormHandler and its purpose is to simplify the usage of record numbering on Dynamics AX forms. Some of the standard Dynamics AX forms like Customers or Vendors already have this feature implemented.
This recipe will show how to
use the number sequence handler on Dynamics AX forms. Although in this
demonstration we will use an existing form, the same approach could be
applied when creating new forms from scratch.
In the standard
application, employee number has to be specified manually and in the
Creating a new number sequence recipe, we have already created a new
number sequence to be used for employees. In this recipe, we will go one
step forward by starting to use this number sequence in the Employee form.
How to do it...
1. In AOT, open EmplTable form and add the following code to the bottom of its class declaration:
NumberSeqFormHandler numberSeqFormHandler;
2. Also, create a new method called numberSeqFormHandler() in the same form:
NumberSeqFormHandler numberSeqFormHandler()

{;
if (!numberSeqFormHandler)
{
numberSeqFormHandler = NumberSeqFormHandler::newForm(
CompanyInfo::numRefEmplId().NumberSequence,
element,
EmplTable_ds,
fieldnum(EmplTable, EmplId));
}
return numberSeqFormHandler;
}
3. In the same form, in the EmplTable data source's create(), add the following line before its super() method:
element.numberSeqFormHandler(
).formMethodDataSourceCreatePre();
4. And add the following code to the bottom of the same method:
if (!extern)
{
element.numberSeqFormHandler(
).formMethodDataSourceCreate();
}
5. In the same data source in its delete(), add the following line right after ttsbegin:
element.numberSeqFormHandler(
).formMethodDataSourceDelete();
6. In the same data source in its write(), add the following line right after super():
element.numberSeqFormHandler(
).formMethodDataSourceWrite();
7. In the same data source in its validateWrite(), add the following code right after super():
ret = element.numberSeqFormHandler(
).formMethodDataSourceValidateWrite(ret) && ret;
8. In the same data source in its linkActive(), add the following line right after the variable declaration section:
element.numberSeqFormHandler(
).formMethodDataSourceLinkActive();
9. Finally, add the following code to the form's close() right before super():
if (numberSeqFormHandler)
{
numberSeqFormHandler.formMethodClose();
}
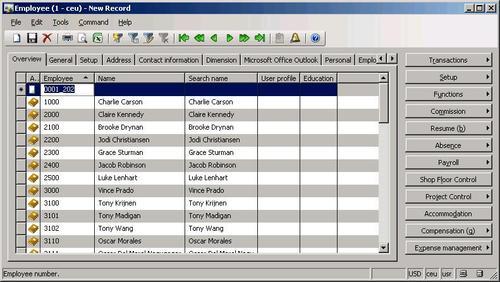
10. To test the employee numbering, open Basic | Employee Details and try to create several new records— the employee number has to be generated automatically:

How it works...
First, we declare the NumberSeqFormHandler object in the form's class declaration. Then, we create a new form method numberSeqFormHandler(), which creates an object of type NumberSeqFormHandler
if it does not exist yet and returns it. This method allows us to store
handler creation code in one place and reuse it as many times as we
need.
We use the static constructor method NumberSeqFormHandler::newForm() to create a new number sequence handler. It accepts several arguments:
The number sequence code, which was created in the prerequisite recipe. Here, we call the numRefEmplId() helper method from the CompanyInfo table to find which number sequence should be used when creating new employees. It was created earlier in the other recipe.
The form object itself.
The form data source where we need to apply the number sequence handler.
The number of the field into which the number sequence will be populated.
The rest of the code in the various data source member methods ensures that the relevant NumberSeqFormHandler class methods are executed. The rest is done automatically inside the class.