Hardware Requirement
The Lync Server Edge Server processor requirements are as follows:
Dual processor, quad-core 2.0 GHz or faster
Four-way processor, dual-core 2.0 GHz or faster
Caution
Lync Server is only a 64-bit
application and requires a 64-bit capable processor. This is generally
not an issue with modern hardware, but be sure to verify that legacy
hardware supports a 64-bit operating system before attempting to use it
for an Edge Server.
The Lync Server Edge Server memory requirement is as follows:
The Lync Server Edge Server disk requirement is as follows:
The Lync Server Edge Server network requirement is as follows:
Tip
When
teaming multiple network adapters, use them only for fault-tolerance.
This means network adapters should be used for failover only and not be
combined for greater throughput.
Operating System Requirements
The Lync Server Edge Server supports the following operating systems:
Windows Server 2008, x64 Standard Edition with Service Pack 2
Windows Server 2008, x64 Enterprise Edition with Service Pack 2
Windows Server 2008, x64 Datacenter Edition with Service Pack 2
Windows Server 2008 R2, Standard Edition
Windows Server 2008 R2, Enterprise Edition
Windows Server 2008 R2, Datacenter Edition
Caution
The Datacenter editions of
Windows Server 2008, x64 with Service Pack 2 and Windows Server 2008 R2
are supported by Microsoft, but have not been fully tested for use with
Lync Server.
The Windows Server Core,
Web, and High Performance Computing editions for any operating system
version are not supported for deployment.
Software Requirements
The Lync Server Edge Server requires the following components to be installed:
Server Roles and Features
Unlike the other roles in Lync
Server, the Edge Server has no requirements for server roles or
features. All the required components are included within the Edge
Server installation.
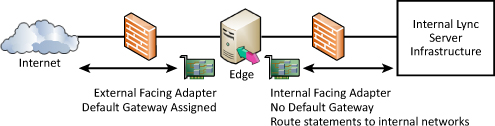
Configure Networking
After
the required components are installed, it is important to get the Edge
Server networking configuration completed. An Edge Server must have at
least two network adapters: one for external traffic and one for
communicating with internal servers or clients.
Tip
Make sure necessary routing statements are entered so that traffic for internal clients uses the correct adapter. As shown in Figure 1, only the external facing adapter should have a default gateway assigned to ensure consistent routing behavior.
Create Edge Pool
After the server has been
fully prepared for installation, the topology must be edited and
published to reflect the new Edge Server pool. This involves editing the
existing topology, if it exists, and then republishing the topology so
that all other servers in the environment are aware of the new Edge
Server pool.
Edit Topology
The next step in deploying
an Edge Server is to edit the existing Lync Server topology. To edit
the topology, perform the following steps:
Tip
If the Topology Builder is not
already installed on the local computer or another computer in the
environment, it can be installed from the Lync Server media.
1. | Open the Lync Server Topology Builder.
|
2. | When prompted to import an existing topology from Active Directory, click OK.
|
3. | Expand the Site node where the Edge Server will deployed.
|
4. | Right-click the Edge pools node, and select New Edge Pool.
|
5. | Click Next to begin the wizard.
|
6. | Enter the fully qualified name of the internal Edge Server pool in the Pool FQDN field.
|
7. | Follow
the appropriate following sections depending on whether a single Edge
Server or pool of load-balanced Edge Servers will be deployed.
|
Deploying Standalone Edge Server
1. | Select Single computer pool, and click OK.
|
2. | If a single public IP address will be used for the Access Edge, Web Conferencing Edge, and A/V Edge services check the box Use a single FQDN and IP address. This requires using ports other than 443 for two of the services.
|
3. | If federation is used, check the Enable federation box.
|
4. | If the IP address used for the A/V Edge uses NAT, check the The external IP address of this Edge pool is translated by NAT box. Click Next when complete.
|
5. | Under the SIP Access section, enter the external server FQDN and port. Typically, this is similar to sip.companyabc.com and port 443.
|
6. | Under the Web Conferencing section, enter the external server FQDN and port. Typically, the name and port are similar to webconf.companyabc.com and port 443.
|
7. | Under the Audio/Video section, enter the external server FQDN, IP address, and port. Typically, the name and port are similar to av.companyabc.com and port 443. Click Next when complete.
|
8. | Enter an internal-facing IP address for the Edge Server pool and click Next.
|
9. | Under the SIP Access section, enter the external IP address.
|
10. | Under the Web Conferencing section, enter the external IP address.
|
11. | Under the Audio/Video section, enter the external IP address and click Next.
|
12. | If the A/V Edge IP address is translated by NAT enter the public IP address and click Next.
|
13. | Select a next-hop pool to be used by the Edge Server pool and click Next. If a Director is deployed, that should be the next hop.
|
14. | Place
a checkmark next to any Front-End pools in the deployment that will use
this Edge server pool for external web conferencing and A/V content.
Click Finish to complete the wizard.
|
Deploying Load-Balanced Edge Server Pool
1. | Select Multiple computer pool and click OK.
|
2. | If
a single public IP address will be used for the Access Edge, Web
Conferencing Edge, and A/V Edge services on each server check the box Use a single FQDN and IP address. This requires using ports other than 443 for two of the services.
|
3. | If federation is used, check the Enable federation box.
|
4. | If the IP address used for the A/V Edge uses NAT, check the The external IP address of this Edge pool is translated by NAT box. Click Next when complete.
|
5. | Under the SIP Access section, enter the external server FQDN and port. Typically, this is similar to sip.companyabc.com and port 443.
|
6. | Under the Web Conferencing section, enter the external server FQDN and port. Typically, the name and port are similar to webconf.companyabc.com and port 443.
|
7. | Under the Audio/Video section, enter the external server FQDN, IP address, and port. Typically, the name and port are similar to av.companyabc.com and port 443. Click Next when complete.
|
8. | Click the Add button to define computers within the pool.
|
9. | Enter the internal-facing IP address and internal FQDN of the server. Click Next.
|
10. | Under the SIP Access section, enter the external IP address.
|
11. | Under the Web Conferencing section, enter the external IP address.
|
12. | Under the Audio/Video section, enter the external IP address and click Next.
|
13. | If the A/V Edge IP address is translated by NAT enter the public IP address and click Next.
|
14. | Repeat steps 8–13 for any additional Edge Server pool members and click Next when all nodes have been added.
|
15. | Select a next-hop pool to be used by the Edge Server pool and click Next. If a Director is deployed, that should be the next hop.
|
16. | Place
a checkmark next to any Front-End pools in the deployment that will use
this Edge server pool for external web conferencing and A/V content.
Click Finish to complete the wizard.
|
Publish Topology
After the topology is modified
to include the Edge Server pool, the configuration can be published.
This step publishes the changes to the Central Management Store, and all
existing Lync Server servers will update their local configuration
stores to match.
1. | Ensure that the Lync Server Topology Builder is open and contains the Edge Server pool recently added.
|
2. | Click the top node of the management console, Lync Server.
|
3. | Click the Action menu and select Publish Topology, or select Publish Topology from the Actions pane on the right side of the console.
|
4. | Click Next to begin publishing the topology.
|
5. | When the log indicates a successful update, click Finish to complete the wizard.
|
Install Server
At this point, the target server should be fully prepared and meet all prerequisites.
Export Topology
The process for installing
a local configuration store on an Edge Server varies depending on
whether an Edge Server is part of the Active Directory domain and can
access the configuration store directly. Typically, the Edge Server is
isolated and requires a few extra manual
steps to read the topology. These steps involve exporting the entire
topology to an XML file and copying it to the Edge Server.
1. | Open the Lync Server Management Shell.
|
2. | Run the following command:
Export-CSConfiguration –FileName C:\Lync2010.zip
|
3. | Copy the file to the Edge Server prior to beginning the installation.
|
Install Local Configuration Store
To install a server role in
Lync Server, the target server must first have a local configuration
store installed and populated with the topology information.
1. | Insert the Lync Server media on the server to be used as an Edge Server and launch Setup.exe found in the Setup\amd64 folder.
|
2. | Enter a location for the installation files to be cached and click Install.
|
3. | Click Install or Update Lync Server system.
|
4. | Under Step 1: Install Local Configuration Store, click Run.
|
5. | Because the Edge Server is part of a workgroup and cannot access the Central Management Store, select import from a file, and then click Browse. If the Edge Server is part of the domain, it should be able to read the Central Management Store directly.
|
6. | Select the .zip file copied earlier and then click Next.
|
7. | Click Finish when the topology is imported successfully.
|
Install Lync Server Components
The following steps enable
the server to read the topology information from the local configuration
store, and then install the server roles matching its own FQDN.
1. | Under Step 2: Setup or Remove Lync Server Components, click the Run button.
|
2. | Select Next to begin the Edge Server installation published in the topology.
|
3. | When prompted to install the Microsoft Network Service, click the Install button.
|
4. | Click Finish when the installation completes.
|
Create Certificates
Like all other
roles in Lync Server, the Edge Server communicates to other servers in
the organization using Mutual Transport Layer Security (MTLS). The Edge
Server requires a few certificates depending on the services published.
At a minimum, the Edge Server always requires a certificate with its
internal FQDN for communication to other servers.
The certificate used for Access Edge services should adhere to the following guidelines:
- The subject name should be the published address for Access Edge services.
- All supported SIP domains must be entered as a subject alternative name in the format sip.<SIP domain>.
The certificate used for Web Conferencing Edge services should adhere to the following guideline:
- The subject name should be the published address for Web Conferencing Edge services.
The certificate used for
A/V Authentication service has no specific guidelines. The certificate
is used only to generate encryption keys, but the name used by the
wizard matches the internal Edge pool FQDN.
Note
The Certificate Wizard in Lync
Server automatically populates the subject name and required subject
alternative names based on the published topology. This greatly
simplifies certificate confusion created by prior versions. As long as
the published topology is accurate, changing the certificate names or
adding subject alternative names is unnecessary.
Use the following steps to request and assign the necessary certificates:
1. | Under Step 3: Request, Install, or Assign Certificate, click the Run button.
|
2. | Highlight the Edge internal option and click the Request button.
|
3. | Click Next to begin the wizard.
|
4. | Select to either Send the request immediately to an online certification authority or Prepare the request now, but send it later (offline certificate request) and click Next. Typically an Edge server will have to use the Prepare the request now, but send it later option.
|
5. | Click the Browse button and select a file location for the certificate signing request (CSR) and click Next.
|
6. | To use the standard WebServer template, click Next on the Specify Alternate Certificate Template page.
|
7. | Enter a friendly name for the certificate such as Lync Server Internal.
|
8. | Select a key bit length of 1024, 2048, or 4096.
|
9. | If the certificate should be exportable, select the Mark certificate private key as exportable check box and click Next.
|
10. | Enter an organization name, which is typically the name of the business.
|
11. | Enter an organizational name, which is typically the name of a division or department, and click Next.
|
12. | Select a country, enter a state or province, and enter a city or locality, and then click Next.
|
13. | Click Next after reviewing the automatically populated subject and subject alternate names.
|
14. | Do not add additional subject alternative names and press Next.
|
15. | Click Next to complete the request, and then click Finish to complete the wizard.
|
After completing the wizard, run through it a one more time to generate a CSR for the External Edge certificate.
If the
certificates are issued from an online certificate authority, they
should be installed automatically. If an offline request is issued, the
wizard must be re-run with the option to complete an offline request.
Assign Certificates
After creating the
necessary certificates, the Edge Server services must have certificates
assigned to them. This process binds each certificate to a specific Edge
service. To assign a certificate, perform the following steps:
1. | Under Step 3: Request, Install, or Assign Certificate, click the Run button.
|
2. | Highlight Edge internal and click the Assign button.
|
3. | Click the Next button to begin the wizard.
|
4. | Select Assign an existing certificate, and then click Next.
|
5. | Select
the correct certificate for this usage. Certificates will not appear
here unless they can be verified to a Trusted Root Certification
Authority and have a private key associated. Press Next.
|
6. | Verify that the certificate is selected, and then click Next.
|
7. | Click Finish when the process is complete.
|
Repeat the previous steps for the External Edge services certificate.
Start Services
After the necessary certificates are requested and assigned, the Lync Server Edge Server services can be started.
1. | Beneath Step 4: Start Services, and then click the Run button.
|
2. | Click Next to start the Lync Server services.
|
3. | Click Finish to complete the wizard.
|
At this point, the Edge Server installation is complete and functional.
