Each development element in NAV is referred to as an object. There are seven types of objects in NAV.
The user can modify any of these
objects provided the license has proper development privileges and
object ranges. Based on the business requirements, these objects can be
exported, modified, and updated in the system using the import function.
The prior versions of NAV did not allow import of objects if the
modified range was not included in the user's license. But starting from
version 5.1, this restriction is no longer applicable. This implies
that the modifications, although not in the license range, can be
imported in NAV, the usage of which is still restricted by license
ranges.
Updating objects
Updating objects in NAV is quite
simple. However, as there is no formal object version management tool or
check-in/check-out tool available in NAV, one has to be careful while
updating these objects. The changes can be overwritten if two developers
work on the same set of objects and update them in NAV at different
times. The last update is the one that will overwrite all the preceding
updates.
Though some developers
have created their own versions of check-in/check-out tools using the
NAV development environment, one of the most common ways is to maintain a
log that shows the objects that are being used and by which developers.
A development team leader or project manager can be the in charge of
maintaining this list of objects.
The procedure for
updating different objects is very much similar in NAV with the
exception of updating tables, where merge and overwrite options are
available.
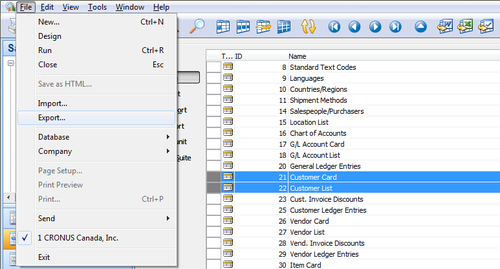
Exporting the objects from NAV
Let's start with exporting the objects from NAV.
The objects can be exported in binary, .fob, or .txt structures. Multiple objects can be selected and can be exported as a single .fob or .txt
file and so the naming is crucial while exporting objects. Most
developers follow certain naming conventions, the most common practice
being to assign a name similar to the requirements or gap ID in the
Gap/Fit sheet or the functional requirements document. This way, the
users can easily identify what changes the fob or txt file pertains to.
Also, it is a good practice to use a short date as suffix in the export
name.
For example, the following can be used to name object export files:
"GAP1-1A01-0210.fob"
"DescriptionFieldLengthIncrease-0210.fob"
"GAP-1A01-ver1-0.fob" etc.
Open the object designer of
the master DB in the Classic client in NAV. The object designer is not
available through the RoleTailored client as of NAV 2009 SP1. The master
DB is the one that maintains the final version of all objects modified
by different developers. Each developer can have their own versions of
development DBs, but eventually all modified objects are updated in the
master DB according to the development log.
1.
Select the objects to be modified. We can then modify the objects as
per the specifications document. Filters can be used to select different
types of objects. It's better to keep all objects in a single .fob or .txt file.
2. The following screenshot describes the selection and export of various objects:
Once the objects are exported,
they can be modified by the developers using their development license.
The Project Manager/Development Manager at this point needs to keep a
tight control on what objects are checked out by which developers. Some
programmers have developed object management tools that help in
monitoring the check-out and check-in of objects. If multiple developers
work on the same objects, make sure that the changes are merged with
the latest version of the import. The next step is to import objects.
Importing a file with modifications
Importing the objects is
similar for all objects, with the exception of tables, where a merge
option is available in addition to the overwrite and replace option.
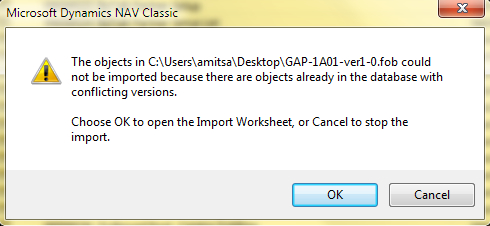
Let's take an example of importing a file that has modifications related to a form and a table:
1. Open the object designer and click on Import.... Point to the .fob file with changed objects. An error message cautioning conflict of objects will appear; click on OK.
2. Once we click on OK, the system shows the import worksheet with all the objects listed. The conflicts come with a warning sign.
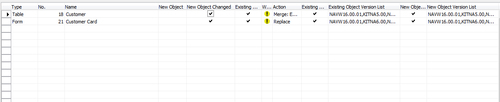
3.
If the object ID doesn't have a conflict in import, the system imports
the new objects without warning. However, if the object ID already
exists in the system, it gives a warning (shown in the screenshot prior
to the preceding one) and opens an import worksheet. The worksheet gives
the option to handle each object in a separate line. The fields for
each line and object describe details of each object and how it should
be handled:
Type: The type of the object is one of the eight object types, such as table, form, and so on.
No.:
The ID of the imported object. The ID identifies the range the object
falls under. For example, a custom object using a standard developer
license can fall in the 50,000 to 99,999 range. The customer is usually
assigned a range in his/her license and is allowed to use customizations
only in that range.
Name: This
field describes the name or description of the object. The name or
description should be unique for each object in the system.
New Object: This option is automatically checked if this is a new object.
New Object Changed: This option is automatically checked if the new object has been marked as changed.
Action: This
is the field that the user can input to choose how to handle conflicting
objects. The options are create, replace, delete, skip, merge (New
<- Existing) and merge (Existing <- New). The two merge options
are available only in the case of tables.
Create: The system creates a new object in the database.
Replace: The existing object will be replaced by the new version of the object.
Delete: The existing object will be deleted.
Skip: This system will skip the import of the object.
Merge (Existing<-New): All fields in the existing table will remain and any additional fields from the new object will be added.
Merge (New<-Existing): All fields in the new table will be imported and any additional fields in the existing table will be added to the new table.
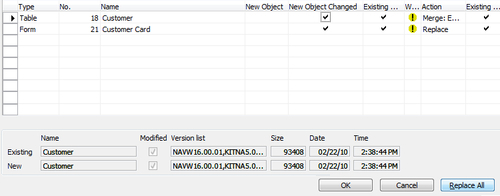
4. Another option available is to use the Replace All
function that replaces all objects with the new version of objects.
This is a commonly used option if the user doesn't want to go through
each line and manually change the option for each object. The following
screenshot shows the Replace All function to replace all objects:
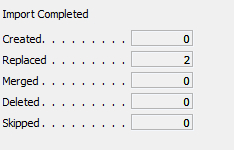
5.
Once the objects are imported, the system displays a message box with
details of how many objects were imported, created, replaced, and so on.
6.
The user is now ready to use the system with the changed objects. The
following screenshot shows the message box with details: