1. Crawling Exchange Public Folders
SharePoint 2010 can also
crawl Exchange public folders. Like file shares, public folders have
enjoyed a certain level of popularity for storing shared documents.
Exchange has the handy capability of sharing e-mail messages and
documents by placing them in shared public folders. Since many
information workers are actively using Outlook, having shared documents
and e-mail in Exchange can be very useful. Of course, SharePoint is the
next-generation solution, and there are many advantages to moving this
content directly into SharePoint. However, if moving them is not
desirable, indexing that content and making it available in SharePoint's
search is possible.
Setting up the crawler to
crawl public folders is similar to the previous content sources, except
you will need to be aware of what user rights the crawler account has.
If it does not have read access to the public folders that need
indexing, a crawl rule will need to be added that defines this user.
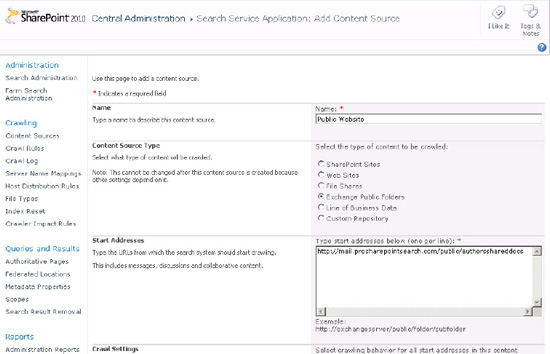
Follow these steps to add Exchange public folders as a content source (see Figure 1):
In the Search Service Application page in the Central Administration, select Content Sources and New Content Source.
Fill out the fields with the appropriate information, and select Exchange public folders as the content source.
Set
the Exchange server and the path to the public folders to be indexed in
the Start Addresses field. Internal sites can use the NetBIOS name in
place of the fully qualified domain name (FQDN). If Exchange Web Access
is running under Secure Socket Layers, be sure to use the HTTPS protocol
in the path. If the server is Exchange 2007 SP2 or later versions, the
path to the public folder can be identified by accessing the public
folders via Exchange Web Access and copying the path in the address bar
from the browser.
Fill out the other fields with appropriate choices (index subfolders, schedule crawl, etc.).
Ensure the crawl user has read access to the public folders or
create a new crawl rule that has the credentials of a user that does
have access. See the following section on crawl rules for more guidance.
Once again, the crawler
will communicate with the Exchange server in a different way than other
content sources. For this reason, it is important to make sure that the
content source is correctly defined.
2. Crawling Line-of-Business Data
Line-of-business (LOB)
systems are those systems in an organization that perform tasks critical
to the operation for the business. Although this definition is
relatively broad, generally, systems such as enterprise resource
planning (ERP), accounting, and customer relations management (CRM)
systems are included in this definition. For many organizations,
SharePoint is quickly becoming an integral part of these systems. Since
SharePoint is a relatively new and lightweight tool for many
organizations, bringing data from larger, older, or more core business
systems can be important.
The ability to crawl
line-of-business data from other IT systems is one of the features that
makes SharePoint a true enterprise search tool. This ability is made
possible by the powerful Business Connectivity Services .
If it is the intention to include line-of-business data in SharePoint
and utilize a Business Data Connectivity service, there should be a
content source defined for that data. Here are the steps to add a
Business Connectivity Services content source.
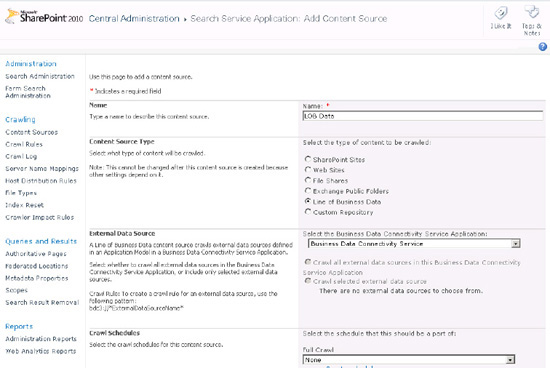
Navigate to the Search service application and select Content Sources on the left-hand menu.
Give the content source a name and choose Line-of-Business Data as a Content Source Type.
Select
the appropriate Business Data Connectivity service if there is more
than one. Selected external sources or all external sources can also be
chosen. This may be necessary if there are several external sources
defined in the service but all are not interesting to crawl.
Set a crawl schedule and a priority.
The crawler is now ready to crawl and index the Business Data Connectivity service (Figure 2).