1. Installing SBS 2011
OK—we’ve prepared our
server, we’ve created our answer file, and we’re ready to go. Time to
install SBS 2011. We’re going to follow the normal steps covered in this article,
except that we’re using the answer file. Insert the removable media with the SBSAnswerFile.xml, insert
your Installation DVD, and turn on the server.
Note:
You won’t actually need the answer file to be available until the Windows Server 2008 R2 portion of the installation completes.
You need to set your BIOS to
boot from the DVD drive as the first option to ensure that the server
boots from the DVD. Then walk through the normal Windows Server 2008 R2
installation steps as covered in this article.
You’ll choose your installation disk, and you can set the size of your
system volume for SBS at this time. Do not set it at fewer than 120
GB—we really prefer 200 GB or more. It’s a real pain to increase the
size later, and there are just too many things that end up going onto
your primary system volume.
After you’ve answered
the initial installation questions, the installation of Windows Server
2008 R2 proceeds automatically. When it completes and the system
reboots, the installation of SBS will automatically begin if the
SBSAnswerFile.xml file is available and you’ve set the answer file for
unattended installation. Even if you’ve selected the Run Unattended
check box in the SBS
Answer File Generator, the installation will stop if it is missing a
critical piece of information. If you’ve left the Run Unattended check
box cleared, the SBS installation process will use the answers you’ve
provided in the file, but it will expect manual input from you to move
from step to step.
The server will reboot
several times during the installation, but if you’ve filled out the
answer file fully and you’ve selected the Run Unattended check box, you
should be able to start it, answer the initial questions, and go away
for a while. Have lunch. Play a game of racquetball. The whole process
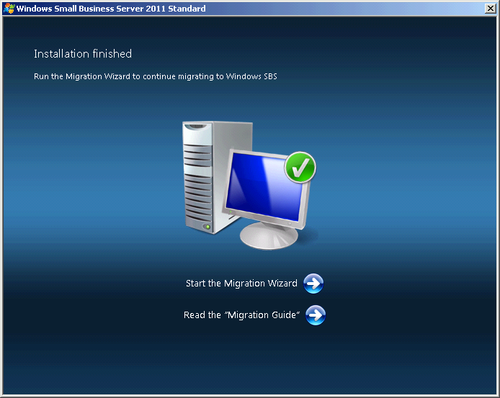
might be automated, but it’s still slow. When the installation is complete, you’ll see the Installation Finished screen shown in Figure 1.
2. Migrating Settings and Data
After you’ve completed the installation of SBS 2011 into your SBS 2003 network, you have 21 days to complete the migration and decommission the original server. There are several steps in the process—some automated, some not.
2.1. Using the Migration Wizard
From the time that Windows Small Business Server 2011
Standard is first installed and running on your existing SBS network,
you have a maximum of 21 days to complete the migration. Required tasks
listed in the Migration Wizard must be completed in the order listed.
Optional tasks can be completed later because the other tasks in the
task list are not dependent on them. The tasks in the Migration Wizard
are listed in Table 1.
Table 1. Tasks in the Migration Wizard
| TASK | REQUIRED OR OPTIONAL |
|---|
| Change data storage locations on the new SBS 2011 server. | Optional |
| Configure networking. | Required |
| Configure Internet address. | Required |
| Migrate network settings from old SBS server. | Optional |
| Migrate Exchange Server mailboxes. | Required if Exchange is used |
| Clean up legacy Group Policy settings. | Optional |
| Migrate users’ shared data. | Optional (but not if you’re the user!) |
| Migrate Companyweb. | Optional |
| Migrate fax data. | Optional |
| Migrate user accounts and groups. | Required |
| Migrate SQL Server data. | Optional and not in the wizard |
| Migrate line-of-business applications. | Optional and not in the wizard |
| Decommission the old SBS 2003 server. | Required |
You can start and stop the
Migration Wizard as often as necessary. Each time you open it after the
initial time, it opens to the Migration Wizard Home page.
Note:
For the steps of this wizard,
we’ve chosen to break the process up in sections that correspond to the
individual tasks in the wizard. Each section begins with a heading and
includes a series of steps. You can complete each section independently
of the other sections, except that each required task in the wizard must
be performed in order.
2.1.1. Starting the Migration Wizard
To run the Migration Wizard, follow these steps:
Log on to the new SBS 2011 server with the new administrator account you created earlier.
Open
the Windows SBS Console if it doesn’t open automatically. Clicking the
Start The Migration Wizard link in the Installation Finished screen
shown in Figure 1 will automatically launch the Windows SBS Console.
Note:
The Windows Small
Business Server 2011 Standard Console is the official name of the
Windows SBS Console, but we don’t want to type that out every time, and
we don’t think you want to read that whole long name every time, either.
So we’ve shortened it to Windows SBS Console or even sometimes just SBS
Console. But it’s still just the same console, and it’s the heart of
everything you do with SBS.
Click
Migrate To Windows SBS to open the Migrate To Windows Small Business
Server 2011 Standard Wizard. The first time you run the wizard, you’ll
see a Welcome page.
Click Next to open the Migration Wizard Home page, shown in Figure 2.
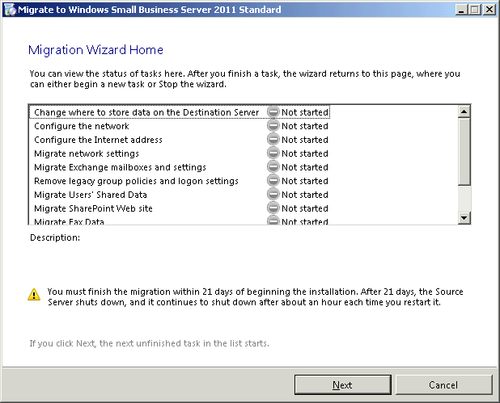
Select Change Where To Store Data On The Destination Server, and click Next to open the page shown in Figure 3.
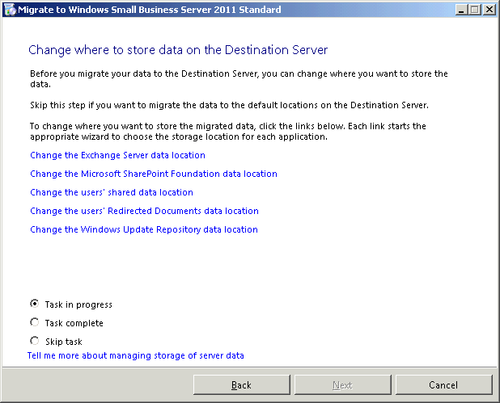
This
is an optional task, so you can choose to skip it. Because the default
location for Exchange Server data is on the C drive, we definitely want
to change that. So click Change The Exchange Server Data Location to
open the Move Exchange Server Data Wizard.
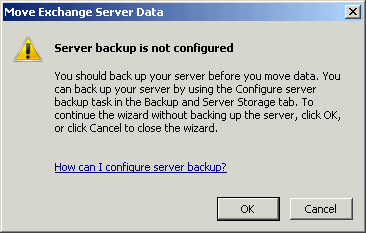
Click
Next and your server hard drives are examined. When the wizard finishes
the examination, it prompts you with the warning Server Backup Is Not
Configured, as shown in Figure 4. We know that, so click OK.
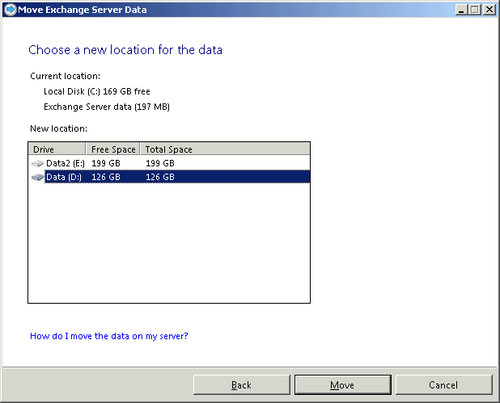
On the Choose A New Location For The Data page, shown in Figure 5, select the location you want to use for the data and click Move.
Click Finish when the task completes.
Complete
the rest of the relocations on this page now, or complete them later.
SBS includes wizards that simplify these tasks even after the migration is complete.
Click Skip Task when you’ve completed all the steps you want to do at this time, and then click Next to return to the Migration Wizard Home page.
Note:
You could also click Task
Complete and return to the Migration Wizard Home page, but by clicking
Skip Task, you will have the option to return to this task later if you
want to.
