After you have your existing SBS server prepared for migration, you need
to create an answer file that can be used to install SBS 2011. You must use an answer file
for the installation of SBS 2011 if you are migrating. Fortunately,
there’s an excellent Answer File Generator tool on the SBS 2011
installation DVD. But there is one step you need to take first—creating a
new SBS administrator account.
1. Administrator Account
SBS 2003 creates a default Administrator account during initial installation and setup. This account, often referred to as the 500 account because of a distinctive portion of the GUID
for the account, is the master account from which all things spring.
This is a legacy from when we were less security-aware and less
concerned about having everything installed by and dependent on a
well-known account.
Today, that is far from a best
practice, and in SBS 2011 the Administrator account is disabled by
default. So to ensure that we have an account for both servers that has
the necessary privileges to complete the migration, we’re going to first
create a new administrator account and make that account part of all
the groups that the current Administrator account is part of. This new
account must have Domain Admins, Enterprise Admins, and Schema Admins
privileges, at a minimum. In fact, we’re simply going to make a copy of
the Administrator account.
To create the new administrator account, follow these steps:
Log on to the existing SBS 2003 server with an account with at least Domain Admins privileges.
Click Start, and open Active Directory Users And Computers from the Administrative Tools folder.
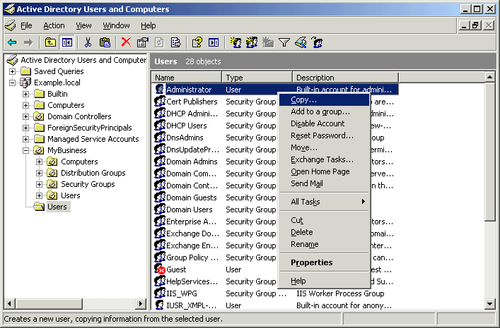
Open the Users folder in the left pane, and select the Administrator account in the right pane.
Select Copy from the Action menu, as shown in Figure 1.
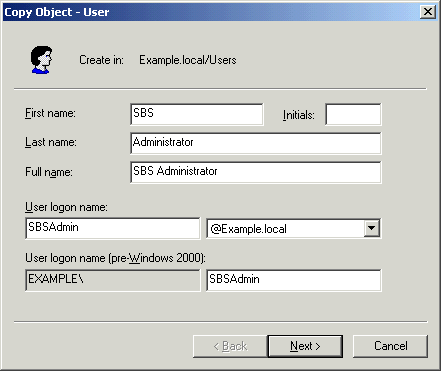
On the user Copy Object – User dialog box, enter the details for the new account, as shown in Figure 2.
After supplying the information for the new administrator
account, click Next to fill in password information for the new
account. Use a password of at least eight characters that is a mixture
of uppercase and lowercase letters, special characters, and numerals to
ensure that it meets complexity requirements for SBS 2011.
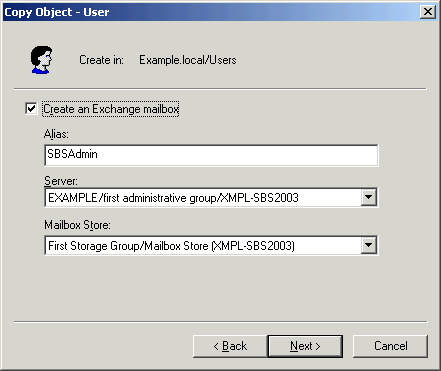
Click Next to open the Exchange mailbox creation step of the Copy Object – User Wizard, as shown in Figure 3.
Click
Next and then click Finish to create the account. The account will be
created in the Users container, which isn’t where we want it.
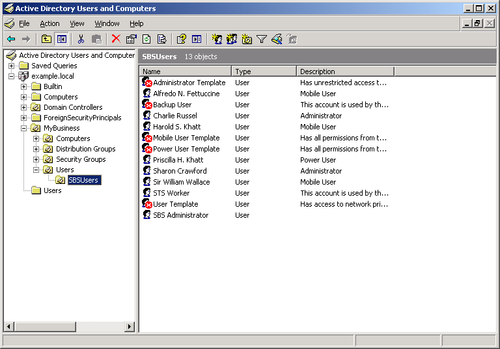
Expand the MyBusiness organizational unit (OU) container, and then expand the Users OU under it so that you can see the SBSUsers OU as shown in Figure 4.

Select the new user you just created, and drag it into the SBSUsers OU. You’ll see the warning shown in Figure 5.
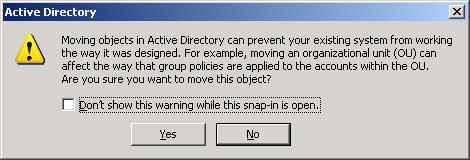
Click Yes to move the user. Figure 6 shows the SBSUsers OU with the new administrator account in it.
Close Active Directory Users And Computers.
2. Using the SBS Answer File Generator
The SBS Answer
File Generator (SBSAfg.exe in the Tools folder of the Installation DVD)
can be used to automate a fresh, new install of SBS. But it has a second and more important function—it is used to generate an answer file for enabling a migration installation. You must use an answer file when doing a migration. You do not have the option of doing it purely interactively.
Before you start the answer
file generator, you should make sure you have all the information you’ll
need. Put together a table with all the answers you’ll need. This will
help ensure you’re not missing a vital piece of information before you
start. Table 1 shows our working table for the migration of our Example.local SBS 2003 network to SBS 2011.
Table 1. Answer File checklist for SBS 2003 migration
| FIELD | ANSWER | REQUIRED |
|---|
| Get Installation Updates | No | No. |
| Run Unattended | Yes | No. |
| Use Time Zone | Manually Set The Clock And Time Zone For The Server | No, and we think it’s a good idea to do this one manually, because it allows you to verify that the time is correct. |
| Business Name | SBS Example | Optional. Not sent to Microsoft. |
| Street Address 1 | 1 Microsoft Way | Optional. Not sent to Microsoft. |
| Street Address 2 | | Optional. Not sent to Microsoft. |
| City | Redmond | Optional. Not sent to Microsoft. |
| State | WA | Optional. Not sent to Microsoft. |
| Zip/Postal Code | 98052 | Optional. Not sent to Microsoft. |
| Country/Region | United States | Yes. |
| Certificate Authority Name | | **Leave Blank for Self-Issued Cert.** |
| Domain Administrator Account Name | SBSAdmin | Yes. |
| Password | Iforget! | Yes. |
| Source Server Name | XMPL-SBS2k3 | Yes. |
| Source Domain Name | Example.local | Yes. |
| Default Gateway | 192.168.51.1 | Yes. |
| Source Server IP Address | 192.168.51.2 | Yes. |
| DHCP Server Running On Source Server | Yes | Highly recommended. It will allow the migration process to move DHCP to the destination server. |
| Destination Server Name | HP160-SBSMIG | Yes. |
| Destination Server IP Address | 192.168.51.3 | Yes. |
Note:
When using a self-signed
certificate, you should leave the Certificate Authority Name field
blank. SBS will create the certificate and use the correct authority
name. It’s very easy to choose a name that will cause problems, and by
the time the installation fails, you’ll have wasted a significant amount
of time.
After you have all the settings for your migration written down, it’s time to run the SBS Answer File Generator using the following steps:
Double-click
the SBSAfg.exe file in the \Tools directory of the first DVD (the
Installation DVD) of the SBS 2011 distribution media.
In the Installation Type section of the Windows Small Business Server 2011 Standard Answer File Tool (shown in Figure 7), select Migration From Existing Server (Join Existing Domain).
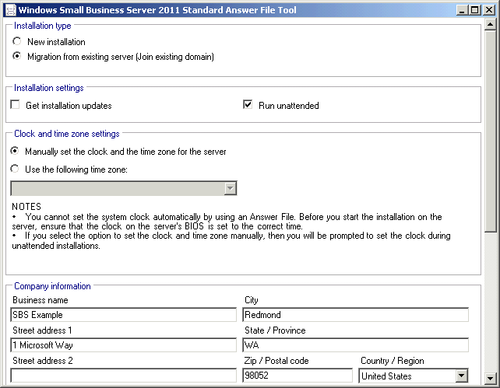
Fill in the fields according to the table you created, making sure to scroll to the end of the file so that you don’t miss any.
Click Print to print a copy of the settings to the default printer if you want a hard copy of the settings.
Warning:
IMPORTANT
The printout has the administrative password clearly visible. This will
also be the domain recovery password. Protect the printout accordingly,
and destroy it when it’s no longer required.
Click
Save As to save a copy as SBSAnswerFile.xml. You can save the copy to a
local hard disk, to a network share, or to removable media.
Warning:
IMPORTANT The SBSAnswerFile.xml
file that is generated has the administrative password in plain text.
This will also be the domain recover password. Protect the file until
you use it, and delete it when you’re done.
Click Cancel to close the Answer File Generator.
Copy
SBSAnswerFile.xml to the root directory of the removable media you’ll
use during installation of SBS 2011. This can be a USB key disk, a
floppy disk, or other removable media that your server can read during
the installation.
