BitLocker is a drive-level encryption feature that
Microsoft first made available with Windows Server 2008 and Windows
Vista. Microsoft has revised and improved upon particular
characteristics of BitLocker with Windows Server 2008 R2 and Windows 7.
BitLocker is now more robust and its usage has been simplified to
improve on the administrative and user experiences. In this section, we
will discuss how you can continue to use BitLocker to enhance the
physical security of your device better than before.
By
using BitLocker to encrypt your system at the partition level, all of
your files and folders, including all the Windows system files, remain
protected. If your laptop were to be stolen, the attacker would be
hard-pressed to gain access to the data on the drive by brute force.
Since the entire partition has been secured, many of the methods used by
the attackers to bypass Windows system security are rendered useless.
The only way to successfully access BitLocker-secured data on the drive
is to provide the BitLocker prestartup authentication password or the
recovery key. Since the BitLocker password is a fundamental piece of the
puzzle in unlocking your encrypted partition, is it important to stress
to end users the importance of utilizing long and complex passwords.
Preparing for BitLocker
One of the most
challenging parts of preparing a machine for BitLocker with Windows 2008
and Windows Vista involved creating the correct number and size
partitions on the disk. It sounds like no big deal, but this is a common
stumbling block in deploying BitLocker.
Often
times, the administrator will prestage a workstation with two
partitions, including one that is at least 1.5 GB in size and is to be
used as the system volume and is to remain unencrypted. It will store
boot files as well as the Windows Pre-Execution environment that are
required for prestartup authentication. Often, by the time the
administrator has gotten back around to walking through a BitLocker
configuration session with the user, there are good chances that the
user has modified the system in some way so that BitLocker cannot be
enabled.
Microsoft has heard the
administrator’s voice regarding this function, and with the release of
Window Server 2008 R2, has done away with the requirement for an
additional partition. Now, a single partition can be configured and the
additional system partition will be automatically prepped and created by
BitLocker. The system partition is created when BitLocker is activated
and it does not have a drive letter, so it will not display in Windows
Explorer. By default, there will still be two partitions built, but the
space required for the system partition in Windows 7 is only 100 MB as
compared to the 1.5 GB with Windows Vista.
This greatly
reduces much of the administrator’s overhead involved with
preconfiguring hard drives in preparation for BitLocker deployments.
Something else to be aware of
is that with Windows 7, BitLocker now supports the usage of Smart Cards
for drive encryption and decryption. With many organizations moving to
two-factor authentication for their user base, extending BitLocker to
support Smart Cards reduces the learning curve for users. Instead of
being required to understanding multiple methods of access and
authentication, Smart Card authentication can be extended across
multiple usages.
Drive encryption targets
With the release of Windows
Server 2008 R2 and Windows 7, Microsoft has extended what drive types
BitLocker can encrypt. Viable drive choices now include operating system
drives, fixed data drives, and removable data drives. By choosing to
utilize BitLocker on their removable media, end users can further
protect valuable company data assets even when they are on the go.
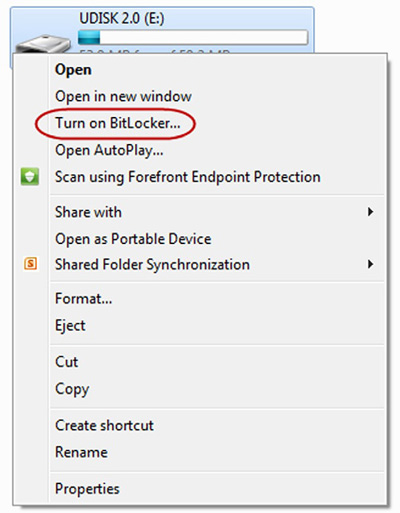
To enable BitLocker on removable media, the user simply needs to right-click the drive letter and select Turn on BitLocker, as depicted in Figure 1.
The user will have to select a password to access the device, and then
will be prompted to print or document the recovery key for the drive. As
long as the user can provide the password information, any Windows 7
client can be used to access the encrypted removable media once it has
been enabled for BitLocker. Only 64 MB of space is used on the device to
enable BitLocker.
Managing BitLocker
To allow uniform
security settings across the board in an organization, administrators
can utilize Group Policy to control and enforce BitLocker settings. With
the release of Windows Server 2008 R2, Microsoft has expanded on the
already existing BitLocker GPO configuration options. Administrators now
have more granular control over when BitLocker must be utilized and can
even force usage on removable drives. Also, drive decryption
mechanisms can be specified and settings such as password length and
complexity can be enforced via GPO. Finally, administrators can even
specify a data recovery agent, allowing for an often much-needed fail
safe that can be used to recover BitLocker-protected drives when users
misplace or forget their passwords.
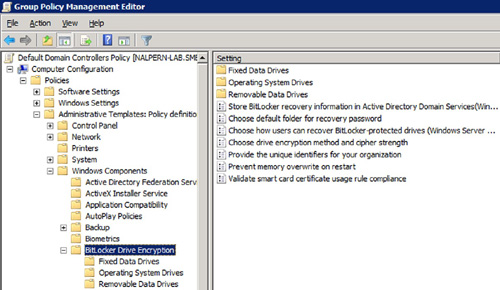
Figure 2 displays the BitLocker GPO content which is located under Computer Configuration\Policies\Administrative Templates\Windows Components\BitLocker Drive Encryption.
It is important to develop a BitLocker policy early in the deployment
of Windows 7 machines into your environment. Many of the BitLocker
settings are enforced when BitLocker is enabled and not when the drives
are in use. So, for instance, if you decide to use GPOs to enforce
complex passwords for removable devices, any devices already encrypted
will be allowed to be decrypted utilizing the mechanism already on the
drive. Any new devices being enabled for BitLocker after the policy is
in effect will be encrypted following the policy settings.
Being able to distinguish
between removable drives and fixed data drives is a new GPO setting that
can be used to control Windows 7 installs. Having
separate sections within the GPO for each drive type gives you the
flexibility to meet the security needs of your organization. While some
organizations do not allow removable drives at all due to security
concerns, the organizations that do allow them can now lock them down
much more effectively by requiring that they be BitLocker-enabled before
data may be saved onto them.
One of the most exciting
new features is specific to recovery. In the Windows 2008/Windows Vista
iteration of BitLocker, users were tasked with creating a password and
keeping their recovery key safe. They could store it in a share or on a
USB drive, or even print it. Regardless of their choice, they were still
in charge of keeping it safe. The problem with this as we all know, is
that some users are not good at keeping things safe.
So let us say a user were to
forget their password and additionally lose track of their recovery key.
Without either piece of information, their BitLocker-encrypted drive
would potentially become inaccessible, making for one upset user. The
one saving grace is that if you are an alert administrator and have
realized the potential harm that a user could bring upon them with
BitLocker, you may have thought to configure policies to store recovery
keys in AD.
If you choose to venture down
this path, be warned, because configuring AD to store recovery
information for BitLocker-encrypted drives is no small feat. Depending
on your AD version, you may require a schema extension. If you have
deployed the Windows 2008 schema, you are covered, but if you are
running something earlier, such as Windows 2003 SP1 or SP 2, you must
perform an import to make the appropriate attributes available.
Additionally, there are quite a few scripts to collect and execute in
your environment to set permissions and complete preparations.
The obvious benefit in
going through all the preparation work is that by storing user recovery
keys in AD, you are able to administratively intervene and rescue the
user from plight by retrieving their recovery key from AD. In effect,
this would allow them to gain access to their drive, decrypt it, and
then start the process again by establishing a new password and recovery
key. So, the question you probably have is, “So what’s wrong with
that?” And the answer at the end of the day is, nothing really, but with
Windows 2008 R2, Microsoft has made recovery a simpler and less painful
process by allowing for the use of a recovery agent.
Enabling a BitLocker recovery agent
With the release of Windows
2008 R2 and Windows 7, you now have the ability to configure the usage
of a recovery agent with BitLocker. The concept of a recovery agent is
not new and has been in use with EFS technologies
for a long time; however, extending it to BitLocker and being able to
manipulate it through GPO settings give administrators an edge,
sometimes a much-needed edge. If users misplace their password and
recovery key, administrators can now use their smart card certificates
and public keys to recover the drive instead of having to dig through AD
to ferret out a specific user’s recovery key. Multiple recovery agents
may be specified so that administrators can share the recovery
responsibility.
Additionally, the process
required to enable a recovery agent is simpler and requires less
administrative effort. In the next sections, we will cover each of the
steps in the process of enabling a recovery agent in more detail. The
high-level steps to enable a BitLocker recovery agent are as follows:
Step 1: Obtain a certificate appropriate for use as a recovery agent
Step 2: Configure the recovery agent certificate as part of the Public Key Policies
Step 3: Configure an identification field for your organization
Step 4: Configure the appropriate GPO to enable a BitLocker recovery agent for the specific drives
Step 1: Obtain a certificate appropriate for use as a recovery agent
Certificates are in use in more
organizations today than ever before. The reinforced need for security
in corporations today has made smart card-based certificate usage as a
part of two-factor authentication more commonplace. Since certificates
have different usages in an organization, you must understand that in
the context of BitLocker, we are specifically referring to certificates
issued to a user or an administrator that have the capability for data
encryption usage. For the certificate issued to be acceptable for
BitLocker usage, it is recommended to utilize a certificate with one of
the following properties:
The default object identifier for BitLocker (1.3.6.1.4.1.311.67.1.1)
The anyExtendedKeyUsage identifier (2.5.29.37.0)
An Encrypting File System (EFS) certificate
Once you have either
identified the existing certificates or generated new certificates for
the designated BitLocker recovery agents, you are ready to move to the
next step.
Step 2: Configure the recovery agent certificate as part of the public key policies
You must now specify the
recovery agent certificates within an AD GPO. To do so, open the GPO for
editing and browse to the following path:
Computer Configuration\Policies\Windows Settings\Security Settings\Public Key Policies\BitLocker Drive Encryption
Right-click on BitLocker Drive Encryption and select Add Data Recovery Agents ...
The wizard will ask you to select each of the certificates for use as
BitLocker recovery agents. You may select from either the AD, if you
have published certificates for the administrators, or a browse to a.cer
file from a local or shared file path.
Step 3: Configure an identification field for your organization
All drives that are to be enabled
for data recovery through the BitLocker recovery agent feature must be
configured with an identification field. The identification field is
populated when BitLocker is activated. If you have configured the AD GPO
value before BitLocker is enabled on a given drive, then the
identification value will be populated based on the policy. Be aware
that if a drive has already been encrypted with BitLocker before you
have configured the organizational identification field via GPO, then
you must manually associate the identification field with that drive
before the recovery agent can be used. The manage-bde
command line tool can be used to manually configure the value. Another
option is to disable and then reenable BitLocker on the drive.
The identification field can be any value of 260 characters or less, and the policy for configuring it is called Provide the unique identifiers for your organization, as shown in Figure 3, and is located within the following path within Group Policy:
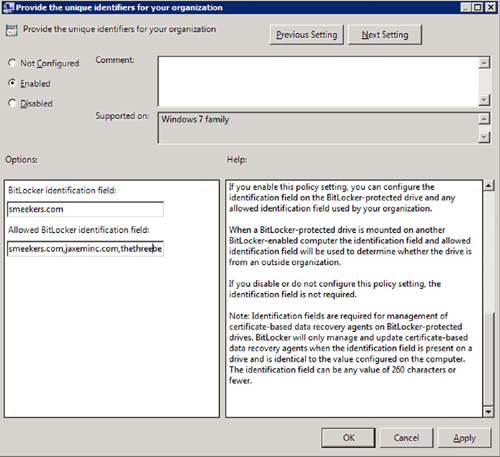
Computer Configuration\Policies\Administrative Templates\Windows Components\BitLocker Drive Encryption
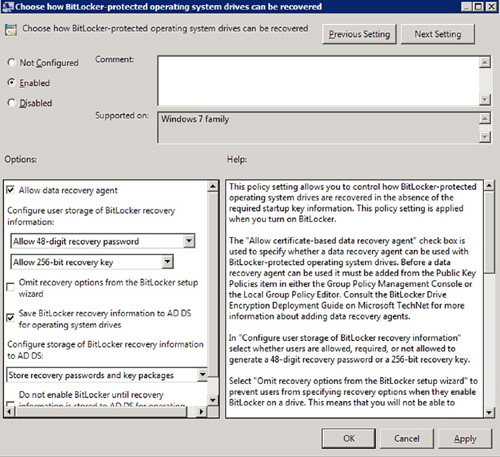
Step 4: Configure the appropriate GPO to enable a BitLocker recovery agent for the specific drives
The final step in
configuring the BitLocker recovery agent is to configure the Group
Policy setting to enable it for the desired drive types. You can choose
to enable the recovery agent across all drive types, or selectively
enable between fixed data drives, operating system drives, and removable
data drives. The policy name is the same across the three drive types
barring the mention of the drive type name: Choose how BitLocker-protected <insert drive type here> drives can be recovered. Figure 4 displays the policy for the system drive type.