1. Copying Campaign Records
Marketing campaigns can be very
involved, and for complex campaigns, it can take considerable effort to enter
the correct information in Microsoft Dynamics CRM. Campaign templates provide a
common starting point for future campaigns and can save you time and duplication
of effort when you are creating campaigns. Microsoft Dynamics CRM also provides
two actions, Copy As Campaign and Copy As Template, to quickly duplicate
information from an existing campaign or template.
The copy action replicates all of the planning activities, campaign activities,
marketing lists, products, and sales literature to your new campaign or
template.
The Copy As Campaign and Copy As Template actions
work similarly and can be used from either a campaign or campaign template. The key
difference is the resulting output. When you use Copy As Campaign,
the output will be a campaign ready for use. The Copy As Template
action will produce a campaign template that can be used to create a campaign in
the future. The following table can help you decide which copy action is
appropriate.
|
Scenario
|
Appropriate Copy Action
|
|---|
|
You have an existing campaign that you want to preserve
for future use.
|
From the campaign record, use Copy As Template to create a
template record that can be used for a later
campaign.
|
|
You want to create a campaign that’s similar to an
existing campaign for immediate use.
|
From the campaign record, use Copy As Campaign to
create a new campaign record that can be used
immediately.
|
|
You want to create a new campaign from an existing
campaign template.
|
Open the campaign template and use Copy As Campaign to
create the new campaign record.
|
|
You want to create a similar campaign template from an
existing template.
|
Open the campaign template and use Copy As Template to
create a new template record.
|
In this exercise, you will create a new campaign from the campaign template
created in the previous section.
Note:
SET UP Use the Internet Explorer web
browser to navigate to your Microsoft Dynamics CRM website, if necessary,
before beginning this exercise.
In the Marketing area, click Campaigns.
Open the TEMPLATE: Product Advertising
campaign template you created in the previous exercise.
 On the ribbon, click the Copy
as Campaign button.
A campaign record opens, with a copy of all of the information from
the originating campaign.
Note:
Troubleshooting Microsoft Dynamics CRM
allows campaign and campaign template records to have the same name. Be sure
to rename your new campaign (or campaign template) to avoid
confusion.
2. Using Quick Campaigns
As you have seen, you can plan and track your marketing efforts with campaigns
in Microsoft Dynamics CRM. But sometimes you might want to simply distribute a
campaign activity (such as a letter, phone call, or email) to an ad-hoc list
without the extra overhead and tracking of a full campaign. A quick campaign is a simplified version of a campaign
in Microsoft Dynamics CRM that allows you to distribute a single campaign
activity to a group of accounts, contacts, leads, or marketing lists.
In this exercise, you will create a quick
campaign to track follow-up tasks for a group of leads.
Note:
SET UP Use the Internet Explorer web
browser to navigate to your Microsoft Dynamics CRM website, if necessary,
and have multiple lead records already created
and available before beginning this exercise.
In the Marketing area, click Leads.
Select a few lead records.
Tip:
You can select multiple records by holding the
Ctrl key while clicking the records.
 Click the Add ribbon
tab, then click the Quick Campaign
button.

Choose For Selected Records from the
submenu.
The Create Quick Campaign Wizard form
opens.
The first step of the Create Quick Campaign
Wizard describes the steps you are about to take. Click
Next to continue.
The next step asks you to enter a name for the quick campaign. In the
Name field, enter Our First Lead Quick Campaign, and then
click Next.
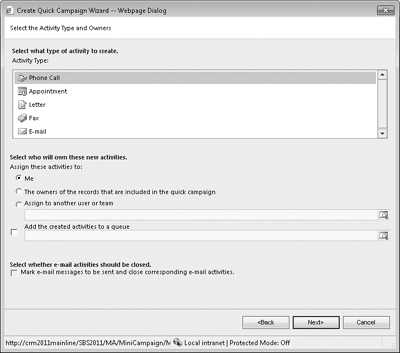
Now you will need to choose an activity type and user to whom
the resulting activities should be assigned. If you choose to use an
email activity, you also have the option of automatically sending and
closing the email activity. In the Activity
Type box, select Phone Call,
and for the Assign these activities to
option, choose Me.

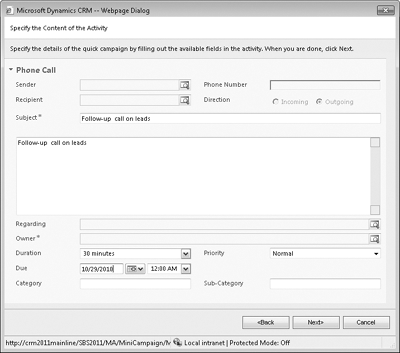
Click Next. The next step allows you to
enter the content for the activity chosen in the previous step. Because
you chose Phone Call, you will see the
Phone Call form displayed. In the
Subject and Description fields, enter Follow-up call on leads. In the Due field, chose the date you want the activity to be
completed.

Click Next. The final step summarizes
the choices made in the previous steps. If everything is correct, click
Create to complete the quick
campaign.
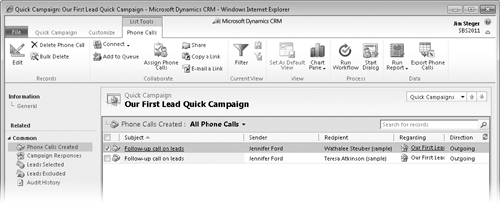
After completion, you can view your new quick campaign by clicking
Quick Campaigns in the Marketing area.
Double-click the Our First Lead Quick
Campaign record to see your quick campaign details,
including the phone call activities created.
