Security Configuration Wizard
The
Security Configuration Wizard (SCW) is a handy tool that was released
as a part of the tool suite for Windows 2003 SP1. Its purpose is to
allow you to create role-based security policies that can then be
applied to any server in your organization. It allows for the repeatable
configuration
of security settings across multiple servers in an organization while
maintaining consistency and reduction of administrative overhead;
basically, all the characteristics administrators look for in a tool!
SCW comes in two flavors,
the first is a GUI-based wizard-driven tool, while the second is a
command prompt tool called scwcmd. One thing to keep in mind with both
of these tools is that they do not perform any configuration changes
related to installation and can only manipulate what already exists on
the system. They are analysis tools that will examine the current state
of your system and report on the findings. They will perform certain
configuration-related actions on the local system, such as editing
Windows Firewall settings and unused disabling services, but no new
software installations can be performed with these tools. It is
recommended that before you run the SCW you determine what applications
will exist on the server for the particular role you are trying to
secure. Then install and run those applications on the server where you
are running SCW. This will ensure that SCW takes into consideration any
ports and services required for those local applications when creating
the security file.
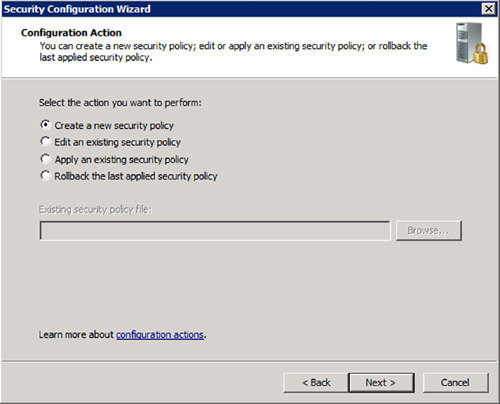
So, the first thing SCW will do
when executed is that it will prompt you for what action you are trying
to perform. The choices vary between creating a new policy, editing an
existing policy, applying a policy, and rolling back the last applied
policy. These options are shown in Figure 1.
Previously, rolling back was a task performed with the command line
Scwcmd tool. With Windows Server R2, it is an available GUI-based
option.
When selecting to create a
new policy, the wizard will walk through analyzing your local system. It
will allow you to review its findings of locally installed roles and
features, and add or remove as appropriate. Part of the display will
include a list of services that would be impacted if the new security
policy were to be deployed to the local server. It will also allow you
to select if you would like to evaluate and configure additional system
settings such as network settings, registry settings, and auditing
settings.
Once you complete the
configuration settings, the last screen in the wizard will allow you to
save your new security configuration file. However, before doing so, you
will have the option to add Security Templates into the file if you
would like. To save the file, you must choose a name and a file path.
The file extension will be .xml. Once you have saved your new security
file, you will be prompted to apply it to the local machine, but be
aware that applying the file through the wizard imports the settings
into the Local Computer Security Policy. These settings are always
overridden by domain-based policies; however, it is a great idea to
apply the policy locally anyway. Why? Well, by applying the policy to
the local machine, you will be able to test to see if the computer has
been impacted in the desired fashion. If there are problems with the
machine after the policy has been applied, you then use the wizard to
rollback the policy and then edit your .xml file to make the appropriate
adjustments.
Once you are ready to deploy
your policy on a larger scale, it is recommended to utilize Group Policy
to target the appropriate machines. The Scwcmd command line tool will allow you to convert an SCW .xml security file to a GPO by issuing the scwcmd transform
command. This will allow you to utilize the security file within AD and
deploy it to multiple servers of the same role simultaneously. Before
rolling out a new SCW security file through Group Policy, it is highly
recommended that you test thoroughly.
Best Practice Analyzer
When companies develop
software, they typically have created use-case scenarios that customers
are intended to follow for deployment. Whether the software is targeted
at the health care market and is used to print patient
bar codes, or is written to be used in construction and is intended to
track work streams and dependencies, each piece of software is design to
be deployed and utilized in a particular way. Some infrastructure
services, such as AD and DNS, must be built and maintained to enable
many other products to function properly. To help facilitate best
practice installations of key server roles, Microsoft has developed the
BPA.
The BPA tool can be utilized
from the Server Manager tool, or BPA actions can be initiated through
PowerShell. The toolset is installed by default on Windows Server 2008
R2, and its function is to perform analysis actions. It is designed to
determine if there are any existing configuration issues such as port
blockages that may cause issues and common administrative problems with
Windows Server roles.
Since the tool functions on a role
basis, it can be found within Server Manager under the corresponding
role that you wish to scan. See Figure 2 for a sample view. Currently, scan support is offered for only some of the server
roles in existence, but additional roles will be made available and
released through the use of Windows Update. Support currently exists for
the following Windows Server 2008 R2 Roles:
Active Directory Domain Services
Active Directory Certificate Services
Dynamic Host Configuration Protocol
Domain Name System
Internet Information Services
Remote Desktop Services
Network Policy and Access Services
When the BPA is run on a
particular role, the first step in the analysis is to go through and
examine the local configuration of the role. The settings and status are
compared against best practices across eight different categories. The
categories each contain a subset of rules that the scanned system is to
be compared against. The eight categories and their descriptions are as
follows:
BPA
Prerequisites—Indication that a rule could not be applied. Results in
this category do not indicate noncompliance, but instead indicate that
compliance could not be validated since a prerequisite was not in place.
Security—Indication of the risk of exposure to threats, loss of data, theft of data
Performance—Indication if the role is able to process and respond within expected performance thresholds
Configuration—Indication of problems with identity-related settings
Policy—Indication of problems with Group Policy and Registry settings
Operation—Indication of failure to perform designated function
Predeployment—Indication of whether best practice rules are satisfied before the role is used in the production
Postdeployment—Applied after all services have started and the role is running in production
The system will evaluate compliance against the category rules and group the results into one of the three compliance ratings:
Noncompliant—the role does not meet the best practices conditions set forth in a rule
Warning—the
role does meet the best practices conditions set forth in a rule, but
configuration changes may still be needed to remain compliant
Compliant—the role meets the best practices conditions set forth in a rule
The output of running a scan with the BPA is displayed in Figure 3
and as you can see, it is sectioned off into the Good, the Bad, and the
Excluded. Any rule that scans as compliance will be displayed in the
Compliant tab, any rule that scans as noncompliant will be displayed in
the Noncompliant tab, and any rule that you have chosen to Exclude shows
in the Excluded tab. Warnings are grouped in with the noncompliance
items and exclusions are identified by the administrator.

Exclusions are
administrator-configured and may shift over time for different roles.
For instance, the first time you run the BPA, the noncompliance list may
show a warning stating that all OUs should be set to be protected from
accidental deletion. The first few times you might think it is pretty
cool that the tool is looking out for you that way, but by the time you
have run the BPA for the third or fourth time, you will probably tire of
looking at the warning message, hence, the exclusions. By selecting the
warning message and clicking the Exclude Result
option, the warning will move to the Excluded tab and will continue to
appear there each time that you run the BPA from then on. If you change
your mind in the future and would like to include the warning message
into the normal noncompliant view once again, you can do so by selecting
the Excluded tab, highlighting the message, and selecting Include Result from the actions pane. See Figure 3 for a sample of BPA output.
BPA from PowerShell
A key discernment between
running the BPA from the Server Manager console and using PowerShell
cmdlets is that PowerShell enables you to run scans of multiple roles
simultaneously. With the GUI rendition of BPA, you are limited to
selecting a single role at a time, executing the BPA, and then examining
the results. If a server has multiple roles installed, this can be a
tedious and time-consuming process. The solution is the utilize
PowerShell.
Before you can actually use
PowerShell for BPA though, you must go through the steps of importing
the correct modules. BPA requires that you
impact both the Server Manager module as well as the Best Practices
module. To import the modules, open PowerShell on your server and input
the following commands:
Import-Module ServerManager
Import-Module BestPractices
At this point, you are ready
to execute the BPA, but to discover what roles are installed on the
server that you can run the BPA against, you should execute a Get-WindowsFeature command. Sample output is displayed in Figure 4.
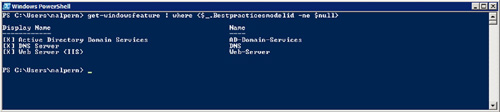
From here, it is a matter of
objective. You can now see which roles are on the server to which BPA
applies, and the next step is to decide which ones you would like to run
the BPA against. The easier choice is to follow the same format as the
Get-WindowsFeature and use the filter to perform the BPA scan against
all installed roles. The syntax for this command would be as follows:
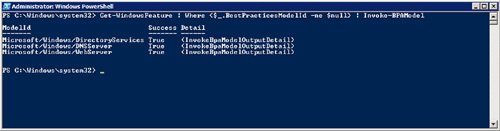
Get-WindowsFeature | Where {$_.BestPracticesModelId -ne $null} | Invoke-BPAModel
Figure 5 displays the command execution results. One of the first things you will notice after running Invoke is that the output results display whether
the run was successful or not, but what they do not show are the actual
results. To see the results of the scan, you will need to utilize the Get-BPAResult cmdlet.