The SMS Administrator Console provides a
backup task among its database maintenance tasks. The SMS site
database, like other SQL databases, consists of the database file and a
transaction log. The database file contains the actual data. The
transaction log maintains an audit of database transactions that have
taken place to aid in recovery of the database in the event of failure.
Because the transaction log contains this audit trail of activity, SQL
Server administrators sometimes use it as an alternative to performing
frequent full database backups. However, SQL 2000 truncates the
transaction log periodically to conserve database space, and there are
limitations on when you can back up the transaction log. You can back up
the SMS site database through SQL Server, of course, but the SMS backup
task is far more comprehensive. Let’s take a look at how to configure
it.
More Info
Please
refer to your SQL Server documentation for detailed information
regarding how to modify database options, create backup devices, and
configure backup and restore options through the SQL Server Enterprise
Manager. |
Backing Up the Site Server
This task was available in
SMS 2.0. However, SMS 2003 has streamlined the backup to include only
those components that are necessary to successfully restore a site.
The SMS Site Backup
service executes the SMS backup task. This service runs according to the
backup schedule you configure. Like other SMS service components, this
service comes with a log file (Smsbkup.log) that you can enable through
SMS Service Manager . Unlike the other log files, which are best used
for troubleshooting tasks, the SMS Site Backup log should be enabled
because it maintains a record of what you ran for site backup. When you
restore a site, you can use the log to verify that you’re restoring from
a valid backup. Like other logs, as this log reaches its maximum size
(1 MB by default), it’s written to Smsbkup. lo_ and a new Smsbkup.log
file is created. For a complete backup history, and for redundancy, back
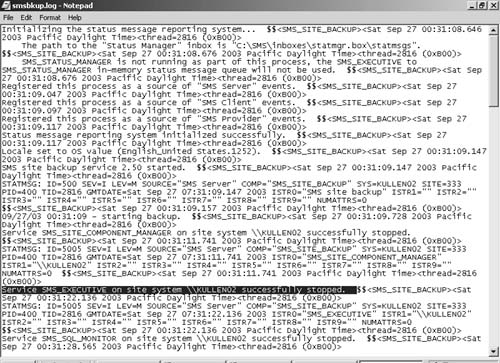
up these two files as well. Figure 1
shows an example Smsbkup.log file created after the Backup SMS Site
Server task is run. Notice that the task first stops SMS components and
services before beginning its copy process.

It’s not necessary to
have predefined a backup device when you enable the Backup SMS Site
Server task. You must, however, provide the name of a backup folder
location where the SMS Site Backup service will write the backed-up
data. This location can actually serve as the main backup location for
several site servers because when the task is run, the SMS Site Backup
service creates a subdirectory named by the site code and all backup
data is written there.
It
should be of no little significance, then, that the location of the
backup folder must be on a partition with adequate disk space to
accommodate the data being written there. It’s recommended that you have
enough space to accommodate not only the SMS database, but the entire
SMS system folder structure as well. You can determine a more accurate
accounting of the space required by considering the following factors:
Amount of disk space used by the entire SMS directory structure
Amount of space used by the following SQL Server databases: master, msdb, and site server
At least 10 MB additional space for miscellaneous files such as saved registry keys
At each subsequent
scheduled backup, the SMS Site Backup service will first remove the old
backed-up data before writing the new data. It will also record each
backup event in the Smsbkup.log file, viewable using any text editor.
The Backup Control File
The entire Backup SMS
Site Server task is actually governed by a backup control file named
Smsbkup.ctl, which is in the SMS\Inboxes\SMSbkup.box folder. This file
outlines exactly what will be backed up and where. Smsbkup.ctl is a text
file, and, as such, it’s fully customizable. It’s also well annotated,
which will assist you in reading and understanding its flow, as well as
in customizing it.
This file contains the
names of the files, registry keys, and databases that need to be backed
up. It also contains commands that run during the backup operation to
gather configuration information. You can customize this file to include
additional files, directories, registry keys, and so on. However, it
isn’t recommended that you remove or modify any of the default entries
in this file unless you’ve tested that, by doing so, you haven’t
compromised your backup’s integrity.
Configuring Backup SMS Site Server
To configure the Backup SMS Site Server maintenance task, follow these steps:
1. | In the SMS Administrator Console, navigate to the Site Maintenance node under Site Settings and expand it.
|
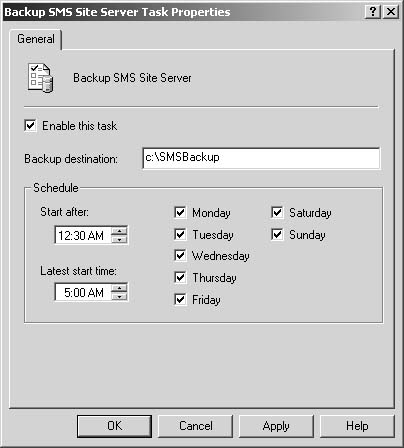
2. | Select
the Tasks node, select Backup SMS Site Server, right-click it, and
choose Properties to display the Backup SMS Site Server Task Properties
dialog box, shown in Figure 2.

|
3. | Select the Enable This Task check box.
|
4. | In
the Backup Destination text box, enter the name of the drive and
directory where you’ve already created a backup folder or where you want
SMS to create the folder for you. This name can’t contain any extended
ASCII characters. You can use a UNC path or a local drive path. Be sure
that the destination location has enough disk space available.
|
5. | Specify a schedule for the backup. For active databases, a daily backup is recommended.
|
6. | Click OK to save your configuration and enable the backup.
|
At the scheduled time,
the SMS Site Backup service will find or create the backup destination
folders, stop appropriate SMS site server services, and perform the
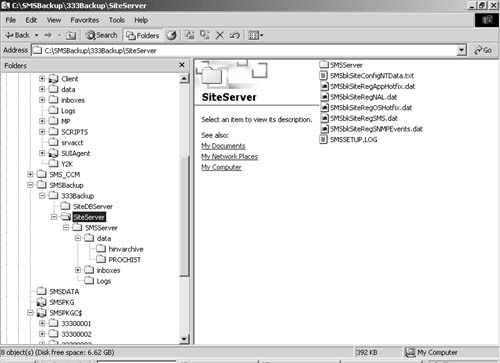
backup. After the backup is complete, you can view the backup folder’s
contents through the Windows Explorer. Figure 3 shows the contents of a sample backup folder.

Notice that the SMS
Site Backup service created a subdirectory named with the site code.
Within this directory are directories containing information relating to
the site database server (SiteDBServer), and the SMS site server
(SiteServer), which
itself contains the entire site directory structure, registry entries,
and site control information. The following registry keys are backed up
from the Windows Registry on the SMS site server:
HKEY_LOCAL_MACHINE\Software\Microsoft\NAL
HKEY_LOCAL_MACHINE\Software\Microsoft\NetworkMonitor
HKEY_LOCAL_MACHINE\Software\Microsoft\SMS
HKEY_LOCAL_MACHINE\Software\Microsoft\SNMPEvents
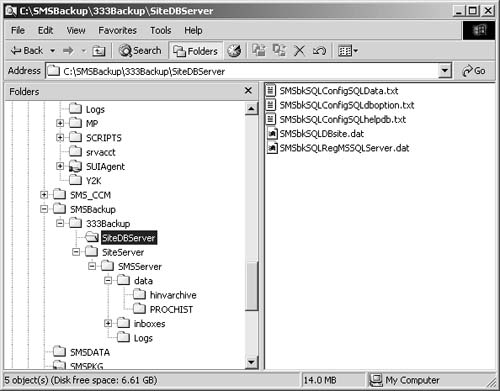
The SiteDBServer directory, shown in Figure 4, contains configuration information about the SQL Server installation in particular.

Notice that
this directory contains the backup of the SMS site database
(SMSbkSQLDBsite. dat). It also contains the
HKEY_LOCAL_MACHINE\Software\Microsoft\MSSQLServer registry key
(SMSbkSQLRegMSSQLServer.dat).
As you can see, this backup routine is quite comprehensive and should be more than adequate to act as your SMS backup routine.
Tip
You
can change the scheduled time for the Backup SMS Site Server task to
whenever you want, but the SMS Site Backup service is engineered to
check the schedule only once per day. If you need to execute this
maintenance task immediately, configure the task and then stop and start
the SMS Site Backup service by running Services in the Control Panel on
the site server. |
SMS Legacy Client components running on Windows clients use the SMS
Client Connection account to connect to CAPs and distribution points to
transfer data such as inventory or client configuration updates. SMS
creates one such account for the Windows domain named SMSClient_sitecode,
with a random password that’s propagated to each Windows client. This
is an internal account that should not be manually modified in any way. When
a site is restored from a backup, the password for the default SMS
Client Connection account is reset. If you haven’t created any client
connection accounts in addition to the default, the SMS Legacy Clients
will effectively be unable to connect to a CAP or distribution point
because the password recognized by the client will be different from
that reassigned as a result of the restore process. The change in
password is copied to all site CAPs so that the clients can be updated.
Ironically, since the client will be unable to connect to the CAP in the
first place, it won’t be able to update itself with the new SMS Client
Connection account password. There’s no way to set the password back to
the original because there’s no way of knowing what the original
password was. If you have
additional client connection accounts specified for the Windows clients
and they can’t connect using one account, they will try using the
others. You control the passwords for the manually created client
connection accounts. The site backup and restore scenario is a perfect
example of why you should consider creating at least one additional
client connection account for your site (preferably before you back up
the site). Or better yet, take Microsoft’s recommendation to heart and
upgrade all your Legacy Clients to Advanced Clients as soon as possible. |