Before deploying Exchange Server 2010, there are several steps that must be done, and several more that should be done.
Performing an Active Directory Health Check
This is a step that should
be done, especially if AD is not being set up from scratch (as it is in
our scenario). The existing AD environment should be validated to
ensure it is functioning correctly. Since Exchange Server relies so
heavily on Active Directory, an extensive health check utilizing tools
such as DCDIAG, NETDIAG, and Replication Monitor can help identify any
underlying problems that will impact the installation or performance of
Exchange Server. A combination of Windows Server 2003 and Windows Server
2008 Support tools can be utilized for these tasks.
For detailed instructions on performing an AD health check, see the Digital ShortCut titled Performing an AD Health Check (Sams Publishing, ISBN: 0-7686-6842-5), which can be purchased and downloaded from www.samspublishing.com/bookstore/product.asp?isbn=0768668425.
Granting the Appropriate Permissions
To
install Exchange Server 2010, you must make sure the domain account you
will be using is a member of the following groups: Domain Admins,
Enterprise Admins, and Schema Admins.
To do so, perform the following steps:
1. | On the domain controller, from the Start menu, select Administrative Tools, then Active Directory Users and Computers.
|
2. | Expand your domain name and select the Users organizational unit (OU).
|
3. | Right-click
Users and click Find. Enter the name of the account that you will be
using to install Exchange Server 2010 and click Find Now.
|
4. | Double-click the user account and select the Member Of tab.
|
5. | Click Add. In the Enter the Object Names to Select field, type Enterprise Admins; Domain Admins; Schema Admins
(separated by semicolons as shown). Click Check Names to ensure all
group names are resolved, and then click OK. Ensure all three groups
show in the Member Of section and click Apply. Click OK to exit the
screen.
|
Installing the Base Operating System on Your Exchange Server
Exchange Server 2010 can be
installed only on a 64-bit version of the Windows Server 2008 Operating
System. Although either Standard or Enterprise can be used, the
Enterprise version is required for some of the more advanced Exchange
Server features.
After you complete the setup of the base operating system, perform the following steps to join the server to the domain:
1. | Install
Windows Server 2008 on your Exchange server. Do NOT continue with the installation of
Active Directory on this server.
|
2. | Configure
your Domain Controller/DNS server as the Preferred DNS Server in the
Internet Protocol Version 4 (TCP/IPv4) settings of your new Exchange
Server.
|
3. | From the Initial Configuration Tasks screen, click Provide Computer Name and Domain.
|
4. | On the Computer Name tab, click Change.
|
5. | In
the Member Of section, select the Domain radio button and type the name
of the domain you created. In our example, this is companyabc. Click OK
to continue.
|
6. | Enter the administrator name and password for your domain and click OK.
|
7. | When
prompted Welcome to the companyabc Domain, click OK; then click OK
again to acknowledge that the computer must be restarted. Close all open
windows and, when prompted, click Restart now.
|
8. | After
the computer restarts, from the log on screen, click Switch User; then
click Other User and enter the domain administrator credentials in the
following format:
–domain\administrator, where domain is the name of your domain, and administrator is the administrative account for that domain.
|
Prepare Internet Explorer to Accept ActiveX Downloads
The default security
settings of Windows Server 2008, combined with the default security
settings of Internet Explorer 8.0, can result in some real challenges
when attempting to download the prerequisite applications for Exchange
Server. To ease the process, perform the following steps.
1. | On the new Exchange server, log on with your domain administrative account.
|
2. | Right-click
the Internet Explorer icon and click Run as administrator. Ensure you
have Internet connectivity by bringing up an Internet website. If you do
not, troubleshoot your network settings and resolve any issues before
continuing.
|
3. | In
Internet Explorer, select Tools, and then Internet Options. Select the
Security tab and then the Trusted Sites icon, and click Sites.
|
4. | In the Add This Website to the Zone field, type https://connect.microsoft.com and click Add. Then type http://download.microsoft.com and click Add. When finished, click Close.
|
5. | Click
the Internet icon and click Custom Level. Under the ActiveX Controls
and Plug-Ins section, change Download Signed ActiveX Controls to Prompt
(recommended).
|
6. | Click OK and click Yes in response to the warning; then click OK again and exit Internet Explorer.
|
Installing the Prerequisites
There are some software
applications that must be installed on the server before you can run the
Exchange Setup Wizard. These applications must be installed regardless
of which server role you are going to install. Follow the steps below to
install these applications.
Installing Windows Remote Management 2.0
1. | Log on to the workstation with your domain administrative account.
|
2. | Insert
the Exchange Server 2010 CD and allow Autorun to start the Microsoft
Exchange Server 2010 Setup Wizard. You can also start the Wizard from a
command prompt by typing d:\setup (assuming d:\ contains your E2010 installation media).
|
3. | If you have installed all updates for the server, Step 1: Install .NET Framework 3.5 should already be completed.
|
4. | Select Step 2: Install Windows Remote Management 2.0.
|
5. | Select
the WinRM on Vista and WS08 (x64) option, and click Download beneath
the file. When prompted This Website Wants to Install the Following
Add-On, right-click the Internet Explorer Information Bar and select
Install This Add-on for All Users on This Computer.
|
6. | Click Install to Install the Microsoft File Transfer Manager.
|
7. | If the Language Update box appears, click OK and install the selected file.
|
8. | When
the Confirm Transfer Request box appears, browse to the location where
you would like to store your prerequisite installation files. (Note: The
browse feature does not allow you to create new folders, so if you are
going to want to create a new folder for the storage of these files, do
so in Explorer before trying to browse.) When you have selected the
location, click Transfer.
|
9. | Once
the file has finished downloading, click Close. You can then go to the
directory where you stored the download. Double-click the WinRM on Vista
and WS08 (x64) Directory; then double-click the installation file. When
prompted to Click OK to Install do so.
|
10. | Accept the license terms by clicking I Accept.
|
11. | Once completed, click Restart Now.
|
Installing Windows PowerShell v2
1. | Log on to the workstation with your domain administrative account.
|
2. | Insert
the Exchange Server 2010 CD and allow Autorun to start the Microsoft
Exchange Server 2010 Setup Wizard. You can also start the Wizard from a
command prompt by typing d:\setup (assuming d:\ contains your E2010
installation media).
|
3. | Select Step 3: Install Windows PowerShell v2.
|
4. | From
the download page for Windows PowerShell V2, locate the download files
and click Download next to the “PowerShell_Setup_amd64.msi” file.
|
5. | Click Run to run the file directly from the download page. If you receive a security warning, click Run again.
|
6. | From the Windows PowerShell Setup Wizard, click Next.
|
7. | On the License Agreement page, click I Accept the Terms in the License Agreement, then click Next, and then click Install.
|
8. | Click Finish when complete and close the Internet Explorer window.
|
Installing the 2007 Office System Converter: Microsoft Filter Pack
This section is required only for Exchange Server 2010 servers that have the Mailbox role installed on them.
1. | Log on to the workstation with your domain administrative account.
|
2. | Open Internet Explorer and go to www.microsoft.com/downloads. Search for 2007 Office Converter Microsoft Filter Pack. Select the Microsoft Filter Pack from the available options.
|
3. | Make
sure you are on the 2007 Office System Converter: Microsoft Filter Pack
page. Scroll down and click Download for the FilterPackx64.exe file.
When prompted, click Run.
|
4. | From the Welcome screen, click Next.
|
5. | From the End-User License Agreement screen, click I Accept the Terms in the Licensing Agreement and click Next.
|
6. | When complete, click OK to exit the installation.
|
Installing the Active Directory Services Remote Management Tools
These steps will allow an administrator to perform the Schema and Domain prep commands from your Windows Server 2008 server.
1. | Open an administrator-enabled command prompt. Right-click Command Prompt and select Run as Administrator.
|
2. | Run the following command:
ServerManagerCmd –i RSAT-ADDS The progress of this command will sit at the <10/100> prompt for awhile—be patient and let it finish. Upon completion, you see two Warnings in yellow stating You Must Restart This Server to Finish the Installation.
|
3. | After
you have successfully installed the Role Administration Tools and the
Active Directory Domain Services Tools, reboot the server as instructed.
|
Note
Simply running the ServerManagerCmd command above from a normal command prompt will result in a frustrating and poorly documented error:
WriteError: Failed to write the log file: Access to the path ‘C:\Windows\logs\ServerManager.log’ is denied.
The need to do this is
the result of a newly added security component found in both Windows
Server 2008 and Windows Vista that is known as “User Access Control” or
“UAC.” UAC allows administrators to enter their credentials while in a
non-administrators user session to accomplish administrative tasks
without having to switch users, log off, or utilize the “run as”
command. UAC also utilized the Admin Approval Mode (AAM) for all
accounts except the built-in Administrator account in Windows Server
2008. AAM is designed to prevent malicious applications from installing
without the knowledge of the logged on user.
AAM allows administrators
to log on and receive a split user access token—the administrator
receives both a full access token and a filtered access token. The
filtered access token is used to start Explorer.exe (the process that
creates the user’s desktop). All applications started by the
Explorer.exe process inherit this filtered access token.
In short—with
UAC enabled, administrators may have to confirm the installation of some
applications or system changes, even when logged in with elevated
privileges.
Preparing the Active Directory Forest, Domain, and Exchange Organization
Before you can install Exchange Server, the Active Directory Schema and Domain must be prepared.
Preparing the Schema
1. | From
the Exchange server, log on with your administrative account. This
account must be a member of the Schema Administrators and Enterprise
Administrators groups.
|
2. | Copy the contents of your Exchange Server 2010 installation media to a directory on a local drive, such as c:\E2k10Install.
|
3. | From
an administrator-enabled command prompt, change to the drive and
directory that holds your Exchange Server 2010 installation media and
run the following command:
Setup /PrepareSchema or Setup /ps
Note
Depending on how
you obtain the media for Exchange Server 2010, you may need to copy the
installation media to a local drive and run the setup from that local
drive. If you do not, your installation may result in the following
error:
An error occurred while copying the file d:\\en\Setup\ServerRoles\Common \en\Details Templates Editor.msc. The error code was 5.
If you did not copy
the installation media locally and you receive this error, delete the
contents of the c:\%windir%\temp file, copy the media locally, and run
the command again.
|
4. | When completed, the screen should look like the one in Figure 1.
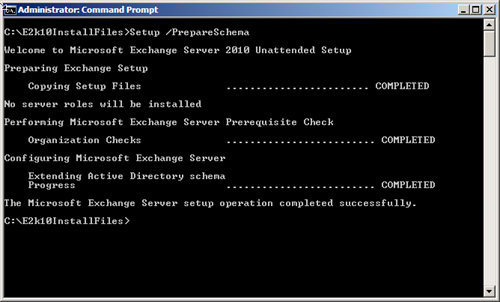
|
5. | When finished, leave your Command Prompt window open and continue with the next section.
|
Preparing the Domain and Organization
1. | To
prepare the Domain and Organization, log on to the Exchange server with
your administrative account. This account must be a member of
Enterprise Administrators and Domain Administrators groups.
|
2. | From
an administrator-enabled command prompt, change to the drive and
directory that holds your Exchange Server 2010 installation media and
run the following command:
Setup /PrepareAD /OrganizationName:SG or Setup /p /on:SG
where SG
is the Organization Name for your environment. In our lab, we are using
TestLab as the Organization Name, so the command will look like this:
Setup /PrepareAD /OrganizationName:TestLab
|
3. | When completed, the screen should look like the one in Figure 2.
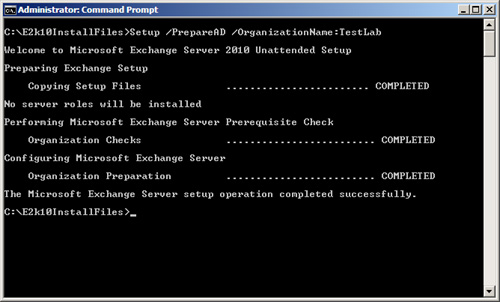
|
4. | When finished, leave your Command Prompt window open and continue with the next section.
|
Installing Additional Required Operating System Components
There are
several additional operating system components that are prerequisites
for all Exchange Server 2010 roles. Additionally, there are specific
prerequisites that are required for each of the individual roles.
To determine what
prerequisites are needed for each role, review the Exchange Server 2010
Prerequisites document on Microsoft Technet. You can find this by going
to http://technet.microsoft.com and searching for “Exchange 2010 Prerequisites.”
The following components are required for a server that will contain the Hub Transport, Client Access, and Mailbox roles:
ServerManagerCmd -i Web-Server
ServerManagerCmd -i Web-ISAPI-Ext
ServerManagerCmd -i Web-Metabase
ServerManagerCmd -i Web-Lgcy-Mgmt-Console
ServerManagerCmd -i Web-Basic-Auth
ServerManagerCmd -i Web-Digest-Auth
ServerManagerCmd -i Web-Windows-Auth
ServerManagerCmd -i Web-Dyn-Compression
ServerManagerCmd -i NET-HTTP-Activation
ServerManagerCmd -I RPC-over-HTTP-proxy
To install these roles, perform the following steps:
1. | Log
on with your domain administrator account. From an
administrator-enabled Command Prompt, run each of the commands above or,
alternately, run the combined command as shown here:
ServerManagerCmd –I Web-Server Web-ISAPI-Ext Web-Metabase Web-Lgcy-
Mgmt-Console Web-Basic-Auth Web-Digest-Auth Web-Windows-Auth Web-Dyn
-Compression NET-HTTP-Activation RPC-over-HTTP-proxy –Restart
Note the addition of the –Restart at the end of the command to ensure the server does not try to restart between component installations. When complete, you should see Success: Installation Successful.
|
2. | Reboot the server upon completion. |
