Using a GPO to
Configure Firewall Rules
The next step is to create
and enable firewall rules for ICMPv4 and ICMPv6 traffic. ICMP messages
need to be sent and received to provide connectivity for Teredo-based
DirectAccess clients, which is needed if the DirectAccess clients will
be behind a NAT.
The ICMP firewall rules will
be deployed with a GPO named “DirectAccess Group Policy Object.” To
create and enable firewall rules for ICMPv4 and ICMPv6 traffic, execute
the following steps:
1. | On the
domain controller DC1, launch Server Manager.
| 2. | Expand Features, Group Policy Management, Forest:
companyabc.com, Domains, and select companyabc.com.
| 3. | In the console tree, right-click the domain
companyabc.com and select Create a GPO in the Domain and Link It Here.
| 4. | Enter the name DirectAccess Group Policy Object
and then click OK.
| 5. | Right-click the DirectAccess Group Policy Object and
select Edit.
| 6. | In the
console tree of the Group Policy Management Editor, expand Computer
Configuration, Policies, Windows Settings, Security Settings, Windows
Firewall with Advanced Security, and select Windows Firewall with
Advanced Security.
| 7. | In the console tree, select and then right-click Inbound
Rules, and then click New Rule.
| 8. | On the Rule Type page, click Custom, and then click
Next and Next.
| 9. | On the
Protocols and Ports page, for Protocol Type, select ICMPv4, and then
click Customize.
| 10. | In the
Customize ICMP Settings dialog box, click Specific ICMP Types, select
Echo Request, and then click OK.
| 11. | Click Next, Next, Next, and Next.
| 12. | On the Name page, in the Name field, type Inbound
ICMPv4 Echo Requests, and then click Finish.
| 13. | In the console tree, right-click Inbound Rules, and
then click New Rule.
| 14. | On the Rule Type page, click Custom, and then click Next
and Next.
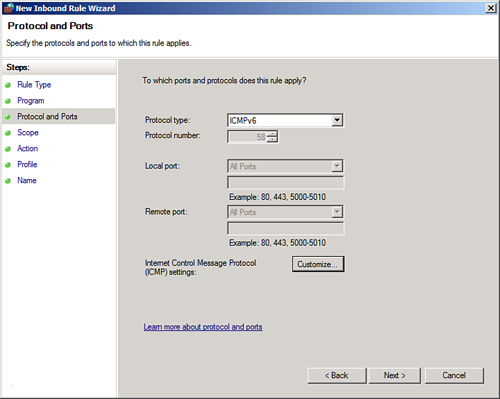
| 15. | On the
Protocols and Ports page, for Protocol Type, select ICMPv6 (shown in Figure 2),
and then click Customize.
| 16. | In the
Customize ICMP Settings dialog box, click Specific ICMP Types, select
Echo Request, and then click OK.
| 17. | Click Next, Next, Next, and Next.
| 18. | On the Name page, in the Name field, type Inbound
ICMPv6 Echo Requests, and then click Finish.
| 19. | In the console tree, right-click Outbound Rules, and
then click New Rule.
| 20. | On the Rule Type page, click Custom, and then click Next
and Next.
| 21. | On the
Protocols and Ports page, for Protocol Type, click ICMPv4, and then
click Customize.
| 22. | In the
Customize ICMP Settings dialog box, click Specific ICMP Types, select
Echo Request, and then click OK. Click Next and Next.
| 23. | On the Action page, click Allow the Connection, and
then click Next and Next.
| 24. | On the Name page, in the Name field, type Outbound
ICMPv4 Echo Requests, and then click Finish.
| 25. | In the console tree, right-click Outbound Rules, and
then click New Rule.
| 26. | On the Rule Type page, click Custom, and then click Next
and Next.
| 27. | On the
Protocols and Ports page, for Protocol Type, click ICMPv6, and then
click Customize.
| 28. | In the
Customize ICMP Settings dialog box, click Specific ICMP Types, select
Echo Request, and then click OK. Click Next and Next.
| 29. | On the Action page, click Allow the Connection, and
then click Next and Next.
| 30. | On the Name page, in the Name field, type Outbound
ICMPv6 Echo Requests, and then click Finish.
| 31. | Close the Group Policy Management Editor and Group
Policy Management Console.
|
This new group policy will
take effect on all domain computers, allowing ICMPv4 and ICMPv6 through
the operating system firewall.
Custom Certificate
Template for IP-HTTPS
Next, create a
certificate template so that requesting computers can specify the
subject name and subject alternative name of a certificate. This
certificate will be used by the DirectAccess server to set up IP-HTTPS
sessions.
To create and enable a custom
Web Server 2008 certificate template, execute the following steps:
1. | On the
domain controller DC1, launch Server Manager.
| 2. | Expand Roles, Active Directory Certificate Services,
and select Certificate Templates.
| 3. | In the contents pane, right-click the Web Server
template, and then click Duplicate Template.
| 4. | Click Windows Server 2008 Enterprise, and then click
OK.
| 5. | In the
Template Display Name field, type Web Server 2008.
| 6. | Click the Security tab.
| 7. | Click Authenticated Users, and then select Enroll in
the Allow column.
| 8. | Click the
Add button, type Domain Computers, and then click OK.
| 9. | Click Domain Computers, and then select Enroll in the
Allow column.
| 10. | Click
the Request Handling tab.
| 11. | Select Allow Private Key to Be Exported and click OK.
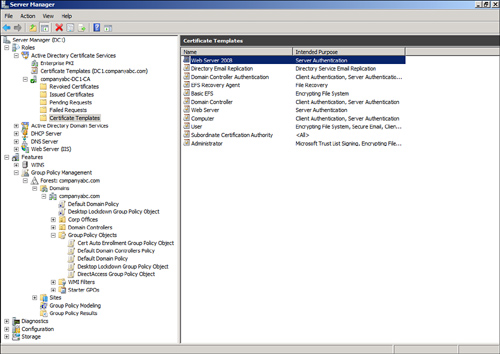
| 12. | Select the companyabc-DC1-CA in the Active Directory
Certificate Services, right-click Certificate Templates, point to New,
and then click Certificate Template To Issue.
| 13. | In the list of certificate templates, click Web Server
2008, and then click OK.
| 14. | Confirm that the new certificate template, Web Server
2008, is listed (shown in Figure 3).
|
Now the certificate server will be able to issue a
Web Server 2008 certificate for the DirectAccess server to use for
IP-HTTPS. The certificate will be requested later in the process.
|
