Before installing Exchange Server 2010, there must be
an existing Active Directory environment to support it. The environment
can be running on either a Windows Server 2003 or Windows Server 2008
platform. The following sections will focus on the steps needed to
install an Active Directory environment on a Windows Server 2008
platform from scratch. This example can be followed in a lab environment
to prepare it for the deployment of Exchange Server 2010.
This sample deployment
will consist of a single site and single domain controller, as might be
found in a small organization. The steps we will deploy include:
- Installing
the Windows Server 2008 operating system
- Promoting a
Windows Server 2008 Server to a domain controller
- Configuring
Active Directory Sites and Services
- Configuring a
global catalog server
Installing the
Windows Server 2008 Operating System
Microsoft Exchange
Servers rely heavily on the Active Directory environment they are
installed in.
For those
experienced with installing previous versions of the Windows Server
operating system, most of the concepts covered in this section will feel
very familiar. The installation of Windows Server 2008 is
straightforward, and takes approximately 30 minutes to an hour to
complete. The following procedure is based on installing Windows Server
from the standard media provided by Microsoft. Many hardware
manufacturers include special installation instructions and procedures
specific to their hardware platform, but the concepts should be roughly
the same.
To install Windows
Server 2008 (Standard or Enterprise Edition) perform the following
steps:
1. | Insert the Windows Server 2008 CD into the CD drive.
|
2. | Power up the server and let it boot to the CD-ROM
drive. If there is currently no operating system on the hard drive, it
automatically boots into the CD-ROM-based setup.
|
3. | Select the language you wish to install, the Time and
Currency Format, and the Keyboard or input method. When ready, click
Next to continue.
|
4. | Click
Install Now.
|
5. | Select
which version of the Windows Server 2008 Operating system you wish to
install. For this example, we will be installing Windows Server 2008
Enterprise (Full Installation) on a 64-bit platform. When ready, click
Next to continue.
|
6. | Review
the Microsoft Software License Terms, click the “I accept the license
terms” check box, and click Next to continue.
|
7. | Select
Custom (advanced) to install a clean copy of Windows.
|
8. | Select the physical disk on which Windows will be
installed and click Next to continue.
|
The server will
begin the installation process, rebooting several times during the
process.
1. | A default account called Administrator will be created,
but you will have to set the password for this account. When prompted
The User’s Password Must Be Changed Before Logging on the First Time,
click OK to continue.
|
2. | Enter the new password for the Administrator account in
both the New password and Confirm password fields, and then press Enter.
When prompted Your password has been changed, click OK.
|
Once the installation
process has completed and the server reboots, there will be an Initial
Configuration Tasks screen. Perform the steps in the Provide Computer
Information section as follows:
Set Time Zone
1. | Click Set Time Zone. On the Date and Time tab, review
the current Date, Time, and Time zone settings and configure them as
needed.
|
2. | If
desired, up to two additional clocks can be configured for additional
time zones with customized display names. If you wish to display more
than one clock, select the Additional Clocks tab and configure them.
|
3. | By default, Windows Server 2008 servers are configured
to automatically synchronize with time.windows.com. The server is
configured to synchronize once a week. If you need to change the source
of your time updates, you can click the Internet Time tab.
|
4. | Click OK to return to the Install Configuration Tasks
screen.
|
Configure
Networking
Windows
Server 2008 has a completely redesigned implementation of the TCP/IP
protocol stack which is known as the “Next Generation TCP/IP stack.”
This updated functionality applies to both Internet Protocol version 4
(IPv4) and Internet Protocol version 6 (IPv6).
1. | Click Configure networking, double-click the Local Area
Network Connection icon, and then click the Properties tab.
|
2. | Double-click the Internet Protocol Version 4 (TCP/IPv4)
option and configure an appropriate IP address, Subnet mask, Default
gateway, and preferred DNS server for your environment.
|
3. | Click OK to save your changes.
|
4. | Perform the same steps to configure the Internet
Protocol Version 6 (TCP/IPv6).
|
5. | Save all settings and exit the Network Connections
utility.
|
6. | Launch
Internet Explorer and confirm internet connectivity. Adjust your network
settings if necessary to allow the computer access to the Internet.
|
Provide Computer
Name and Domain
Each
computer on a Windows network and in Active Directory must have a
unique computer name. This name, known as the NetBIOS name, allows
users, resources, and other computers to contact this computer on the
network.
A standard NetBIOS
name is limited to 15 characters and should only consist of letters
(A-Z, a-z), digits (0-9), and hyphens (-). For example, weinhardt-dc is a
standard computer name, but weinhardt_dc is nonstandard. Although the
implementation of a DNS server will allow you to use nonstandard
computer names and still find the resources in your environment, servers
as critical as domain controllers and Exchange servers should only use
standard computer names.
1. | Click Provide Computer Name and Domain. If you have
already closed your Initial Configuration Tasks screen, you can click
Start, right-click Computer, select Properties; then, beside Computer
Name, Domain, and Workgroup Settings, click Change Settings.
|
2. | On the Computer Name tab, click Change.
|
3. | Under Computer name, enter the computer name for this
machine; then click OK to continue.
|
4. | Acknowledge that you must restart your computer to
apply these changes by clicking OK, and then click Close.
|
5. | When prompted You Must Restart Your Computer, click
Restart Now.
|
Enable Automatic
Updating and Feedback
Windows Server allows you
the option of automatically applying updates as they are released from
Microsoft. While this option may be a good idea for some applications,
most organizations require change control procedures before updating
servers as business critical as domain controllers and Exchange servers.
1. | Click on Enable Automatic Updating and Feedback.
Although the first option, Enable Windows Automatic Updating and
Feedback, states that it is “recommended,” in this author’s opinion,
that setting is NOT recommended for domain controllers or Exchange
servers. Instead, click on Manually Configure Settings.
|
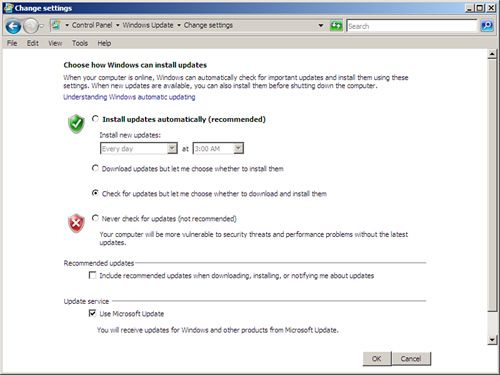
2. | Under Windows Automatic Updating, click Change Setting.
Set the automatic updates according to your organization’s policies.
The author recommends selecting either Download Updates but Let Me
Choose Whether to Install Them or Check for Updates but Let Me Choose
Whether to Download and Install Them. Additionally, the author
recommends Include Recommended Updates When Downloading, Installing, or
Notifying Me about Updates, as shown in Figure 1.
|
3. | When
ready, click OK to continue.
|
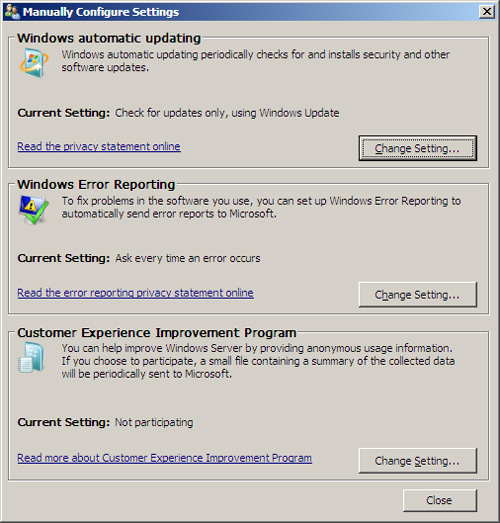
4. | Review the Windows Error Reporting and Customer
Experience Improvement Program settings. The author recommends the
default settings, as shown in Figure 2. When finished,
click Close to continue.
|
5. | Click
Download and Install Updates; if prompted to Install new Windows Update
Software, click Install Now. As part of the installation process, the
Windows Updates application will automatically close and reopen and
begin checking for updates.
|
6. | At this point, you can either click View Available
Updates and select which ones to install or simply click Install Updates
to automatically download and install all available updates.
|
7. | Accept any license agreements and click Finish to begin
installing available updates. Monitor the installation, as you may have
additional prompts from the installation process. When finished, if a
restart is required, click Restart Now.
|
8. | When the server has rebooted, log on again and return
to the Download and Install Updates section.
|
9. | Click the option to Get Updates for More Products.
|
10. | From the Microsoft Update site, place a check mark in
the I Accept the Terms of Use box and click Next.
|
11. | Select Use Current Settings and click Install; then on
the User Account Control window, click Continue.
|
12. | When complete, your server now checks for updates for
all Microsoft products on the server (such as Exchange Server), and not
just for the standard Windows updates. Close all windows to finish.
|
This concludes the
installation of the Base operating system for both the Domain Controller
and the Exchange Server 2010 server.
