1. | On the
DirectAccess server DA1, launch Server Manager.
|
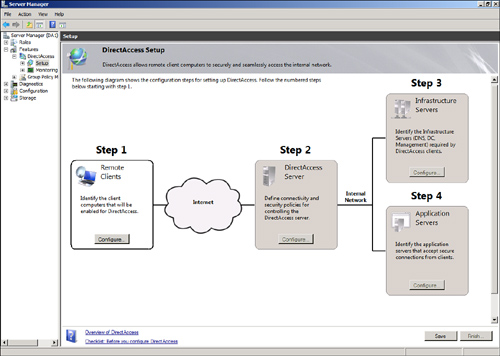
2. | Expand Features, DirectAccess, and select the Setup
node. The screen will show the four-step DirectAccess setup, as shown in
Figure 5.
|
3. | On the
Select Features page, select DirectAccess Management Console.
|
4. | In Step 1 Remote Clients, click Configure.
|
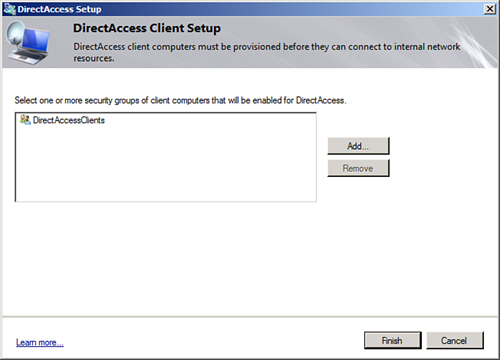
5. | On the DirectAccess Client Setup page, click the Add
button.
|
6. | In the
Select Group dialog box, type DirectAccessClients and click OK.
The screen will show the group, as shown in Figure 6.
|
7. | Click
Finish.
|
8. | In Step 2
DirectAccess Server, click Configure.
|
9. | On the Connectivity page, for Interface Connected to
the Internet, ensure that the correct interface is selected. For
Interface Connected to the Internal Network, ensure that the correct
interface is selected. The wizard will attempt to select the best
interfaces based on the IP address ranges. In Figure 7, the public
address 12.155.166.3 has been assigned to the Internet interface and the
private address 192.168.3.211 has been assigned to the internal
interface.
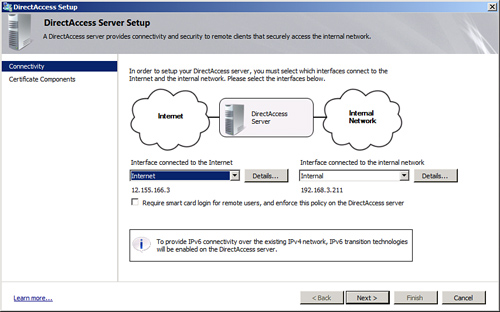
Note
The DirectAccess Setup
Wizard has an informational note that it detected that the internal
network is IPv4-based and will enable IPv6 transition technologies as
part of the setup. The DirectAccess server will be configured as the
ISATAP server.
|
10. | Click
Next.
|
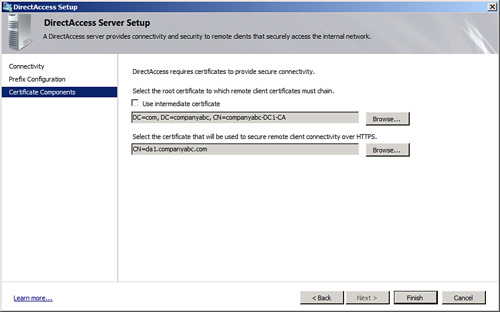
11. | On the
Certificate Components page, for Select the Root Certificate to Which
Remote Client Certificates Must Chain, click Browse. In the list of
certificates, click the companyabc-DC1-CA root certificate, and then
click OK.
|
12. | For
Select the Certificate That Will Be Used to Secure Remote Client
Connectivity over HTTPS, click Browse. In the list of certificates,
click the certificate named IP-HTTPS, and then click OK. The results are
shown in Figure 8. Click Finish.
|
13. | In Step 3
Infrastructure Servers, click Configure.
|
14. | On the Location page, click Network Location Server Is
Run on a Highly Available Server, type https://nls.companyabc.com,
click Validate, and then click Next. You should get a green check mark
with a Validation Successful message.
|
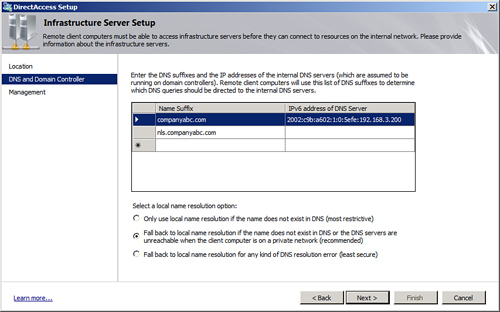
15. | On the DNS and Domain Controller page (shown in Figure 9),
note the entry for the name companyabc.com with the IPv6 address
2002:c9b:a602:1:0:5efe:192.168.3.200. This is the 6to4 IPv6 address for
the DC1 domain controller. All DirectAccess client requests to the
domain companyabc.com will be forwarded to this domain controller. The
nls.companyabc.com is also listed with a blank DNS server, which ensures
that DirectAccess clients will not forward the requests to this host.
Note
The blank DNS for the
Network Location Service (NLS) is needed so that DirectAccess clients
can use the URL to determine if they are inside the corporate network or
on the Internet. When inside the network, the DirectAccess clients will
be able to access the site. When remote and connected via DirectAccess,
the clients will be unable to reach the site due to the blank DNS
entry, although they can reach all other internal resources.
|
16. | |
17. | On the Management page, if there were internal
management servers, such as Microsoft System Center Configuration
Manager 2007 (SCCM) servers that needed to reach the DirectAccess
clients, they would be entered in this portion of the setup. Leave this
blank and click Finish.
|
18. | In Step 4 Application Servers, click Configure.
|
19. | On the DirectAccess Application Server Setup page,
leave Require No Additional End-to-End Authentication.
Note
If end-to-end
protection were required, Step 4 is where the permitted application
servers would be added. This scenario is doing end-to-edge, so no
configuration is needed.
|
20. | Click
Finish.
|
21. | Click
Save, and then click Finish to launch the configuration wizard.
|
22. | In the DirectAccess Review dialog box, click Apply. The
configuration will be applied.
|
23. | In the DirectAccess Policy Configuration message box,
click OK. The configuration has now been applied. The configuration is
stored in %WinDir%\DirectAccess\ in an XML file named
DirectAccessConfig.xml.
|
