2. Customizing Report Data Selection
ConfigMgr reports are based on the ConfigMgr
database views. You can add columns to your report or remove columns
from the report by changing the selection list in the report SQL
statement. You can also filter which rows display in the report, by
modifying the WHERE clause of the report SQL statement or by specifying
additional qualifiers.
Modifying Report Columns
To add or remove columns from this report, perform the following steps:
1. | Expand
the Configuration Manager console tree to System Center Configuration
Manager -> Site Database -> Computer Management -> Reporting
-> Reports. Right-click the Computers with low free disk space (less than specified MB free) report and choose Properties.
|
2. | On the report Properties page General tab, click the Edit SQL Statement button. A portion of the report’s SQL statement is:
SELECT SYS.Name, SYS.SiteCode, LDISK.Description0,LDISK.DeviceID0, LDISK.
VolumeName0,LDISK.FileSystem0, LDISK.Size0,LDISK.FreeSpace0
  FROM v_FullCollectionMembership SYS
  join v_GS_LOGICAL_DISK LDISK on SYS.ResourceID = LDISK.ResourceID
  WHERE
  LDISK.DriveType0 = 3 AND
  LDISK.FreeSpace0 < @variable AND
  SYS.CollectionID = @CollID
  ORDER BY SYS.Name= @CollID
  ORDER BY SYS.Name
|
3. | The
SQL statement’s FROM clause on the third and fourth lines of the code
listing in step 2 indicates that the report is based on data from the
v_FullCollectionMembership and v_GS_LOGICAL_DISK views. Figure 18.30
displays the Query Builder interface, which you can use to select
columns from these views to display in the report. This figure shows
v_GS_LOGICAL_DISK in the views list and VolumeSerialNumber0 in the
columns list as selected. After clicking the Insert button, add the view
alias LDISK as a column prefix and a comma after the column name. You
should also add the LDISK.Compressed0 column from the same view and
SYS.Domain0 from the v_FullCollectionMembership view. The modified
selection list is as follows:
SELECT SYS.Name, SYS.SiteCode,SYS.Domain,LDISK.Compressed0,LDISK.
  VolumeSerialNumber0,
  LDISK.Description0,LDISK.DeviceID0, LDISK.VolumeName0, LDISK.FileSystem0,
  LDISK.Size0,LDISK.FreeSpace0
  FROM v_FullCollectionMembership SYS
  join v_GS_LOGICAL_DISK LDISK on SYS.ResourceID = LDISK.ResourceID
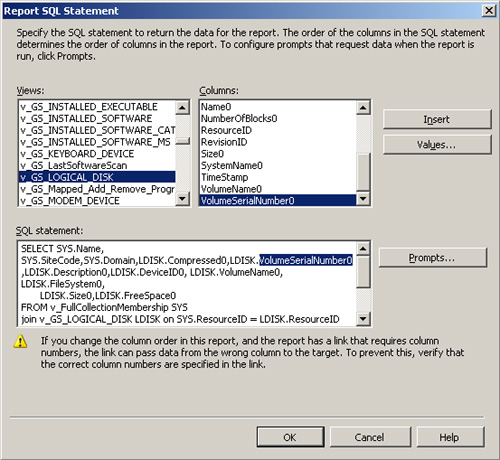
|
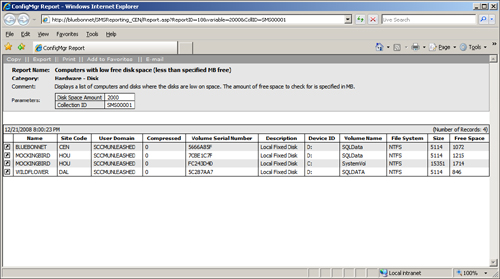
The modified report now includes domain
information from the system view, and the volume serial number and
compression attribute from the logical disk view. Figure 3 displays the new report.
Filtering Report Data to Select Specific Rows
This is common in ConfigMgr
reports and occurs because one or both views contain records that are
identical with respect to the data selected for the report but differ on
some characteristic that is not of interest. This example contains two
entries for Microsoft SQL Server version 9.00.3042.00 on each computer.
Let’s look at the SQL code used for the Computers with a specific product name and version report:
Select SYS.Netbios_Name0, SYS.User_Name0, SP.ProductName, SP.CompanyName,
SP.ProductVersion
FROM v_GS_SoftwareProduct SP JOIN v_R_System SYS on SP.ResourceID = SYS.ResourceID
WHERE SP.ProductName = @variable AND SP.ProductVersion = @variable1 Order by
SP.ProductName, SP.ProductVersion
It is often easier to
use the Query Tool rather than the Query Builder interface when you
want to quickly experiment with a number of changes to SQL statements
and see the results. To find the source of the apparent duplicate entry,
paste this SQL statement into the Query Tool and change the selection
list in the first line of the statement by replacing the specific
columns from the v_GS_SoftwareProduct view (alias SP) with the wildcard SP.*.
This returns all available columns from v_GS_SoftwareProduct. You also
want to replace the variables in the WHERE clause with the literal
strings ‘Microsoft SQL Server’ and ’9.00.3042.00’ to avoid having to populate the report prompt parameters at run time. The resulting SQL statement is
Select SYS.Netbios_Name0, SYS.User_Name0,  SP.*
  FROM v_GS_SoftwareProduct SP JOIN v_R_System SYS on SP.ResourceID = SYS.ResourceID
  WHERE SP.ProductName = 'Microsoft SQL Server' AND SP.ProductVersion = '9.00.3042.00'
  Order by SP.ProductName, SP.ProductVersion
Running the modified query in the SQL Query tool generates the results shown in Figure 4.

The data in rows 1 and 3, for example, is
identical with the exception of the ProductID and ProductLanguage
columns. The product information is gathered from file headers by the
software inventory process, and the database contains inventory from
files that show the product language code as 0 and from files showing
the product language code as 1033. Each language version is also
distinguished by Product ID. Product language information is not
necessary for this report, so filter the data by adding the keyword
distinct to the selection list in the original SQL statement:
Select distinct SYS.Netbios_Name0, SYS.User_Name0, SP.ProductName, SP.CompanyName,
SP.ProductVersion
This example has the prompt variables in the
SQL statement replaced with literal strings to make the query easier to
work with using the Query Tool. You might also want to use this
technique to modify reports so that you can use them in dashboards or
send to users with prepopulated parameters. You cannot use the Computers with a specific product name and version
report in a dashboard because it contains prompts. However, the
modified SQL statement that explicitly specified the product name
‘Microsoft SQL Server’ and product version ‘9.00.3042.00’ could be used
to create a dashboard report, or could be sent to your database
administrators to provide specific information about that SQL Server
version.
Another
common issue with reports is seeing stale data included in the report.
The site database often includes data about inactive computers, which
are not reporting heartbeat discovery, or obsolete records about
computers that have been re-imaged or replaced. To exclude this data
from your reports, add the following conditions to the WHERE clause of
your SQL statement:
SYS.Obsolete0 <> 1
SYS.Active0 = 1
Tip: Removing Old Data from the Site Database
ConfigMgr provides maintenance tasks that can
periodically remove various types of outdated data from the site
database. You can greatly improve the quality of data in many of your
reports by enabling these tasks and optimizing them for your
environment.
In some cases, you might want to filter data
based on criteria not in the base views for the report you work with. As
an example, the Computers with a specific product name and version
report is based on software inventory data, so you might want to ensure
you are looking only at data from systems that have recently reported
software inventory. The last software inventory scan date is in the
v_GS_LastSoftwareScan view, which is not part of the report. To add the
view to the report and filter for only those systems with inventory
scans in the last 30 days, perform the following steps:
1. | Add
the v_GS_LastSoftwareScan to the JOIN clause of the report’s SQL
statement. Using the Query Builder or the SQL Query Tool, you can list
the columns of v_GS_LastSoftwareScan.
Like all ConfigMgr resource views, v_GS_LastSoftwareScan
contains a ResourceID column. Use this to add this view to the report by
changing
FROM v_GS_SoftwareProduct SP JOIN v_R_System SYS on SP.ResourceID =
SYS.ResourceID
to
FROM v_GS_SoftwareProduct SP JOIN v_R_System SYS on SP.ResourceID =
SYS.ResourceID
JOIN v_GS_LastSoftwareScan LSS on SP. ResourceID = LSS. ResourceID
|
2. | The columns from v_GS_LastSoftwareScan are now available for the report, so add the following condition to the WHERE clause:
LSS.LastScanDate > (getdate ()-30)
The final SQL statement looks like this:
Select distinct SYS.Netbios_Name0, SYS.User_Name0, SP.ProductName, SP.CompanyName,
SP.ProductVersion
FROM v_GS_SoftwareProduct SP JOIN v_R_System SYS on SP.ResourceID = SYS.ResourceID
JOIN v_GS_LastSoftwareScan LSS on SP. ResourceID = LSS. ResourceID
WHERE SP.ProductName = @variable AND SP.ProductVersion = @variable1
And SYS.Obsolete0 <> 1 and SYS.Active0 = 1 and s.LastScanDate > (getdate ()-30)
Order by SP.ProductName, SP.ProductVersion
|
The
report now includes modifications to show only distinct rows and
exclude data from obsolete records and machines that are inactive or
have not reported software inventory in the past 30 days.
