3. Reporting on Custom Data
With their default settings, ConfigMgr discovery
and inventory methods gather a wide variety of data that you can use to
report on your environment. If you need additional information about
your client systems or discovered AD objects, there is a good chance
ConfigMgr can get the data you need. The following sections present
examples of customizing AD discovery and hardware inventory to extend
your reporting capability.
Reporting on Custom Discovery Data
The Configuration Manager AD discovery methods
import information about computers, users, and security groups from the
AD database. Each method has a default set of attributes that it
retrieves from the directory. You can specify additional attributes you
want to include in the AD system discovery and AD user discovery
methods. As an example, add the department, telephone number, and title
to the AD user discovery method, and then display these attributes in a
customized report. Perform the following steps to add attributes to the
AD user discovery method:
1. | Expand
the Configuration Manager console tree to System Center Configuration
Manager -> Site Database -> Site Management -> <Site Code> <Site Name> -> Discovery Methods. Right-click Active Directory User Discovery and choose Properties.
|
2. | In
the Active Directory User Discovery Properties dialog box, select the
Active Directory attribute tab, click the new (starburst) button, enter
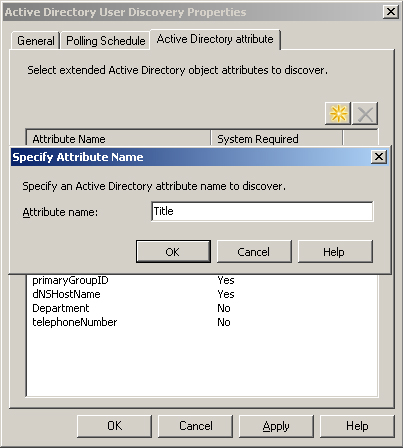
the name of the attribute you want to add, and click OK. Figure 5 displays the dialog box for adding the Title attribute.
|
Tip: Using ADSIEdit to View Object Attributes
To view the available attributes for user or
computer objects, run ADSIEdit, expand the domain naming context, and
select an object of the appropriate type. Right-click the user or
computer object and choose Properties. This launches the Attribute
Editor, which displays a complete list of available attributes for the
object type.
When the discovery method runs, it generates
data discovery record (DDR) files for each object it discovers. When the
ConfigMgr Discovery Data Manager (DDM) component processes a DDR
containing a new property, the DDM updates the WMI resource class and
the site database with the new property. ConfigMgr automatically adds
the new property to the appropriate resource view, which makes it
available for reporting. The resource view for user data is v_R_User.
Having specified the attributes you want in the user resource view,
let’s see how to add them to a report.
The Asset Intelligence report category includes
a number of reports on user activity, such as the systems, software,
and licenses the user has used. Including additional user details might
make these reports more useful in understanding who the user is and how
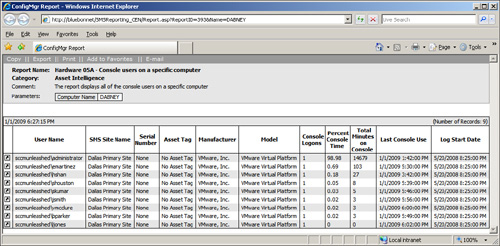
to contact them. Figure 6 shows the Hardware 05A – Console users on a specific computer report, which displays all users who have logged on to the machine’s console.
An abridged version of the SQL statement for this report is as follows:
Select  v_GS_SYSTEM_CONSOLE_USER.SystemConsoleUser0 as [User Name],
...
FROM v_GS_SYSTEM_CONSOLE_USER
INNER JOIN v_R_System_Valid on
v_R_System_Valid.ResourceID =
v_GS_SYSTEM_CONSOLE_USER.ResourceID
...
 WHERE v_R_System_Valid.Netbios_Name0 = @Name
...
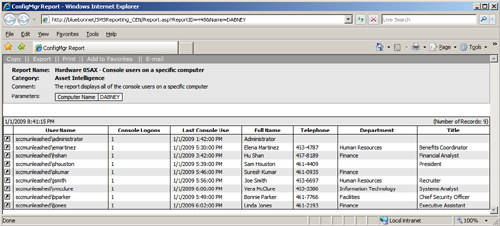
To create a report showing details about the users that have logged on to a particular computer, you can clone the Hardware 05A – Console users on a specific computer report and modify the SQL statement as follows:
In the FROM clause, add the following join to the user resource view.
INNER JOIN v_R_User U on v_GS_SYSTEM_CONSOLE_USER.SystemConsoleUser0 =
U.Unique_User_Name0
In the select
list, remove columns you are not interested in and add details from the
user resource view. The list of columns added from the user resource
view include the telephoneNumber, Department and Title AD attributes
added to the AD User Discovery method in Figure 18.33, as follows:
U.Full_User_Name0 AS [Full Name], U.telephoneNumber0 AS [Telephone],
U.Department0 AS Department, U.Title0 As Title
Figure 7 displays the modified console users report.
Reporting on Custom Inventory Data
This section demonstrates how to use these additional classes in
ConfigMgr reports. The hardware inventory process gathers basic data
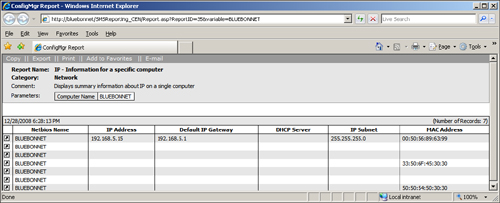
about each network adapter’s IP configuration by default. Figure 8 displays the IP – Information for a specific computer report for the computer Bluebonnet, which shows the basic network adapter inventory data.
The next example adds the DNS server and DNS suffix search order to this report. Perform the following steps:
1. | Use
a text editor such as Windows Notepad to locate the following lines in
class Win32_NetworkAdapterConfiguration section of the SMS_Def.mof file:
[SMS_Report (FALSE)     ]
    string     DNSDomainSuffixSearchOrder[];
[SMS_Report (FALSE)     ]
    string     DNSServerSearchOrder[];
|
2. | Change SMS_Report value for each of these items from FALSE to TRUE:
[SMS_Report (TRUE)     ]
    string     DNSDomainSuffixSearchOrder[];
[SMS_Report (TRUE)     ]
    string     DNSServerSearchOrder[];
|
This change causes the hardware inventory agent
on computers in the site to collect and report the DNS server and DNS
domain suffix search order values for each configured network adapter.
When the site server processes inventory files containing this
information, it appends two new rows to the Network_DATA table in the
site database:
Remember that Microsoft bases Configuration
Manager reports on SQL views rather than the underlying tables. Here is
the SQL statement for the IP – Information for a specific computer report:
Select Sys.Netbios_Name0, NETW.IPAddress0, NETW.DefaultIPGateway0,
NETW.DHCPServer0, NETW.IPSubnet0, NETW.MACAddress0
FROM v_R_System Sys JOIN v_Network_DATA_Serialized NETW ON NETW.ResourceID=Sys.
ResourceID WHERE Sys.Netbios_Name0 like @variable
The FROM statement in the third line above
reveals the report uses network information from the view
v_Network_DATA_Serialized. Unlike the resource views used to report on
discovery data, the inventory views are not updated automatically when
you add new attributes to ConfigMgr inventory.
You can use SQL
Server Management Studio to examine and edit the
v_Network_DATA_Serialized view. Perform the following steps:
1. | Launch
SQL Server Management Studio from Start -> Programs -> Microsoft
SQL Server 2005 -> SQL Server Management Studio.
|
2. | After connecting to the site database server SQL instance, expand <servername> -> database -> SMS_<Site Code> -> views in the tree control in the left pane.
|
3. | Right-click
the v_Network_DATA_Serialized view and choose Edit. This opens a query
window that displays the SQL statement required to alter the view.
V_Network_DATA_Serialized is based on the following select statement:
SELECT nd.MachineID As 'ResourceID', nd.InstanceKey As 'GroupID',
nd.RevisionID, nd.AgentID,
  nd.TimeKey As 'TimeStamp', nd.DefaultIPGateway0, nd.DHCPEnabled0,
  nd.DHCPServer00 As 'DHCPServer0', nd.DNSDomain00 As 'DNSDomain0',
  nd.DNSHostName00 As 'DNSHostName0', nd.Index0, ip.SubStr1 As
  'IPAddress0',
  nd.IPEnabled00 As 'IPEnabled0',ip.SubStr2 as 'IPSubnet0',
  nd.MACAddress0,
  nd.ServiceName0
  FROM Network_DATA as nd
  CROSS APPLY fnSplitStringsAndMerge(nd.IPAddress0, nd.IPSubnet0, ',') as ip
|
4. | Add the following attributes to the SELECT list; then click the Execute button from the SQL Server Management Studio toolbar:
nd.DNSDomainSuffixSearchOrde0, nd.DNSServerSearchOrder00
|
The v_Network_DATA_Serialized view now includes the DNS domain suffix search order and DNS server configuration information.
Note: About Changes to Default Views
Future upgrades to ConfigMgr might overwrite
customizations you make on default ConfigMgr objects, including views.
You should document all customizations and be prepared to re-create your
custom views following a service pack or upgrade.
To display this information in the IP – Information for a specific computer
report, edit the SQL statement for the report and add the
DNSDomainSuffixSearchOrde0 and DNSServerSearchOrder00 columns to the
SELECT list. You also need to remove NETW.DHCPServer0 from the list. Figure 9 displays the resulting report for the computer Bluebonnet.
Including External Data Sources in Reports
You undoubtedly have other applications and
data stores in your environment that contain information related to your
ConfigMgr client systems and other objects in the site database.
Although reports linking to external data sources are not strictly
ConfigMgr reports in that they are not based exclusively on the
ConfigMgr views, linking in external data can be useful for a variety of
purposes. This section presents an example of a report that uses data
from the v_R_System view and from an external spreadsheet. The example
imports the spreadsheet data into the ConfigMgr database. You can also
use data in a separate database on a local server or on another SQL
Server.
Note: About Fully Qualified Object Names in SQL Server
Up to now, the discussion has focused
exclusively on objects in the ConfigMgr site database. When objects such
as tables and views are in the site database, you can refer to them by
the simple object name, and ConfigMgr reporting will know where to find
them. To reference data stored in other databases or on other servers,
use the four part or fully-qualified name in the form server.database.schema.object. For example, the fully qualified name for the sites table in the central site database for SCCMUnleashed.com is bluebonnet.sms_cen.dbo.sites.
The dbo schema is the default schema for objects created by the
database owner. The server, database, and schema qualifier are optional
but must be supplied if the appropriate values differ from the defaults.
Figure 10
shows a portion of a spreadsheet in which the SCCMUnleashed IT
department keeps information about systems in the company data centers.

To add the sample data to the Computer information for a specific computer report, perform the following steps:
1. | Open
the spreadsheet in Microsoft Excel, then choose File -> Save As from
the Excel menu, and save as a file of type text (tab delimited). Save
this file as systeminfo.txt.
|
2. | Open
SQL Server Management Studio and connect to the site database server.
Expand the Databases node in the Object Explorer (the tree on the left
side), right-click the site database, and choose Tasks -> Import
Data. This launches the SQL Server Import and Export Wizard.
|
3. | Click
Next on the wizard’s startup page. On the Choose a Data Source page,
choose Flat File Source from the data source list box and browse to the
location of the saved text file. Click the Column names in the first
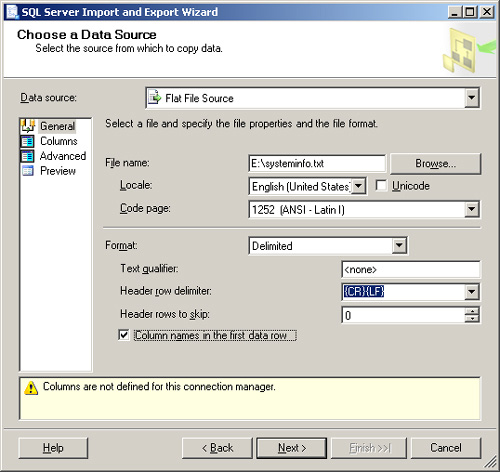
text row checkbox, and then click Next. Figure 11 shows the Choose a Data Source page with the appropriate options selected.
|
4. | On the next page of the wizard, verify that the row delimiter is {CR}{LF} and Tab {t} is the column delimiter; then click Next.
|
5. | On
the Choose a Destination page, the default options should show the
destination as SQL Native Client and the servername and database name
for your site database. Verify that the options are correct and click
Next.
|
6. | The
Select Source Tables and Views page shows your file mapped to a
database table with the same name. Click Next to accept this mapping.
|
7. | The
wizard’s Save and Execute Package page offers options to execute the
import immediately to save the data import package. If you plan to
update the data in the future, you can use a saved package to import
your updated data on demand or on a scheduled basis.
After selecting the appropriate options, click Next and then Finish, which completes the wizard.
|
8. | Expand
the Tables node under the site database in the Object Explorer tree.
Right-click the newly created table and choose Properties, and then
select the Permissions page. Click the Add button and add
webreport_approle to the list of users and roles. Check Select in the
Grant column of the list of explicit permissions for webreport_approle
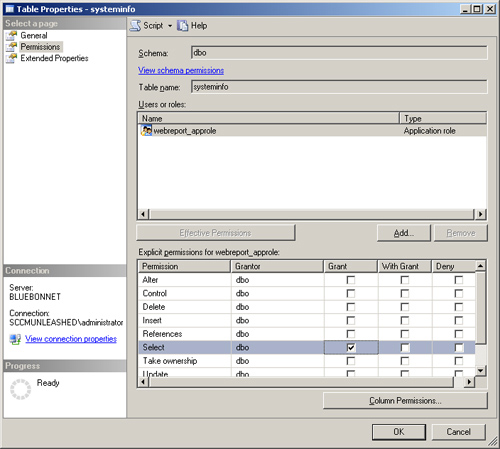
and click OK. Figure 12 shows the Permissions page for the systeminfo table.
|
9. | Open the Configuration Manager console and navigate to the Reports node. Right-click on the Computer information for a specific computer report, choose Clone, and enter the name for the new report. Name the new report Computer information for a specific computer – extended.
|
10. | Right-click
the new report, choose Properties, and then edit the report’s SQL
statement. Locate the following portion of the statement:
FROM v_R_System SYS LEFT JOIN  v_RA_System_IPAddresses IPAddr
on SYS.ResourceID = IPAddr.ResourceID
Insert an additional join condition for the systeminfo table. The edited section will be
FROM v_R_System SYS LEFT JOIN systeminfo INFO on SYS.Name0 = INFO.[Name]
LEFT JOIN  v_RA_System_IPAddresses IPAddr on SYS.ResourceID =
IPAddr.ResourceID
Edit the selection list at the beginning of the SQL statement and replace the following column names:
SYS.User_Name0, SYS.User_Domain0, SYS.Resource_Domain_OR_Workgr0,
Processor.Manufacturer0, CSYS.Model0
with:
INFO.City, INFO.Row, INFO.Rack,  INFO.[Business Contact], INFO.[Regulatory
Requirements]
|
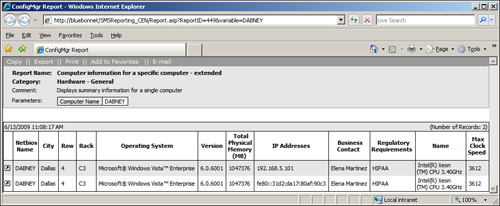
Figure 13 shows the Computer information for a specific computer – extended report for the computer DABNEY.