Moving Mailboxes
After a new Exchange
Server 2010 server has been installed into an existing Exchange Server
2003 organization, the movement of mailboxes from an old Exchange Server
back-end server to a new Exchange Server 2010 mailbox server is as
simple as selecting the mailbox or mailboxes, and through a few mouse
clicks, selecting the new destination server. The specific process is as
follows:
1. | Launch the Exchange Management Console (EMC) on an Exchange Server 2010 server.
|
2. | Expand
the recipient configuration, and click on the mailbox container. You
will see a list of mailboxes. In the Recipient Type Details column, you
will notice some of the mailboxes are flagged as Legacy Mailbox and some
of the mailboxes are flagged as User Mailbox. Those flagged as Legacy
Mailbox are still on Exchange Server 2003 and need to be transitioned to
Exchange Server 2010. Those mailboxes already on Exchange Server 2010
are flagged as Mailbox User.
|
3. | Click
on a mailbox, or alternately hold down the Shift key and select a group
of mailboxes, or hold down the Ctrl key and click on specific mailboxes
that you want to transition.
|
4. | Right-click
and select New Local Move Request. (A remote move is a move to a server
in a different Exchange Server organization.)
|
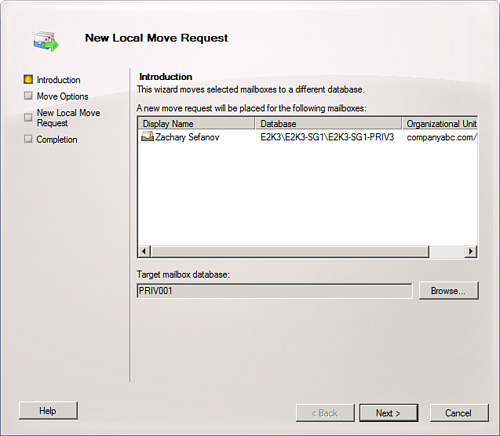
5. | A
New Local Move Request Wizard appears, and you are prompted with the
option of choosing which mailbox database you want to move the mailbox
to. Choose the database and review the settings, similar to what is
shown in Figure 2. Choose the destination of the mailbox(es), and then click Next.
|
6. | You
are prompted with a Move Options screen to choose to Skip the Mailbox
or to Skip the Corrupted Messages if corrupted messages are found during
the move process. Usually, you would want to choose to skip the corrupt
messages so you can complete the transition; however, if you want to
problem-solve the corrupt messages, you can skip the transition of the
mailbox, and then debug the mailbox problem and try the transition of
the mailbox later. Click Next to continue.
|
7. | A
summary screen is shown that summarizes the choices made. Review the
source and destination of the mailboxes that will be moved, and either
click Back and make any desired changes, or click New to submit the
request and begin the movement of mailboxes to the Exchange Server 2010
environment.
|
The move time will vary
based on the amount of data to be moved, and the bandwidth between the
source and destination server. This is something that should be tested
in the lab to determine whether all the mailboxes desired to be moved at
any one time can be accomplished
in the time available. Organizations with a lot of data to move choose
to install gigabit Ethernet adapters in servers and place systems on the
same subnet to efficiently move large sets of data.
This is also something to
ensure if mirrored in the test environment, as some organizations test
the movement of mail on an isolated gigabit test lab switch with fast
results, and then when performing the real transition, are working
across a slower WAN backbone with very slow performance speeds. After
the Move Request is submitted, it can be monitored and cancelled from
the Move Request node in the Recipient Configuration console section.
|
Even after the
Exchange Server mailboxes have been successfully moved from the old
Exchange Server 2003 server(s) to the new Exchange Server 2010
server(s), keep the old Exchange Server 2003 servers running on the
network for typically two weeks. The reason is that in Outlook, the mail
profile on each user’s system is keyed to a server—in this case, the
old Exchange Server 2003 server. If you remove the old server
immediately after the mailboxes are moved, the next time the users
launch Outlook, their profiles will look for the old server, not find
the server, and the users will not have access to email. You need to go
to each user’s Outlook profile and enter in the name of the new server
so that the Outlook client can find the new mailbox server where the
user’s mailbox contents are stored.
However, if you leave the
old server running, when the user launches Outlook, the Outlook profile
connects the user to the old Exchange Server 2003 server. The old
server tells the Outlook client that the user’s mailbox has been moved
to a new server, and the user’s profile is automatically updated on each
user’s client system to now find the user’s mailbox on the new server.
When this is done once for each user, it never needs to be done again.
The user’s Outlook client profile is set to find the user’s mailbox on
the new server. The idea of leaving the old server running for two weeks
is that usually within a couple of weeks, all users will have launched
Outlook once and their profile will automatically change. After two
weeks, you can remove the old Exchange Server 2003 server. See the
section on “Cleaning Up the Exchange Server 2003 Environments” for the process to properly remove an Exchange server from the network.
If a user had not
launched Outlook in the two-week timeframe that you had the old server
running, such as an individual on maternity leave, on a sabbatical, or
on an extended leave of absence, you will need to go back to the user’s
system and manually change the user’s Outlook profile to connect the
user to the new Exchange Server 2010 server. This will likely be done
for a very limited number of users. Obviously, the old Exchange Server
2003 server can remain on for a very long time with no mailboxes on the
system, but merely be there to redirect users to the new system.
However, it is usually recommended to remove the old server just so that
objects can be removed from Exchange Server and the organization
doesn’t have to patch, maintain, and manage a server in the environment
beyond a reasonable operating timeframe.
|
Adding Unified Messaging and Edge Transport Servers and Enterprise Policies
After
the core Exchange Server 2003 front-end and back-end servers have been
transitioned to applicable Exchange Server 2010 client access and
mailbox servers, additional server roles such as Unified Messaging
servers, Edge Transport servers, or Hub Transport servers, including
servers managing enterprise policies, can be added to the new Exchange
Server 2010 organization. Because the addition of these additional
server roles are not directly related to the transition of mail from
Exchange Server 2003 to Exchange Server 2010, usually it is recommended
to wait a few days and make sure that Exchange Server 2010 is operating
smoothly in its new environment before adding more to the network.
The addition of enterprise
policies on a Hub Transport server or security policies on a Edge
Transport server in an Exchange Server 2010 environment might cause mail
to be filtered, blocked, or altered as part of a spam filtering or
policy management rule. This might appear to be a problem with basic
Exchange Server 2010 functionality, whereas it is a function of a change
in content filtering added to the new Exchange Server environment.
Allowing Exchange Server 2010 to operate for a week or two as a basic
Exchange Server 2010 environment provides the Exchange Server
administrators as well as Exchange Server users time to become familiar
with the operation of the new Exchange Server 2010 environment before
changes are made in applying filters, new routes, or new operational
structure changes.
Changing the Offline Address Book Generation Server
The
server responsible for Offline Address Book (OAB) generation must be
changed to an Exchange Server 2010 system before removing Exchange
Server 2003 from an organization. To do this, select the Mailbox node
under the Organization Configuration section and navigate to the Offline
Address Book tab. Select the OAB to be moved and click on the Move
action. The wizard move screen, as shown in Figure 3, enables you to select a server to become the new OAB generation server.

Replicating Public Folders from Exchange Server 2003 or Exchange Server 2003 to Exchange Server 2010
Just as mailboxes are
transitioned from Exchange Server 2003 servers to Exchange Server 2010
systems, public folders need to be replicated before retiring the old
Exchange Server 2003 servers. In the past, this procedure involved a
manual replication of folder hierarchy, which could prove to be a
tedious process. Microsoft addressed this drawback with a utility on the
Exchange Server 2003 CD called PFMigrate. PFMigrate can create public
and system folder replicas on new systems, and remove them from old
servers. The following procedure outlines how to use PFMigrate to
transition from an Exchange Server 2003 server to an Exchange Server
2010 system:
1. | Open a command prompt (select Start, Run, type cmd, and click OK).
|
2. | Type cd D:\support\Exdeploy and press Enter.
|
3. | To create a report of current public folder replication, type the following:
pfmigrate.wsf /S:OLDSERVERNAME /T:NEWSERVERNAME /R /F:c:\LOGNAME.log
This generates a report named LOGNAME.log on the C: drive. OLDSERVERNAME should be the name of the old Exchange Server 2003 system, and NEWSERVERNAME should be the new Exchange Server 2010 system.
|
4. | To replicate system folders from the Exchange Server 2003 server to the Exchange Server 2010 server, type the following:
pfmigrate.wsf /S:OLDSERVERNAME /T:NEWSERVERNAME /SF /A /N:10000
   /F:c:\LOGNAME.log
|
5. | To replicate public folders from Exchange Server 2003 to Exchange Server 2010, type the following:
pfmigrate.wsf /S:OLDSERVERNAME /T:NEWSERVERNAME /A /N:10000
/F:c:\LOGNAME.log
Note
The /N:#### field
determines how many public folders should be addressed by the tool. If a
larger number of public folders than 10,000 exists, the parameter
should be increased to match.
|
6. | After
all public folders have replicated, the old replicas can be removed
from the Exchange Server 2003 servers by typing the following:
pfmigrate.wsf /S:OLDSERVERNAME /T:NEWSERVERNAME /D
|
7. | The LOGNAME.log
file can be reviewed to ensure that replication has occurred
successfully and that a copy of each public folder exists on the new
server.
|
Tip
Public Folder
management is easier from the Exchange Server 2003 side, which is why
the pfmigrate.wsf tool is an Exchange 2003 tool. For 2007 or 2010 public
folder replica creations, consider the use of the PowerShell
AddReplicaToPFRecursive.ps1 script included on a deployed server.
