In a worst-case scenario, server hardware fails and
cannot be recovered. To return to operations, you must have a complete
backup of the server that you can restore to a new piece of hardware.
This complete backup will include data stored on the server,
applications, and the operating system itself.You will learn how to use the
same utilities to back up the system so that you can return to
operational status quickly in the event of such a worst-case scenario.
You will also learn how to use the Recovery Console to perform surgical
repairs of specific problems including service or driver failures.
System State
Windows 2000 and Windows Server 2003 introduced the concept of System State to the backup process. System State data contains critical elements of a system’s configuration including:
The system’s registry
The COM+ Class Registration Database
The boot files, which include boot.ini, ntdetect.com, ntldr, bootsect.dos, and ntbootdd.sys
System files that are protected by the Windows File Protection service
In addition, the following are included in the System State when the corresponding services have been installed on the system:
Certificate Services database on a certificate server
Active Directory and the Sysvol folder on a domain controller
Cluster service information on a cluster server
Internet Information Services (IIS) metabase on a server with IIS installed
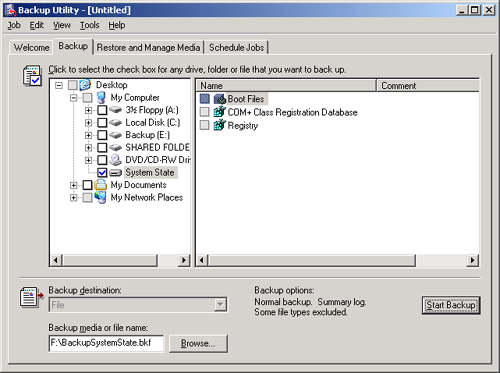
To
back up the System State in the Backup Utility, include the System
State node as part of the backup selection. The System State and its
components are shown in Figure 1.
If you prefer to use the command line, use Ntbackup with the following syntax:
Ntbackup backup systemstate /J "backup job name" ...
Followed by the /F
switch to indicate backing up to a file, or appropriate /T, /G, /N, /P
switches to back up to a tape.
There are several important notes and considerations related to backing up the System State:
You cannot back up
individual components of the System State. For example, you cannot back
up the COM+ Class Registration Database alone. Because of
interdependencies among System State components, you can back up only
the collection of System State components as a whole.
You
cannot use Ntbackup or the Backup Utility to back up the System State
from a remote machine. You must run Ntbackup or the Backup Utility on
the system that is being backed up. You can, however, direct the backup
to a file on a remote server, which can then transfer the file onto
another backup media. Or you can purchase a third-party backup utility
that can remotely back up the System State.
The
System State contains most elements of a system’s configuration, but
may not include every element required to return the system to full
operational capacity. It is therefore recommended to back up all boot,
system, data, and application volumes when you back up the system state.
The System State is a critical piece of a complete backup, but is only
one piece.
Performing
a system state backup automatically forces the backup type to Copy,
although the interface may not indicate that fact. Take that fact into
consideration when planning whether to include other items in your
backup selection.
To restore the System
State on a computer that is operational, use the Backup Utility and, on
the Restore And Manage Media tab, click the System State check box. If
the computer is not operational, you will most likely turn to Automated
System Recovery to regain operational status.
System State on a Domain Controller
The System State on a domain
controller includes the Microsoft Active Directory directory service and
the Sysvol folder. You can back up the System State on a domain
controller just as on any other system, using the Backup Utility or
Ntbackup command. As with all backup media, it is paramount to maintain
physical security of the media to which the Active Directory is backed
up.
To restore the System
State on a domain controller, you must restart the computer, press F8
to select startup options, and select Directory Services Restore Mode. In Directory Services Restore Mode, the domain controller boots but
does not start Active Directory services. You can log on to the computer
only as the local Administrator, using the Directory Services Restore
Mode password that was specified when Dcpromo was used to promote the
server to a domain controller.
When in Directory
Services Restore Mode, the domain controller does not perform
authentication or Active Directory replication, and the Active Directory
database and supporting files are not subject to file locks. You can
therefore restore the System State using the Backup Utility.
When restoring the System
State on a domain controller, you must choose whether to perform a
non-authoritative (normal) or authoritative restore of the Active
Directory and Sysvol folder. After restoring the System State using the
Backup Utility, you complete a non-authoritative restore by restarting
the domain controller into normal operational status. Because older data
was restored, the domain controller must update its replica of the
Active Directory and Sysvol, which it does automatically through
standard replication mechanisms from its replication partners.
There
may be occasions, however, when you do not want the restored domain
controller to become consistent with other functioning domain
controllers and instead want all domain controllers to have the same
state as the restored replica. If, for example, objects have been
deleted from Active Directory, you can restore one domain controller
with a backup set that was created prior to the deletion of the objects.
You must then perform an authoritative restore, which marks selected
objects as authoritative and causes those objects to be replicated from the restored domain controllers to its replication partners.
To perform an
authoritative restore, you must first perform a non-authoritative
restore by using the Backup Utility to restore the System State onto the
domain controller. When the restore is completed and you click Close in
the Backup Utility, you are prompted to restart the computer. When that
occurs, you must select No. Do not allow the domain controller to
restart. Then, open a command prompt and use Ntdsutil to mark the entire
restored database or selected objects as authoritative. You can get
more information about Ntdsutil and authoritative restore by typing ntdsutil /? at the command prompt or by using the online references in the Help And Support Center.
Automated System Recovery
Recovering a
failed server has traditionally been a tedious task, involving
reinstallation of the operating system, mounting and cataloging the
backup tape, then performing a full restore. Automated System Recovery
makes that process significantly easier. Automated System Recovery
requires you to create an ASR set, consisting of a backup of critical
system files, including the registry, and a floppy disk listing the
Windows system files that are installed on the computer. If the server
ever fails, you simply restart with the Windows Server 2003 CD-ROM and
select the option to perform an Automated System Recovery. The process
uses the list of files on the ASR disk to restore standard drivers and
files from the original Widows Server 2003 CD-ROM, and will restore
remaining files from the ASR backup set.
To create an ASR set, open the Backup Utility from the Accessories program group, or by clicking Start, then Run, and typing Ntbackup.exe.
If the Backup And Restore Wizard appears, click Advanced Mode. Then,
from the Backup Utility’s Welcome tab, or from the Tools menu, select
ASR Wizard. Follow the instructions of the Automated System Recovery
Preparation Wizard. It will request a 1.44 megabyte (MB) floppy disk to
create the ASR floppy. The ASR Wizard is shown in Figure 2.

The backup created by the
ASR Wizard includes disk configuration information for each disk in the
computer, a System State backup, and a backup of files including the
driver cache. The backup set is sizable. On a standard installation of
Windows Server 2003, the ASR backup size will be more than 1 gigabyte
(GB).
The ASR floppy disk is
created by the Automated System Recovery Preparation Wizard, and is
specific to the system and the time at which the ASR set was created.
You should label the ASR backup set and floppy disk carefully and keep
them together.
The ASR floppy disk
contains two catalogs of files on the system: Asr.sif and Asrpnp.sif. If
the system does not have a floppy drive when you create the ASR set,
you can create the floppy disk after running the wizard by copying these
two files from the %Systemroot%\repair
folder on the system to another computer that does have a floppy drive,
and copying the files to the floppy disk on that second system. If you
lose the floppy disk, you can restore the two files from the %Systemroot%\repair folder in the ASR backup set. You must
have the ASR floppy disk to perform an Automated System Recovery. If
the system does not have a floppy drive you will need to connect one
before performing the restore.
Tip
The
ASR set contains the files required to start the system. It is not a
comprehensive backup of the entire system. Therefore it is highly
recommended to create a complete backup, including the System State,
system volume, applications and, perhaps, user data when you create your
ASR set. |
When you perform an Automated System Recovery, you will need
Tip
You
will also need any mass storage device drivers that are not part of the
standard Windows Server 2003 driver set. To facilitate recovery, you
should consider copying those drivers to the ASR floppy disk. |
To restore a system
using Automated System Recovery, restart using the Windows Server 2003
CD-ROM, just as if you were installing the operating system on the
computer. If the computer requires a mass storage device driver that is
not included with Windows Server 2003, press F6 when prompted and
provide the driver on a floppy disk. After loading initial drivers, the
system will prompt you to press F2 to perform an Automated System
Recovery. Press F2 and follow the instructions on your screen. Automated
System Recover will prompt you for the system’s ASR floppy, which
contains two catalogs, or lists, of files required to start the system.
Those files will be loaded from the CD-ROM. Automated System Recovery
will restore remaining critical files, including the system’s registry,
from the system’s ASR backup set. There is a restart during the process,
and if the computer requires a vendor-specific mass storage device
driver, you will need to press F6 during this second restart as well.
Because there is a restart, you should either remove the floppy after
the initial text-based portion of the restore, or set the restart order
so that the system does not attempt to restart from the floppy drive.
