Verifying the Client Configuration
One of the first
signals of a DHCP failure appears either when a client loses
connectivity to network resources or when a new client cannot establish
such connectivity in the first place. In these cases, you need to
determine whether the problem originates on the client or elsewhere.
Begin by using the
Ipconfig command to determine whether the DHCP client has received an
address lease from the DHCP server. If so, the Ipconfig /all output
shows that DHCP is enabled, and the IP address is described as an “IP
Address” and not an “Autoconfiguration IP Address.” Alternatively, you
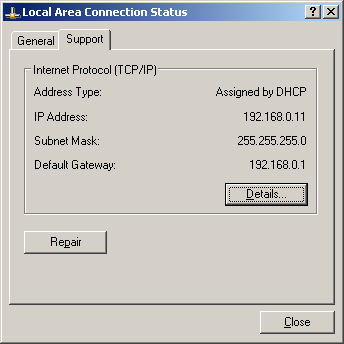
can check the address type listed on the Support tab of the status
dialog box for the connection. You open this dialog box, shown in Figure 1,
by double-clicking the relevant connection in the Network Connections
window. When the IP address has been assigned by a DHCP server, the
address type is described on the Support tab as Assigned By DHCP.

If
the client has been assigned by DHCP an address that is compatible with
the rest of the network, and no warning messages have appeared about
address conflicts, you can assume that the network problem does not
result from an addressing error on the local client.
Address Conflicts
If a client computer has
been assigned an address in use by another computer on the network, a
warning message informing you of this conflict appears in the system
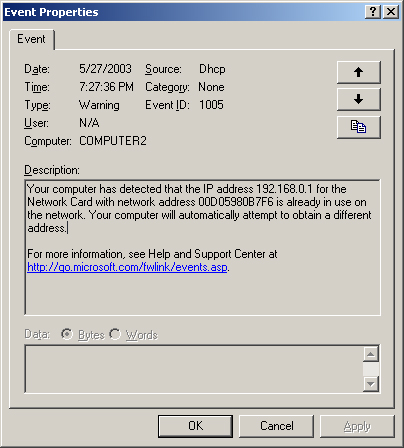
tray. You can also learn about such address conflicts in the System log,
which you can access through Event Viewer. Figure 2 shows this type of warning message.

When
you receive a warning message about an address conflict, and when you
can verify that the client has received its IP configuration from a DHCP
server, this conflict can be a sign of competing DHCP servers or of a
sudden DHCP scope redeployment.
To check for competing
DHCP servers, you can use the Dhcploc.exe utility (included in Windows
Support Tools) to locate rogue DHCP servers on the network. After
removing rogue servers as needed, verify that no two remaining DHCP
servers can issue address leases from the same address range.
To recover gracefully from
a scope redeployment, first increase the conflict detection attempts on
the server and then renew client leases. To renew a client lease, use
either the Ipconfig /renew command or the Repair button in the relevant
connection’s status dialog box. If you need to renew many leases, you
can use the Shutdown /i command to restart multiple remote computers.
Note
The Shutdown /i command opens a graphical tool that allows you to select a number of remote computers to shut down. |
|
Clicking the Repair button on the Support tab of a connection’s status dialog box (shown in Figure 8-6) performs the following six functions in sequence:
1. | Broadcast
a DHCP Request message to renew the currently assigned client IP
address. (This step is performed only if the client is a DHCP client.)
This function is similar to the one provided by the Ipconfig /renew
command, but in the case of the Ipconfig /renew command, the request to
renew the currently active IP address is sent by unicast, not broadcast,
to the DHCP server that assigned the address. If no address (0.0.0.0)
is currently assigned to the client, the first step performed by the
Repair button (as with the Ipconfig /renew command) is to broadcast a
DHCP Discover packet to the network.
| 2. | Flush the ARP cache. This step is the functional equivalent of entering arp–d * at a command prompt.
| 3. | Flush the NetBIOS cache. This step is the functional equivalent of entering the nbtstat–R command at a command prompt.
| 4. | Flush the DNS cache. This step is the functional equivalent of entering the ipconfig /flushdns command at a command prompt.
| 5. | Reregister the client’s NetBIOS name and IP address with a WINS server. This step is the functional equivalent of entering the nbtstat–RR
command at a command prompt.
| 6. | Reregister the client’s computer name and IP address with DNS. This step is the functional equivalent of entering the ipconfig /registerdns
command at a command prompt.
|
|
Tip
For the exam, know the operations performed by the Repair button and their command-line equivalents. |
Failure to Obtain a DHCP Address
When the Ipconfig /all
command output or the connection status dialog box reveals that the
client address is assigned by APIPA or by an alternate configuration,
you can first attempt to refresh the IP configuration by using either
the Ipconfig /renew command or the Repair button in the connection’s
status dialog box.
If
the problem persists, this situation can signal either the absence of a
DHCP server or relay agent deployed within broadcast range, a break in
the physical connection, or an error at the DHCP server or scope. If you
can verify that a DHCP server or relay agent is deployed within
broadcast range, verify next that the physical connection to the DHCP
server or relay agent is functioning properly. Note that to ping the
DHCP server or relay agent successfully, you might need to assign a
temporary manual address that places the client on the same logical
subnet as its default gateway.
Tip
If you do not know the location, address, or name of a DHCP server on your network, enter netsh dhcp show server at a command prompt. This command provides you with the names and addresses of all servers authorized in Active Directory. |
Once you can rule
out problems in physical connectivity, and if you can rule out problems
in the configuration or status of the DHCP relay agent (if deployed),
you can move on to troubleshoot the DHCP server and scope. When
troubleshooting the DHCP server for the client’s failure to obtain an IP
address, verify that the server is fully installed, configured, and
authorized. When troubleshooting the scope for the client’s failure to
obtain an IP address, verify that the scope is active and that the
available leases have not all been assigned to other clients. (See the
“Verifying the Server Configuration” section later in this lesson for
more information on troubleshooting these problems at the server and
scope.)
Address Obtained from Incorrect Scope
If the Ipconfig
/all command output or the connection’s status dialog box reveals that
the client has obtained an address from a DHCP server, and you determine
that this address belongs to an incorrect scope, first verify that no
competing servers exist on the network. To assist in this task, you can
use the Dhcploc.exe utility to determine whether rogue servers are
distributing IP addresses. If no rogue servers exist, verify that all
DHCP servers authorized on the network are leasing from distinct address
ranges. No overlap in leasable address space should exist among active
DHCP servers.
The correct DHCP
server might also have supplied an address from an incorrect scope.
Multiple scopes can be active on a single DHCP server; scopes not native
to the server’s own subnet are used for remote clients. However, the
DHCP server can match remote clients to the proper scope only when the
RFC 1542–compliant router or DHCP relay agent through which the client
communicates is properly addressed. In this scenario, when a remote
client is assigned an incorrect address by the DHCP server, verify that
the DHCP relay agent or router forwarding DHCP messages is itself
correctly addressed.
Note
DHCP
Request messages contain a certain field named Giaddr that informs the
DHCP server of the originating subnet of the request. When the field is
empty, the client is assigned an address from the local scope. When the
Giaddr field contains an address, as in the following case, the DHCP
server assigns the client an address from a scope compatible with this
address. DHCP: Relay IP Address (giaddr) = 192.168.2.1
|