In cases when PXE boot is not supported on the system
or on the network, it might be necessary to use bootable media to start
a WDS imaging process. This can be accomplished with a WDS discover
image. A discover image is created from an existing WDS boot image that
contains Windows PE and the WDS client, but can be stored on removable
media making it easier to deploy images to older systems or on
heterogeneous networks that have PXE issues. To create a discover image,
perform the following steps:
1. | Log on to
the Windows Server 2008 R2 system that has the WDS role installed with
an account with local administrator and domain administrator rights.
|
2. | Click Start, click All Programs, click Administrative
Tools, and select Windows Deployment Services.
|
3. | When the Windows Deployment Services console opens, in
the tree pane, select and expand the WDS server and select the Boot
Images node.
|
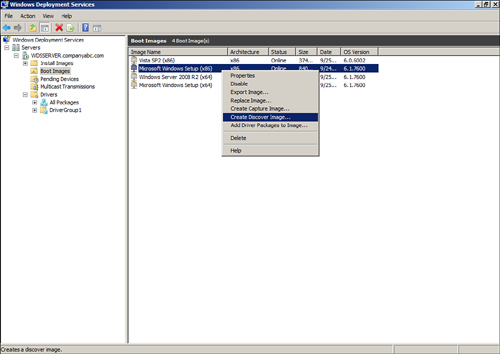
4. | In the
tasks pane, locate and right-click the desired boot image, and select
Create Discover Image, as shown in Figure 1.
|
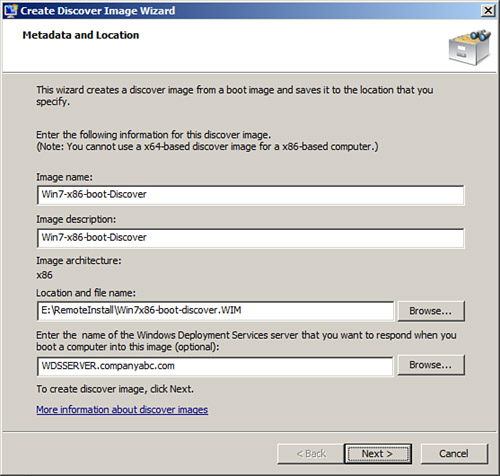
5. | On the
Discover Image Metadata and Location page, enter a name and description
for the new discover boot image. In the Location and File Name section,
browse to a folder on the local system where the new discover boot image
can be created, type in a name for the discover image, and click Open
to return to the Discover Image Metadata and Location page.
|
6. | Enter the fully qualified domain name of the WDS server
that the discover image will connect to after booting into the Windows
PE and loading the WDS client. Figure 2 shows the
discover metadata that will be used for this example; the path to the
file is important as it will be required later. Click Next to create the
discover image.
|
7. | When the
discover image is created, click Finish to close the window and return
to the WDS console.
|
At this point, a new
discover image has been created, but a few additional steps are required
before it can be used to boot a system and connect to a WDS server.
The discover image can now be
added to the WDS server as a boot image, by following the steps in the
previous section on adding boot images to the WDS server. You might ask
why a WDS administrator would want to do this—there have been documented
issues where a WDS client PC cannot connect to the WDS server using a
standard boot image but can connect using a
discover image. Perhaps it has to do with the fact that the WDS server
is already selected, but this is an out-of-the-ordinary case that is
only listed here because it might add value to a WDS administrator
troubleshooting an implementation.
An alternate and more
common use of discover images is to create bootable media that can be
used on client or server hardware that does not support PXE boot. To
create a bootable CD or DVD that will use the new discover boot image,
the tools included in the Windows Automated Installation Kit (WAIK) are
required. The WAIK for Windows 7 and Windows Server 2008 R2 is new and
includes many updated features and settings.
Creating Bootable Media
with Discover Boot Images and the Windows Automated Installation Kit
(WAIK)
After a new discover
image has been created, it is pretty useless until we can actually boot a
system and connect to a WDS server using it as a WDS boot image or by
creating a bootable removal media. To create bootable media that loads a
discover image, the Windows Automated Installation Kit (WAIK) needs to
be downloaded from Microsoft and installed on a Windows Server 2008 R2
system. The WAIK can be installed on other operating systems, but
several prerequisites must be met before it can be installed.
The Windows Automated
Installation Kit is used primarily to help OEM computer builders deploy
Windows operating systems onto new hardware. It contains deployment
tools that are compatible with the latest version of Windows. Download
and install the WAIK on a Windows Server 2008 R2 system. After the WAIK
is installed, to create a bootable ISO file that boots the discover boot
image, perform the following steps:
1. | Log on to
the Windows Server 2008 R2 system with an account with administrative
rights.
|
2. | Download
and install the latest version of the Windows Automated Installation Kit
that is compatible with Windows Server 2008 R2 and Windows 7.
|
3. | After the WAIK is installed, copy the discover image
created previously to a local drive and folder path. For this example,
the file path of our discover image is E:\RemoteInstall\Win7x86-boot-discover.WIM.
|
4. | Click Start, click All Programs, click Accessories, and
select Command Prompt.
|
5. | Type cd \ and press Enter to focus the command
prompt to the root of the C: drive.
|
6. | Type cd "Program Files\Windows AIK\Tools\PETools\"
and press Enter to change the command prompt focus to the PETools
folder.
|
7. | Type CopyPe
x86 E:\RemoteInstall\Winpe and press Enter. This creates the WinPE
folder and a copy of the Windows Preinstallation Environment, also
known as Windows PE or WinPE for short, for x86-based systems on the
specified destination on the E: drive. The process copies several files
to the destination folder and when completed returns the cursor back to
the command prompt, which is now focused in the destination folder.
|
8. | Now we have the WinPE files necessary to boot a
system and we need to copy the discover image into the correct folder.
Type the following command based on the folder and files paths presented
in the previous steps: Copy /y
E:\RemoteInstall\Win7x86-boot-discover.WIM
E:\RemoteInstall\WinPE\ISO\Sources\Boot.wim and press Enter. This
command copies the created discover boot file and creates or overwrites
the default boot.wim file that is contained in the WinPE
installation folder.
|
9. | After the file copy completes successfully, type in C:
and press Enter. The focus should be returned back to c:\program
files\Windows AIK\Tools\PETools, but if not, change to the PETools
directory.
|
10. | At this
point, we have a WinPE installation ready to create a bootable ISO image
that includes our custom discover image. Type the following command and
then press Enter:
oscdimg –n –bE:\RemoteInstall\Winpe\ISO\Boot\etfsboot.com E:\RemoteInstall\Winpe\ISO E:\RemoteInstall\Win7-x86-bootable-Discover-image.ISO
|
11. | The
previous command should be entered as a single line and there is no
space between the –b and the path to the etfsboot.com
file. The –b option defines the media used to make the ISO
bootable and the –n command allows for the use of long
filenames. Each of the options is used for ISO image creation but this
utility can be used to create other types of media. After the ISO is
created, copy it to a system that has the necessary CD/RW or DVD/RW
drive and the necessary software to burn a CD using an ISO image.
|
12. | After the bootable CD is created, boot a system using
it to verify that it functions and boots as intended.
|
This might seem like a
tedious process, but it really only needs to be performed once for every
WDS server deployed on the network.
