Pre-creating Active
Directory Computer Accounts for WDS
Without doing any extensive
customization to the imaging process, you can include customizations to
boot images, install images, or the WDS server configuration settings.
WDS automatically generates the name of the computer and uses the
credentials specified during the image deployment to add the imaged
system to the Active Directory domain of which the WDS server is a
member. WDS uses the configuration settings in the WDS Properties, AD DS
tab, as shown in Figure 4, to define the Client Naming Policy format for computers
and to define which domain and container the new computer accounts will
be created in.
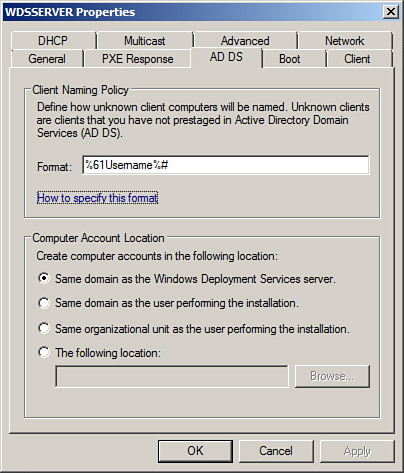
The configuration options in the
WDS Property page, AD DS tab work well for new computer account
placement, but are not very flexible for naming computer accounts. When
many computers will be deployed and will require predefined computer
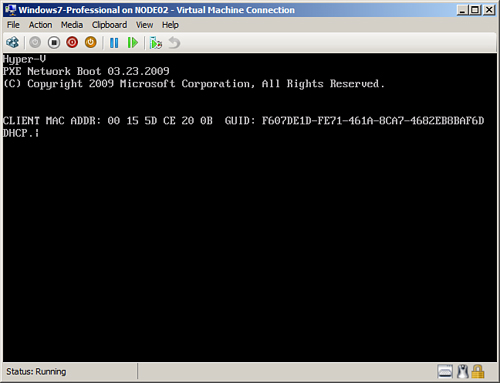
names in Active Directory, the computer accounts can be pre-created. For
the pre-created computer accounts to be linked to the actual systems, the
GUID associated with the system’s network adapter is required. On most
systems, the GUID will be displayed during the PXE boot sequence, as
shown in Figure 5. After the GUID has been identified and
recorded, the Active Directory computer account can be created. The
account will need to be created before the system is imaged using WDS.
To create an Active Directory computer account for use with WDS, perform
the following steps:
1. | Log on to
the Windows Server 2008 R2 system running WDS with an account with
administrative rights.
|
2. | If the Remote Server Administration tools for the Active
Directory Domain Services AD DS role are not installed on the WDS
server, they must be installed now.
|
3. | After the domain services tools are installed, click
Start, click All Programs, click Administrative Tools, and select Active
Directory Users and Computers.
|
4. | Expand the domain and select the container that the WDS
server will place new computer accounts in, as specified in the WDS
Properties page, AD DS tab. By default, all new computer accounts will
be placed in the domain’s Computers container.
|
5. | Right-click on the domain’s Computers container, click
New, and select Computer.
|
6. | When the New Object – Computer window opens, type in the
desired name of the new computer account in the Computer Name field,
and click Next.
|
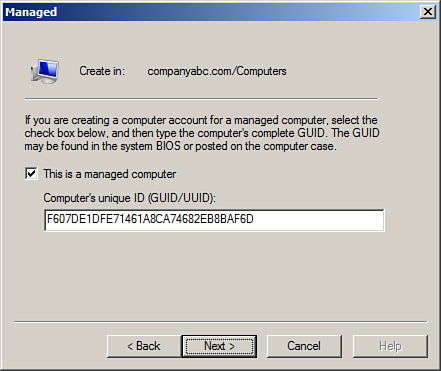
7. | On the
Managed page, check the This Is a Managed Computer check box.
|
8. | After the check box is checked, enter the previously
recorded GUID associated with the network card on the system that will
be imaged, as shown in Figure 6, and click Next
to continue. The dashes will need to be removed and should not be typed
into the GUID field.
|
9. | The next
page is the Host Server page where a specific WDS server can be
specified to provide images to this host. Either specify a WDS server or
leave the default of allowing any WDS server to provide images to this
client, and click Next.
|
10. | Review the settings and click Finish to complete the
process.
|
11. | After the
computer account is created, the system can be imaged and will join the
domain using the preconfigured computer account name.
|
Migration Path from
Win2k3 RIS to W2k3-Sp2 WDS to Win2k8-WDS
Windows Server 2003 Remote
Installation Services (RIS) is included with the release of the product
and with Service Pack 1. With the release of Windows Server 2003 Service
Pack 2, RIS services were upgraded to Windows 2003 Windows Deployment
Services. The first time the new WDS console is opened on a Windows
Server 2003 SP2 system, a prompt appears asking if the WDS server should
be configured to run in Legacy or Mixed mode. If you plan to use
previously created RIS images only, Legacy mode can be used. If you want
to use your RIS images as well as the Windows Vista, Windows Server
2008, Windows 7, and Windows Server 2008 R2 Windows Imaging Format files
(WIM), Mixed mode should be selected.
There are three
different modes of WDS within Windows Server 2003: Legacy, Mixed, and
Native. Legacy mode is primarily used for RIS image compatibility, Mixed
mode is used for utilizing both RIS and WIM files or images, and Native
mode is used primarily for WIM files. To upgrade to Windows Server 2008
R2 WDS, your Windows Server 2003 WDS server must be in WDS Native mode.
To upgrade your server from
Legacy to Mixed mode, open up the WDS console on the WDS server, locate
and right-click the server, and select Initialize Server. After the
process completes, the server will be in Mixed mode.
To
upgrade your server from Mixed mode to Native mode, first decide
whether you want to keep your existing RISETUP and RIPREP images.
RISETUP images are the base installation images created from Windows
2000, 2003, and XP installation media; RIPREP images are those images
created from custom installations that have been pushed up to the RIS
server. If you want to remove these images, simply delete the images. If
you want to convert them, you have two options: offline conversion,
which is used for RIPREP images only, and deploy and recapture, which is
used for RIPREP and RISETUP images. Run the WDSUTIL /SET-Server
/ForceNative command to convert the WDS to
Native mode. After the Windows Server 2003 WDS server is running in
Native mode, the operating system might be upgradeable to Windows Server
2008 R2 if no other issues prevent the upgrade and if the Windows
Server 2003 system is running the 64-bit edition.
Upgrading a RIS Image
to a Windows Server 2008 R2 WDS Image
If you have a working RIS
environment and have images that will need to be maintained, these
images can be manually imported into a Windows Server 2008 R2 WDS server
using a capture image and a detailed process. The following list
includes the high-level steps to support this process for migrating
Windows XP and Windows Server 2003 RIS images to a Windows Server 2008
R2 WDS server:
1. | Deploy
the image to a system using the legacy RIS server.
|
2. | Prepare the newly deployed system using the Sysprep
utility and, as required, the Setup Manager utility to prepare the
system for imaging.
|
3. | Create a capture boot image on the Windows Server 2008
R2 WDS server. Add the capture boot image to the WDS boot images.
|
4. | Boot the system that will be imaged, using PXE boot.
|
5. | Select the capture image when the list of available
images is presented.
|
6. | Follow the capture imaging prompts to create the new
custom install image. |
