4. Installing the guest operating system
If you have selected an installation option when
creating a VM, then you can begin the operating system installation
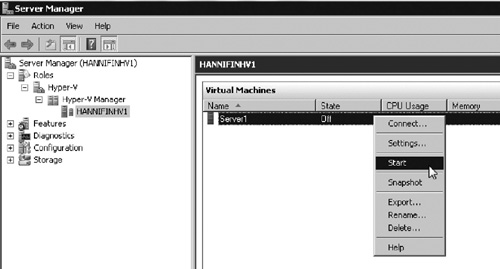
process simply by powering on the VM. To start the VM, locate the server
within Hyper-V Manager. Right click the VM and select Start (see Figure 7).
After starting the VM, you can open the console by
double-clicking the VM within Hyper-V Server Manager. This will allow
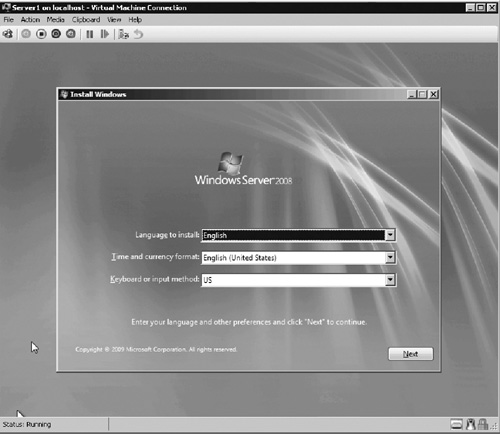
you to see the VM boot. After the VM boots from the installation media,
you can begin the operating system installation process just like a
physical computer (see Figure 8).
After installing the guest operating system, you will
want to install the Hyper-V integration services. Integration services
provide a way for the VM to communicate with this Hyper-V host, allowing
the VM to synchronize with the host, providing the host with the
ability to interact with VM VSS Services, providing heartbeat
capabilities between the Hyper-V host and the VM, and allowing the host
to send a clean shutdown command to the VM. Additionally the integration
services installation will install enhanced network adapter, display,
and mouse drivers on some operating systems. To install integration
services, perform the following:
1. | When the guest operating system installation is complete, logon to the VM.
|
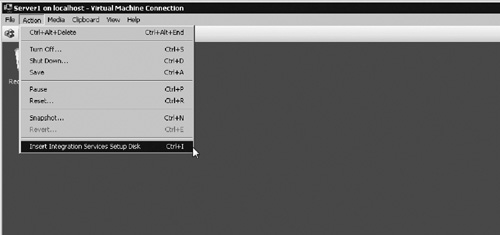
2. | From the Virtual Machine Connection window, select the menu option Action | Insert Integration Services Setup Disk (see Figure 9).
|
Windows Server 2008 R2 and integration services
Windows Server 2008 R2 guest VMs will already have
the integration services installed as part of the operating system. You
will not need to install the integration services a second time.
|
|
3. | Complete the setup wizard to install integration servers and reboot when prompted.
|
5. Updating virtual machine settings
After
creating a VM, you may, at some point, want to modify settings. For
example, you may need to add additional memory or processors to support a
new application being installed on the VM. VM settings can be accessed
by performing the following:
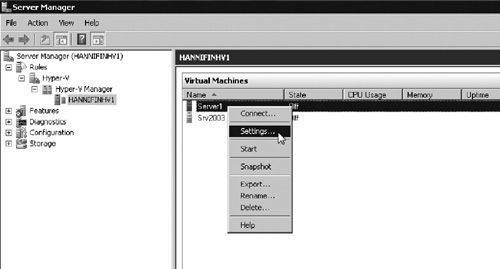
1. | Right click on the VM within Hyper-V Manager and select Settings (see Figure 10).
|
2. | The VM settings window will open as seen in Figure 11. Here you can modify the various configuration options for the VM.
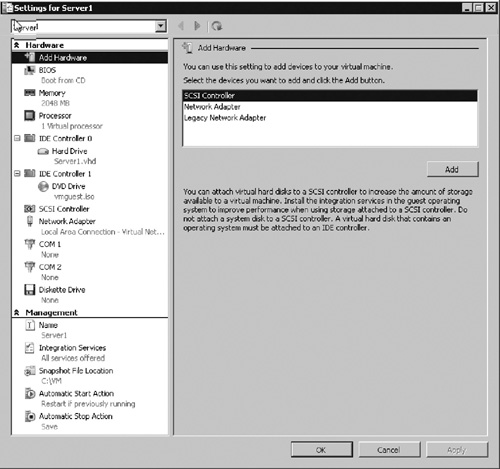
|
The following options can be configured for a VM.
Add hardware
The Add Hardware option can be used to add new
hardware to the VM. Using the Add Hardware option, you can add SCSI
controllers for additional disk drives, additional network adapters, or a
legacy network adapter
to support a network-based installation of operating systems, general
network support for older operating systems, and network support for
operating systems that do not have integration services installed.
BIOS
The BIOS option can be used to set boot order of VM
devices. Typically this setting is used to boot from the correct
location when installing a guest operating system. For example, if you
are installing the OS from a CD, you should select the CD as the first
boot device.
Memory
The memory option can be used to increase the amount
of memory allocated to the VM. As mentioned previously, you may need to
increase memory to support new applications or increased workloads on
the VM.
Processor
The processor option can be used to add or remove
processors from the VM as well as manage processor resources. You can
configure the following resource options:
Virtual machine reserve
—This setting reserves the specified percentage of resources to this
VM. This will ensure that the specified percentage of resources is
always available to the VM. This setting can be useful when you want to
guarantee that resources are available for a given VM.
Virtual machine limit
—You can use this setting to limit the processor resources that can be
consumed by this VM. For example, by entering 20%, you will limit the VM
to using only 20% of the physical CPU. This setting is very useful to
prevent a rogue machine from consuming all of the host’s processing
power. This setting can be used to ensure that development and test
servers do not interfere with production servers by maxing out the
processors on the host.
Relative weight
—Relative weight is used to determine this VMs importance related to
other VMs on the host. In the event of two machines requesting
processing, the one with the higher weight is given priority over the
other. You can use this setting to ensure that mission critical VMs are
given a processor priority higher than that of other VMs.
IDE disk controllers
Each VM is configured with two IDE disk controllers.
The operating system must be installed on a disk drive attached to an
IDE controller. You can select the IDE controllers to add additional
disk drives and DVD drives.
SCSI controllers
SCSI
controllers can be used to add disk drives that do not contain the
operating system. For best performance, SCSI controllers should be used
for secondary storage when the integration services are not installed.
However, when the integration services are installed, SCSI or IDE
controllers can be used.
|
Hot-add disk drives
Windows Server 2008 R2 Hyper-V allows administrators
to add or remove disk drives to VMs without turning off the VM. Only
SCSI controllers support hot-add and remove features. You cannot hot-add
or remove a disk drive to or from an IDE controller.
|
Network adapters
You can select any listed network adapter to
configure the settings for that adapter. These include MAC address, VLAN
tagging, and which virtual network the adapter is connected to.
Comm Ports
Each VM includes the option to connect to physical
Com Ports via a named pipe connection. This setting can be useful if you
need to give the VM access to Com Port options such as modems.
Diskette Drive
The Diskette Drive option can be used to give the VM
access to a virtual floppy image. This can be used to install some
operating systems or load drivers that might be available on a virtual
floppy disk file.
Name
You can use the Name setting to rename the label for
the VM. Note that this does not change the computer name within the
operating system. This option only changes the label for how the machine
is referenced within Hyper-V Manager.
Integration services
The Integration Services setting allows you to
disable or enable individual services offered by Integration Services.
For example, you can use this setting to disable synchronization between
the VM and the Hyper-V host.
Snapshot file location
This
setting allows you to change the path to where snapshot files are
stored for this VM. You may want to change this if you need additional
disk space for snapshots that is not available using the default path.
Automatic start and stop actions
These settings allow you to configure how
you want the VM to act when the physical host boots or shuts down. For
example, you can use this setting to configure the VM to perform a clean
shut down every time a shutdown command is sent to the physical host.