5. Use Fine-Grained Password Policy
Password policies provide you
with a way to set strict enforcement of the length, age, and complexity
of the passwords used in your network. In the Windows 2000 Server and
Windows Server 2003 versions of Active Directory, there was a single
password policy that could be set, and it was created by default as part
of the Default Domain Policy. If you had an environment where you
wanted to implement another password policy, for whatever reason, you
were stuck creating a new domain to get a new Default Domain Policy
object wherein you could create your new password policy. It seems a
little silly to create a new domain simply to get an additional password
policy object, but that is how it was done. Windows Server 2008 R2 will
let you create more than one password settings object (PSO) per Active
Directory domain. This means it is now possible to create multiple
password policies and their corresponding lockout restrictions in a
single-domain environment. This ability to create multiple password
policies that have differing levels of impact on different users and
groups has been termed fine-grained password policies.
To use these policies, Windows
Server 2008 R2 relies on two object classes in the Active Directory
schema called Password Settings Container and Password Settings. The
Password Settings Container object class is created by default in the
System container in the domain. It is responsible for storing the PSOs
for the domain.
When you build a
fine-grained password policy for your domain, there are some things to
consider. First, although your domain is probably organized into
organizational units, PSOs will need to be applied to security groups.
This will mean that moving a user from one OU to another will require
updating group memberships to meet password policy requirements. Why not
just apply the PSO to the OU? There are several reasons:
Groups are a lot more flexible for managing users than OUs are.
You
have already used a systematic set of groups in your Active Directory
deployment in Domain Admins, Enterprise Admins, Schema Admins, Backup
Operators, Account Operators and so on. It works!
Using
groups makes deploying fine-grained password policy so much easier
because you don't have to restructure OUs to match your password policy
structure, which can really be a pain, not to mention have negative side
effects on the Group Policy inheritance you have worked so hard to get
right.
Before you create your first PSO, there are some important rules to know:
By default, only
members of the Domain Admins group can create PSOs. They are the only
ones who have write permissions to the PSO once it is created and
therefore are the only ones who can tie the PSO to an object.
PSOs apply only to user objects and global security groups. They cannot be applied to computer objects.
You
can delegate Read permissions to the default security descriptor of the
PSO to any other group in the domain or forest. (For example, you might
want to delegate Read permissions to your help-desk group.)
6. Create PSOs
So, you are ready to go to work
building your own PSO. There are actually two tools that can be used to
build a PSO. You can build PSOs with the Active Directory Service
Interfaces Editor (ADSI Edit) or LDAP Data Interchange Format Directory
Exchange (LDIFDE.) Realistically, ADSI Edit is sufficient for the
majority of cases in which you will create PSOs. For the purposes of
this example, you'll use ADSI Edit:
Select Start  Run, type adsiedit.msc, and then click OK.
If
this is the first time you have run ADSI Edit on this machine, then in
the ADSI Edit snap-in, right-click ADSI Edit, and then click Connect To.
In Name, type the fully qualified domain name (FQDN) of the domain in which you want to create the PSO, and then click OK.
Double-click DC=<domain_name>.
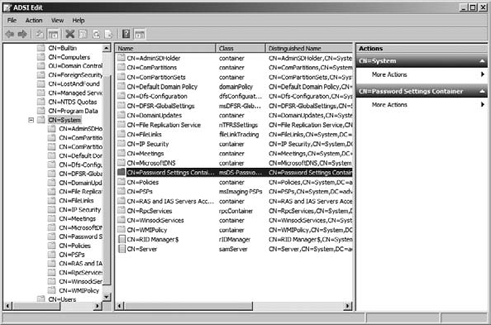
Click CN=Password Settings Container, as shown in Figure 6.
Right-click CN=Password Settings Container, click New, and then click Object.
In the Create Object dialog box, under Select A Class, click msDS-PasswordSettings, and then click Next.
In Value, type the name of the new PSO, and then click Next.
Continue with the wizard, and enter appropriate values for all must-have attributes, as shown in Table 1.
On the last screen of the wizard, click More Attributes.
In the Select Which Property To View menu, click Optional or Both.
In the Select A Property To View drop-down list, select msDS-PSOAppliesTo.
In
Edit Attribute, add the distinguished names of users or global security
groups that the PSO is to be applied to, and then click Add.
Repeat step 15 to apply the PSO to more users or global security groups.
Table 1. PSO Attribute Values and Settings
| Attribute | Description | Values | Sample Value |
|---|
| msDS PasswordSettingsPrecedence | Password Settings Precedence | Values greater than 0 | 7 |
| msDS PasswordReversible EncryptionEnabled | Reversible Encryption settings for User accounts | True/false | False (recommended) |
| msDS PasswordHistoryLength | Password History Length | 0 through 1024 | 30 |
| msDS PasswordComplexityEnabled | Password Complexity Requirement | True/false | True (recommended) |
| msDS MinimumPasswordLength | Minimum Password Length | 0 through 255 | 8 |
| msDS MimimumPasswordAge | Minimum Password Age | None or 00:00:00:00 through the msDS MaximumPasswordAge value | 02:00:00:00 (2 days) |
| Ms DS MaximumPasswordAge | Maximum Password Age | msDS MinimumPasswordAge through (Never) | 30:00:00:00 (30 days) |
| msDS LockoutThreshold | Lockout Threshold | 0 through 65535 | 15 |
| msDS LockputObservationWindow | Lockout Observation Window | (none) or 00:00:00:01 through the msDS LockoutDuration value | 00:00:15:00 (15 minutes) |
| msDS LockoutDuration | Lockout duration | None, Never, or any value between the msDS LockoutObservation Windows through (Never) | 00:00:30:00 (30 minutes) |
| msDS PSOAppliesto | Links PSO to objects | Distingushed names of users or global security groups | "CN=user1, CN=users, DC=Server1, DC=xyz, DC=com" |
Please note that as you create the values in the PSO, they must exactly match the syntax and formatting shown in Table 5.1, or you will not be successful in creating the object.
Once you have created
your PSO and associated it to your user or group accounts, you are ready
to go. Now what happens if you decide that there is another group that
you want this PSO to apply to? Do you have to go back to ADSI Edit and
reassociate the PSO to the group? You could do that, but an easier way
is to simply use Active Directory Users And Computers to associate the
PSO to the group.
6.1. Associate a PSO to an Additional User or Group
To associate a PSO to an additional user or group, follow these steps:
Select Start => Administrative Tools => Active Directory Users And Computers.
On the View menu, ensure that Advanced Features is selected.
In the console tree, navigate to Active Directory Users And Computers\domain node\System\Password Settings Container.
In the details pane, right-click the PSO, and then click Properties.
Click the Attribute Editor tab.
Select the msDS-PsoAppliesTo attribute, and then click Edit.
In
the Multi-valued String Editor dialog box, enter the distinguished name
of the user or the global security group that you want to apply this
PSO to, click Add, and then click OK.
To
get the distinguished name of a global Security group, you can
right-click the group and choose Properties. On the Attribute Editor
tab, view the value of the Distinguished Name attribute.
PSOs can be managed in much
the same way they were created using ADSI Edit. Let's say you wanted to
delete a PSO for whatever reason. To do so, you simply go back to ADSI
Edit, locate the PSO, right-click, and choose Delete. If you wanted to
make changes to the settings of a PSO, you would use Active Directory
Users And Computers to navigate to the Password Settings objects
container. Right-click the object, and edit its attributes.
PSOs make it possible for you
to have a flexible password policy, which in turn will help you enrich
the security of your directory database.
