Exchanging Files in NetMeeting
Assuming that you’ve
established a connection with one or more remote users, NetMeeting
makes it easy to send files back and forth. To transfer a file, follow
these steps:
1. | Display the File Transfer window by using any of the following techniques:
|
2. | Select File, Add Files to display the Select a File to Send dialog box.
|
3. | Select the file you want to ship and then click Add.
|
4. | Repeat steps 2 and 3 to add other files, if necessary.
|
5. | Use the drop-down list to select the file recipient: either Everyone or a specific user.
|
6. | To send files, you have two choices:
To send a single file, select the file and then select File, Send a File. To send all the files, select File, Send All.
|
NetMeeting begins sending the file and displays the progress of the operation in the status bar.
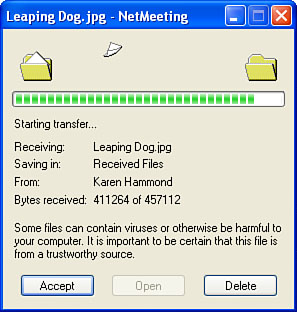
On the remote end, the user sees a dialog box similar to the one shown in Figure 1. There are three ways to proceed:
To have NetMeeting
store the file on your hard drive without further ado, click Accept.
Alternatively, you can wait until the download is complete and then
click Close.
To cancel the file transfer (or to remove the file after the transfer is finished), click Delete.
To work with the file after the transfer has finished, click Open.
Note
NetMeeting stores the files that are transferred to your computer in the following folder:
%SystemDrive%\Program Files\NetMeeting\Received Files
To
change this folder, open the File Transfer window and select File,
Change Folder. Use the Browse for Folder dialog box to select the new
folder, and then click OK.
Using the Chat Feature
If you don’t have a
microphone, NetMeeting’s audio features won’t do you much good. That
doesn’t mean you can’t communicate with remote callers, however. For
simple text communications in real time, NetMeeting’s Chat feature is
perfect.
To run Chat, use any of the following methods:
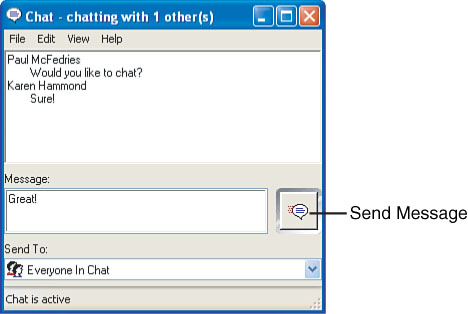
The Chat window that appears is shown in Figure 2.
To use Chat, follow these steps:
1. | Type your message in the Message text box
|
2. | Use the Send To list to select the recipient of the message
|
3. | Press Enter or click the Send Message button to the right of the Message text box
|
Messages appear in the upper text box, along with the name of each person who sent them.
Chat also has a couple
of customization features. Select View, Options to display the Options
dialog box. Here’s a summary of the available settings:
| Information Display | Use
these check boxes to specify how much information Chat displays about
each message. In addition to the person’s name, you can also choose to
display the date and time that each message is sent. |
| Entire Message Is on One Line | If you activate this option, each Chat message is displayed on a single line across the window. |
| Wrap (Message Appears Next to Information Display) | If
you activate this option, the messages are wrapped within the Chat
window, and they appear beside the person’s name (or whatever is checked
in the Information display group). |
| Wrap (Message Appears Below Information Display) | If
you activate this option (this is the Chat default), the messages again
are wrapped within the Chat window, but they appear below the displayed
information. |
| Fonts | Use these buttons to set the font for received messages, received private messages, sent messages, and sent private messages. |
