There's something about the
term "wireless" that makes it seem as though it must be easier than
"wired." In truth, wireless networking is quite a bit more complicated
terminology-wise. There are lots of buzzwords and acronyms everyone
assumes that you already know.
1. The 802.11 standard
The Institute of Electrical and Electronics Engineers, Inc., abbreviated IEEE and pronounced EYE-triple-E,
is an organization of some 360,000 electrical engineers who develop
many of the standards that PC products use to interact with one another.
The IEEE isn't big on giving fancy names to things. They prefer numbers
(which somehow seems fitting). Names often get tacked on later. For
example, what is now called Ethernet is actually IEEE 802.3. What Apple
calls FireWire and Sony calls iLink is actually IEEE 1394.
IEEE created the 802.11 standard for most wireless
networking today. Several revisions to the original specification have
been proposed, with 802.11a, 802.11b, 802.11g, and 802.11n being the
four that actually have made it to market . Most
likely, you'll be using 802.11g or 802.11n, because they are the
standard to which most of the recently released wireless networking
products adhere.
2. Access point, SSID, WEP, and WPA
Wireless networking requires some kind of wireless access point, also called a base station.
The base station is the central unit with which all computers in the
network communicate. It's the same idea as a hub in Ethernet networking.
It's just that there are no wires connecting computers to the access
point. Instead, each computer has a wireless network interface card
(NIC), as illustrated in Figure 1.
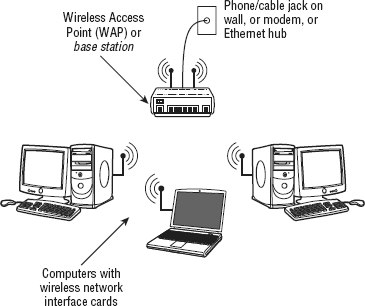
The access point in a wireless network plays the same
role as the hub in a wired network, in that all traffic goes to the
access point first, and is passed on to the appropriate destination from
there. The problem is, with wireless networks, you have radio waves,
which aren't confined to the inside of a wire. Radio waves go all over
the place, just like when you throw a rock in the water and make waves
that spread out in a circle.
The radio waves can be a problem when you have
multiple wireless networks that are close to each other. For example,
let's say that a company has several departments, and each department
has its own, separate wireless network. If the departments are fairly
close to each other in the same building, it's possible that network
messages from one department might get picked up by another department's
wireless access point, which in turn might send the message off to a
computer in its own network rather than to the correct recipient.
To avoid that problem, you need some means of
discriminating among multiple wireless access points. For example, you
need some means of setting rules like "these six computers in the
marketing department communicate only with each other through access
point X, while these 12 computers in Accounting communicate with each other, only, through access point Z." The way you do that in today's wireless networking is through things such as network names, SSID, WEP, and WPA.
2.1. About SSIDs
Every wireless network has a unique name called a service set identifier (SSID) or just a wireless network name
for simplicity. The access point in the network holds the SSID, and
broadcasts it out at regular intervals. When you start a wireless
network computer, it scans the airwaves for SSID. When you set up a
wireless network access point (by reading the manufacturer's
instructions, of course), you assign an SSID to your access point.
The name you assign doesn't have to be anything
fancy, but it should be unique enough to avoid conflict with any close
neighbors who also have wireless networks. The SSID doesn't provide any
real network security. After all, the access point broadcasts the SSID
out some distance from the access point. So if some hackers happened to
be driving by with a notebook computer, they might be able to pick up
the name of your wireless LAN from the car. Then they could join your
network and receive data being sent by computers in your network. WEP
and WPA are encryption tools designed to avoid such intrusions.
2.2. About WEP and WPA
Open System Wired Equivalent Protocol (WEP) is a
wireless security protocol that protects wireless network data from
falling into the wrong hands. Before any information leaves your
computer, it's encrypted using a WEP key. The key is a simple string of
characters that you can generate automatically, or have Windows generate
for you.
Wi-Fi Protected Access (WPA) is a newer and stronger
encryption system that supports modern EAP security devices such as
smart cards, certificates, token cards, one-time passwords, and
biometric devices. Eventually, IEEE will release a new 802.11i standard,
which will offer the type of security currently found only in WPA. If
your wireless networking hardware supports both WEP and WPA, you should
go with WPA because that's the wave of the future.
3. Installing the wireless networking hardware
The most critical step in setting up a wireless
network is installing the hardware devices. It's imperative that you
follow the instructions that came with the device to a tee, because
guessing almost never works. In particular, it's important to note that
even devices that plug into a hot-pluggable port like USB devices or a
PC Card need you to install drives before
you install the hardware device. That's unusual for hot-pluggable
devices, and most people just assume that they can plug in the device
and go. But it just doesn't work that way with wireless networking
devices.
4. Connecting to available networks
The main trick to wireless networking is setting up
the base station (access point). Typically, you do this by choosing one
computer to operate the access point, and you configure the access point
from that computer. There you give the network its name (SSID) and
choose your encryption method. The access point then begins transmitting
that name at regular intervals.
On any computer that's to join the LAN, you install a
wireless network adapter. On a notebook computer, it's likely that a
card resides internal to the system. On a desktop computer, you can
install an internal wireless network adapter, connect one to a USB port,
or even slide one into a Compact Flash slot.
Once you've installed the network adapter, you can
check and configure one of the available networks by following these
steps. If you have enabled security on your access point, move on to the
next set of steps. To connect to an unsecured access point, follow
these steps:
Click the Start button and choose Control Panel.
If Control Panel opens in Category view, click the Network and Internet icon.
Open the View Network Status and Tasks link below Network and Sharing Center.
As shown in Figure 2, the system is not connected to a network, but this window indicates that wireless networks are available.
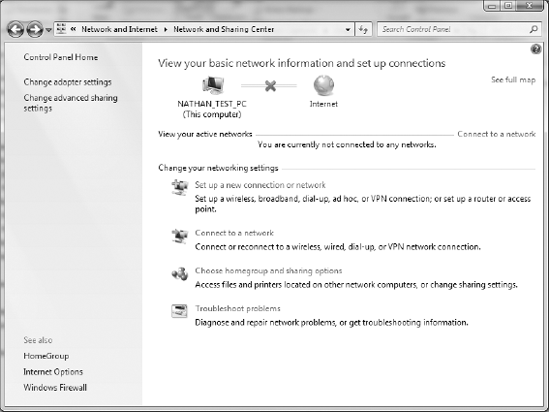
After clicking the Connect to a Network link, you will see what networks Windows says are available in screens similar to Figure 3.
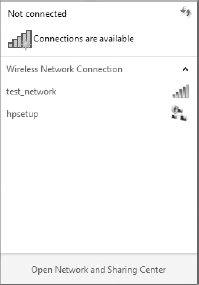
If
you choose an unsecured network and click the Connect button, Windows
may prompt you with a window confirming that you want to connect to an
unsecured network. Click to connect to the unsecured network.
After
Windows has successfully connected to the network, a dialog box may pop
up asking what type of network you just connected to. To learn more
about the different types of network categories, search for Network
Categories under Windows Help and select "What are network categories?"
If you have enabled either WEP or WPA encryption at
your access point, you can follow these steps to get connected to your
wireless network:
Click the Start button and choose Control Panel.
If Control Panel opens in Category view, click the Network and Internet icon.
Open the View Network Status and Tasks link below Network and Sharing Center.
As shown in Figure 2, the system is not connected to a network, but this window indicates that wireless networks are available.
After clicking the Connect to a Network link, you will see what networks Windows says are available in a screen similar to Figure 3.
Click the desired wireless network and then click Connect.
Windows prompts for the network security key (Figure 4). Type the key and click OK. Windows will connect to the wireless network.
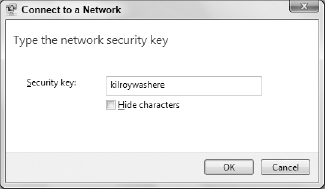
If you need to retype the network security key or change other wireless properties, follow these steps:
Open the Control Panel and click View Network Status and Tasks.
Click Manage Wireless Networks in the left pane.
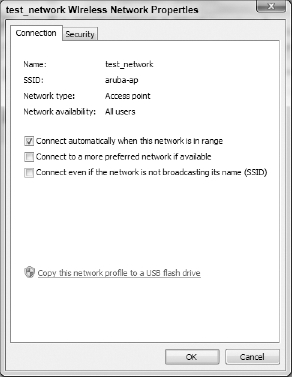
In the Manage Wireless Networks window, right-click the wireless connection and choose Properties. Figure 5 shows the Connection tab of this dialog box.
Click the Security tab shown in Figure 6.
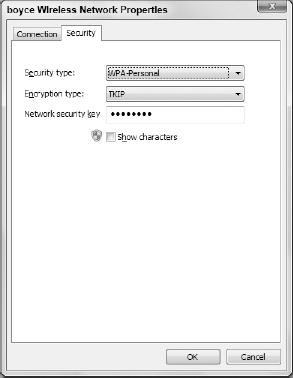
Select
the security type, encryption type, and enter a network security key
based on the configuration of your access point. Then, click the OK
button.
Click
the wireless network icon in the tray to view the available networks,
click the network you want to connect, and click Connect. After a few
seconds your system should be connected to your local network and also
the Internet if you have configured your router. To test this, use
Internet Explorer and try browsing to a Web site.
5. The notification icon
Windows 7 can include your network connectivity
information within the Notification area. The icon for a wired
connection is a computer with a network cable beside it. The icon for a
wireless connection is a set of signal strength bars. If you don't see
an icon, check to make sure that it's not just hidden by clicking the
< button at the left side of the Notification area. If you still
don't see the icon, right-click an empty space on the taskbar and select
Customize Notification Icons. Beside the Network item, click the
drop-down list under the Behaviors column and choose Show Icon and
Notifications. Then, click the OK button.